A data flow is the path that data takes from the source to the destination with optional transformations. You can configure the data flow by creating a Data flow custom resource or using the operations experience web UI. A data flow is made up of three parts: the source, the transformation, and the destination.
flowchart LR
  subgraph Source
  A[DataflowEndpoint]
  end
  subgraph BuiltInTransformation
  direction LR
  Datasets - -> Filter
  Filter - -> Map
  end
  subgraph Destination
  B[DataflowEndpoint]
  end
  Source - -> BuiltInTransformation
  BuiltInTransformation - -> Destination

To define the source and destination, you need to configure the data flow endpoints. The transformation is optional and can include operations like enriching the data, filtering the data, and mapping the data to another field.
You can use the operations experience in Azure IoT Operations to create a data flow. The operations experience provides a visual interface to configure the data flow. You can also use Bicep to create a data flow using a Bicep file, or use Kubernetes to create a data flow using a YAML file.
Continue reading to learn how to configure the source, transformation, and destination.
Prerequisites
You can deploy data flows as soon as you have an instance of Azure IoT Operations using the default data flow profile and endpoint. However, you might want to configure data flow profiles and endpoints to customize the data flow.
Data flow profile
If you don't need different scaling settings for your data flows, use the default data flow profile provided by Azure IoT Operations. Avoid associating too many data flows with a single data flow profile. If you have a large number of data flows, distribute them across multiple data flow profiles to reduce the risk of exceeding the data flow profile configuration size limit of 70.
To learn how to configure a new data flow profile, see Configure data flow profiles.
Data flow endpoints
You need data flow endpoints to configure the source and destination for the data flow. To get started quickly, use the default data flow endpoint for the local MQTT broker. You can also create other types of data flow endpoints like Kafka, Event Hubs, OpenTelemetry, or Azure Data Lake Storage. For more information, see Configure data flow endpoints.
Get started
When you have the prerequisites, you can start creating a data flow.
To create a data flow in operations experience, select Data flow > Create data flow.
Select the placeholder name new-data-flow to set the data flow properties. Enter the name of the data flow and choose the data flow profile to use. The default data flow profile is selected by default. For more information on data flow profiles, see Configure data flow profile.
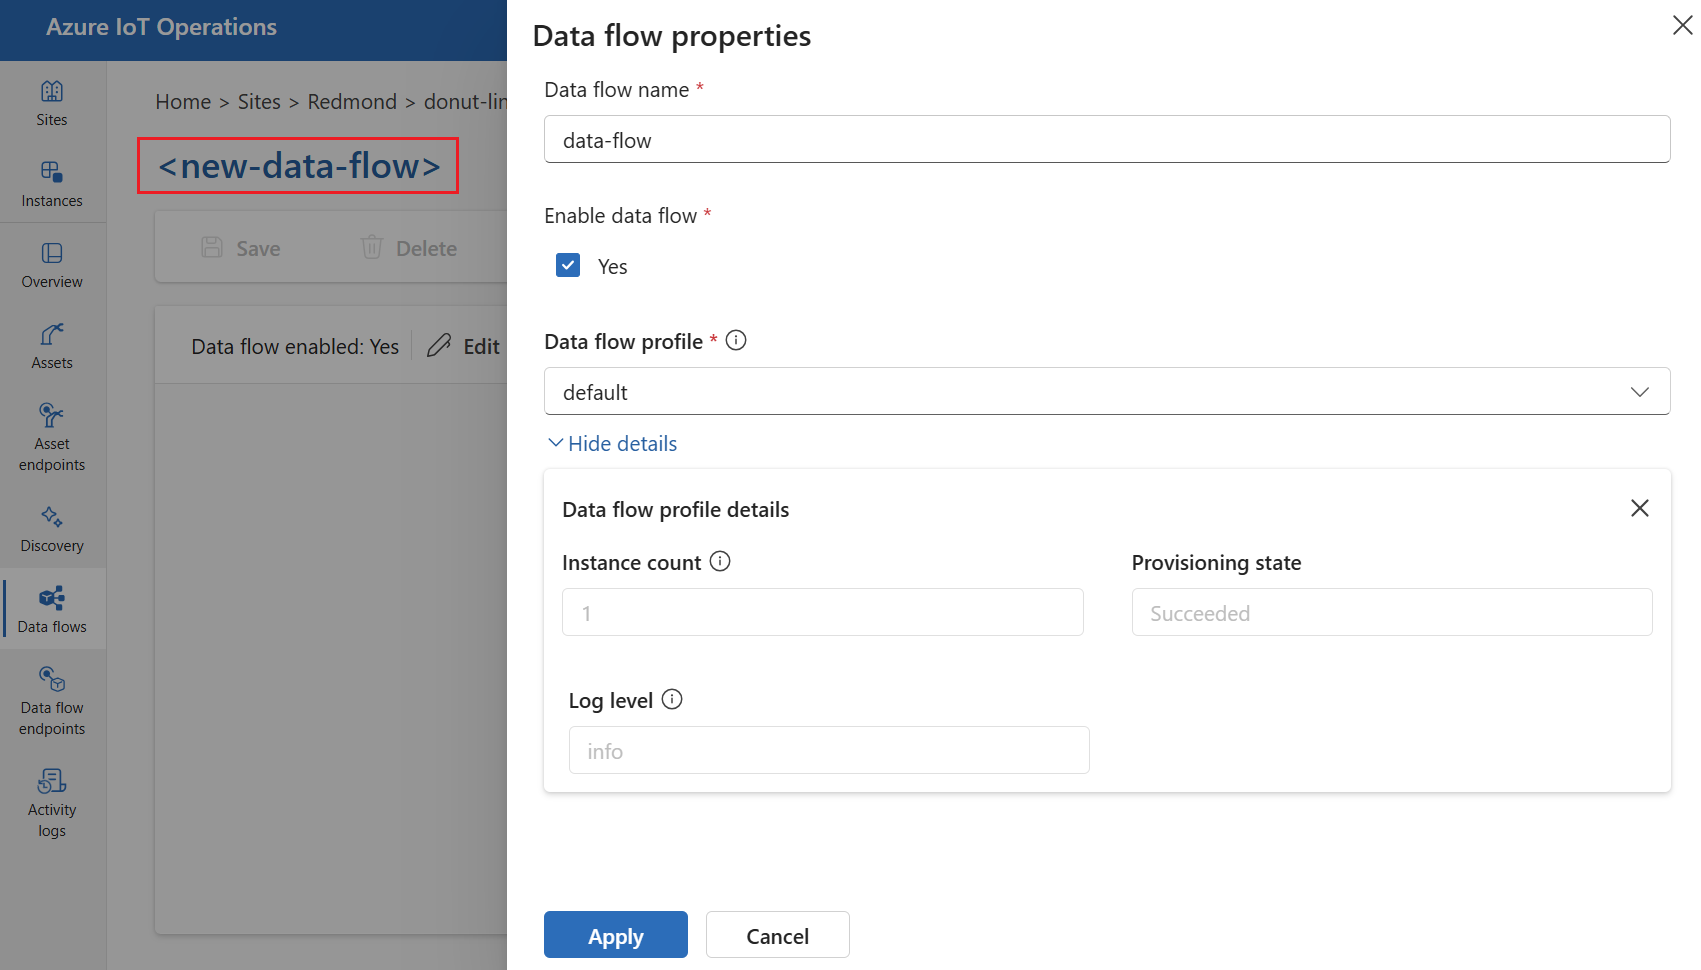
Important
You can only choose the data flow profile when creating a data flow. You can't change the data flow profile after the data flow is created.
If you want to change the data flow profile of an existing data flow, delete the original data flow and create a new one with the new data flow profile.
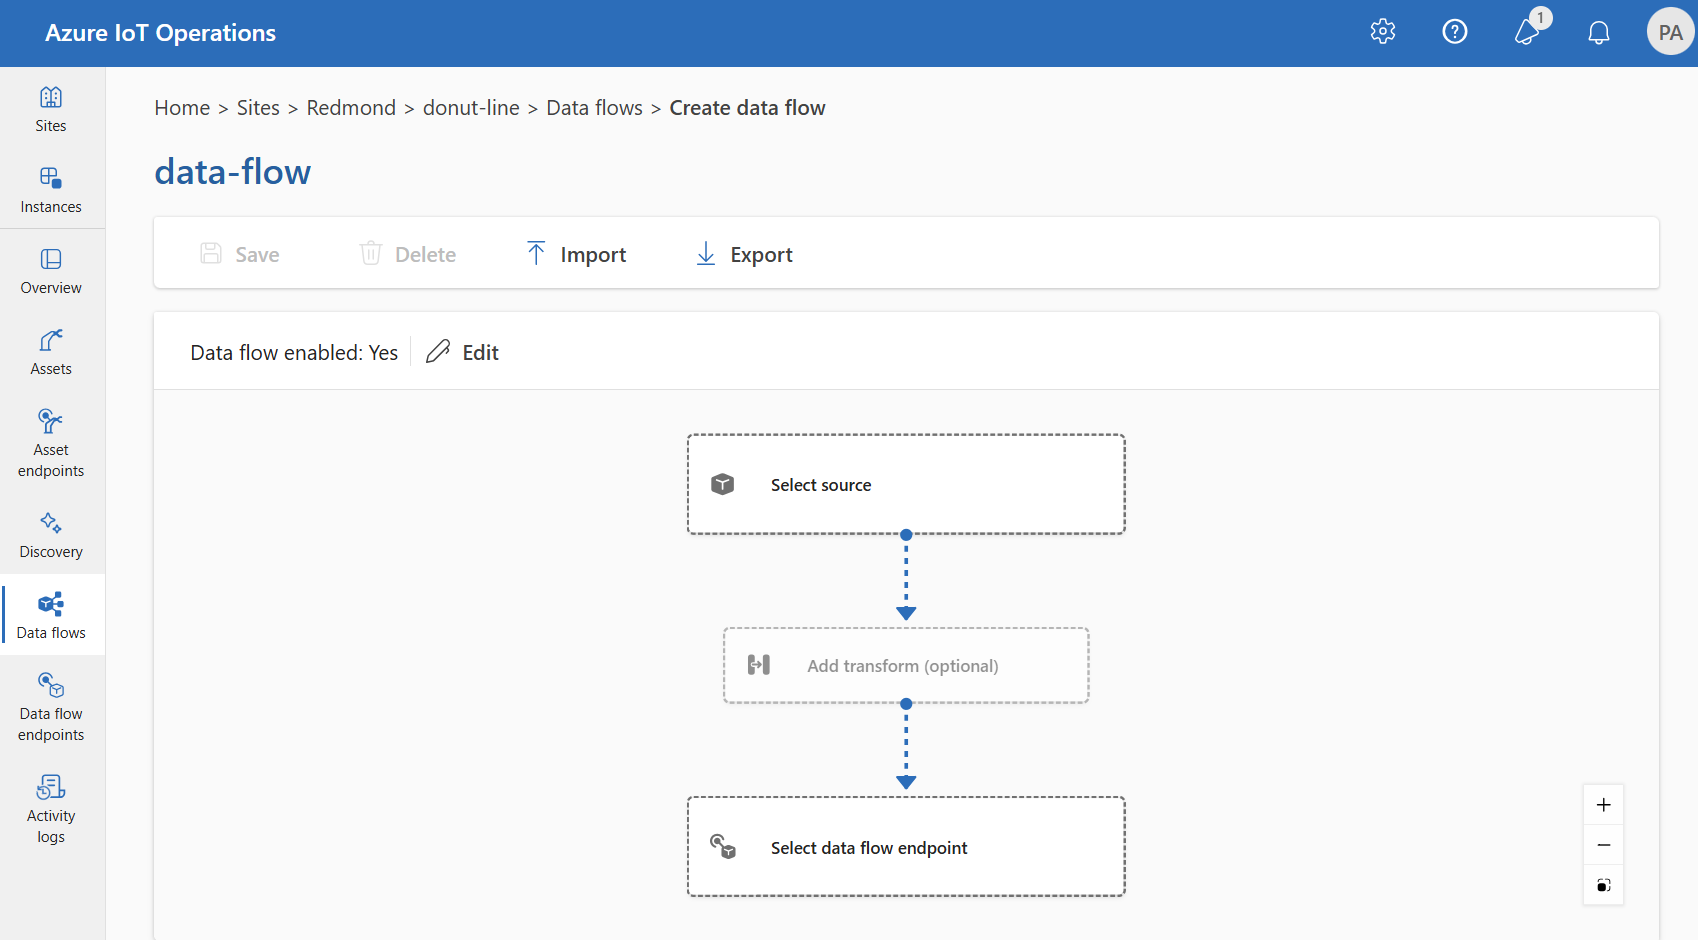
Configure the source, transformation, and destination endpoint for the data flow by selecting the items in the data flow diagram.
Use the az iot ops dataflow apply command to create or change a data flow.
az iot ops dataflow apply --resource-group <ResourceGroupName> --instance <AioInstanceName> --profile <DataflowProfileName> --name <DataflowName> --config-file <ConfigFilePathAndName>
The --config-file parameter is the path and file name of a JSON configuration file containing the resource properties.
In this example, assume a configuration file named data-flow.json with the following content is stored in the user's home directory:
{
    "mode": "Enabled",
    "operations": [
        {
            "operationType": "Source",
            "sourceSettings": {
                // See source configuration section
            }
        },
        {
            "operationType": "BuiltInTransformation",
            "builtInTransformationSettings": {
                // See transformation configuration section
            }
        },
        {
            "operationType": "Destination",
            "destinationSettings": {
                // See destination configuration section
            }
        }
    ]
}
Here's an example command to create or update a data flow using the default dataflow profile:
az iot ops dataflow apply --resource-group myResourceGroup --instance myAioInstance --profile default --name data-flow --config-file ~/data-flow.json
Create a Bicep .bicep file to start creating a data flow. This example shows the structure of the data flow containing the source, transformation, and destination configurations.
param aioInstanceName string = '<AIO_INSTANCE_NAME>'
param customLocationName string = '<CUSTOM_LOCATION_NAME>'
param dataflowName string = '<DATAFLOW_NAME>'

resource aioInstance 'Microsoft.IoTOperations/instances@2024-11-01' existing = {
  name: aioInstanceName
}

resource customLocation 'Microsoft.ExtendedLocation/customLocations@2021-08-31-preview' existing = {
  name: customLocationName
}

resource defaultDataflowEndpoint 'Microsoft.IoTOperations/instances/dataflowEndpoints@2024-11-01' existing = {
  parent: aioInstance
  name: 'default'
}

// Pointer to the default data flow profile
resource defaultDataflowProfile 'Microsoft.IoTOperations/instances/dataflowProfiles@2024-11-01' existing = {
  parent: aioInstance
  name: 'default'
}

resource dataflow 'Microsoft.IoTOperations/instances/dataflowProfiles/dataflows@2024-11-01' = {
  // Reference to the parent data flow profile, the default profile in this case
  // Same usage as profileRef in Kubernetes YAML
  parent: defaultDataflowProfile
  name: dataflowName
  extendedLocation: {
    name: customLocation.id
    type: 'CustomLocation'
  }
  properties: {
    mode: 'Enabled'
    operations: [
      {
        operationType: 'Source'
        sourceSettings: {
          // See source configuration section
        }
      }
      // Transformation optional
      {
        operationType: 'BuiltInTransformation'
        builtInTransformationSettings: {
          // See transformation configuration section
        }
      }
      {
        operationType: 'Destination'
        destinationSettings: {
          // See destination configuration section
        }
      }
    ]
  }
}
Important
The use of Kubernetes deployment manifests isn't supported in production environments and should only be used for debugging and testing.
Create a Kubernetes manifest .yaml file to start creating a data flow. This example shows the structure of the data flow containing the source, transformation, and destination configurations.
apiVersion: connectivity.iotoperations.azure.com/v1
kind: Dataflow
metadata:
  name: <DATAFLOW_NAME>
  namespace: azure-iot-operations
spec:
  # Reference to the default data flow profile
  # This field is required when configuring via Kubernetes YAML
  # The syntax is different when using Bicep
  profileRef: default
  mode: Enabled
  operations:
    - operationType: Source
      sourceSettings:
        # See source configuration section
      # Transformation optional
    - operationType: BuiltInTransformation
      builtInTransformationSettings:
        # See transformation configuration section
    - operationType: Destination
      destinationSettings:
        # See destination configuration section
Review the following sections to learn how to configure the operation types of the data flow.
Source
Configure the source endpoint and data sources (topics) for the data flow. You can use the default MQTT broker, an asset, or a custom MQTT or Kafka endpoint as the source.
For complete configuration details, including MQTT topic wildcards, shared subscriptions, Kafka topics, and source schema, see Configure a data flow source.
If you don't use the default endpoint as the source, you must use it as the destination. For more information about using the local MQTT broker endpoint, see Data flows must use local MQTT broker endpoint.
Request disk persistence
Disk persistence keeps data flow processing state across restarts. For configuration details, see Configure disk persistence.
The transformation operation is where you transform the data from the source before you send it to the destination. Transformations are optional. If you don't need to make changes to the data, don't include the transformation operation in the data flow configuration. Multiple transformations chain together in stages regardless of the order in which you specify them in the configuration. The order of the stages is always:
- Enrich: Add more data to the source data given a dataset and condition to match.
- Filter: Filter the data based on a condition.
- Map, Compute, Rename, or add a New property: Move data from one field to another with an optional conversion.
This section is an introduction to data flow transforms. For more detailed information, see Map data by using data flows, and Enrich data by using data flows.
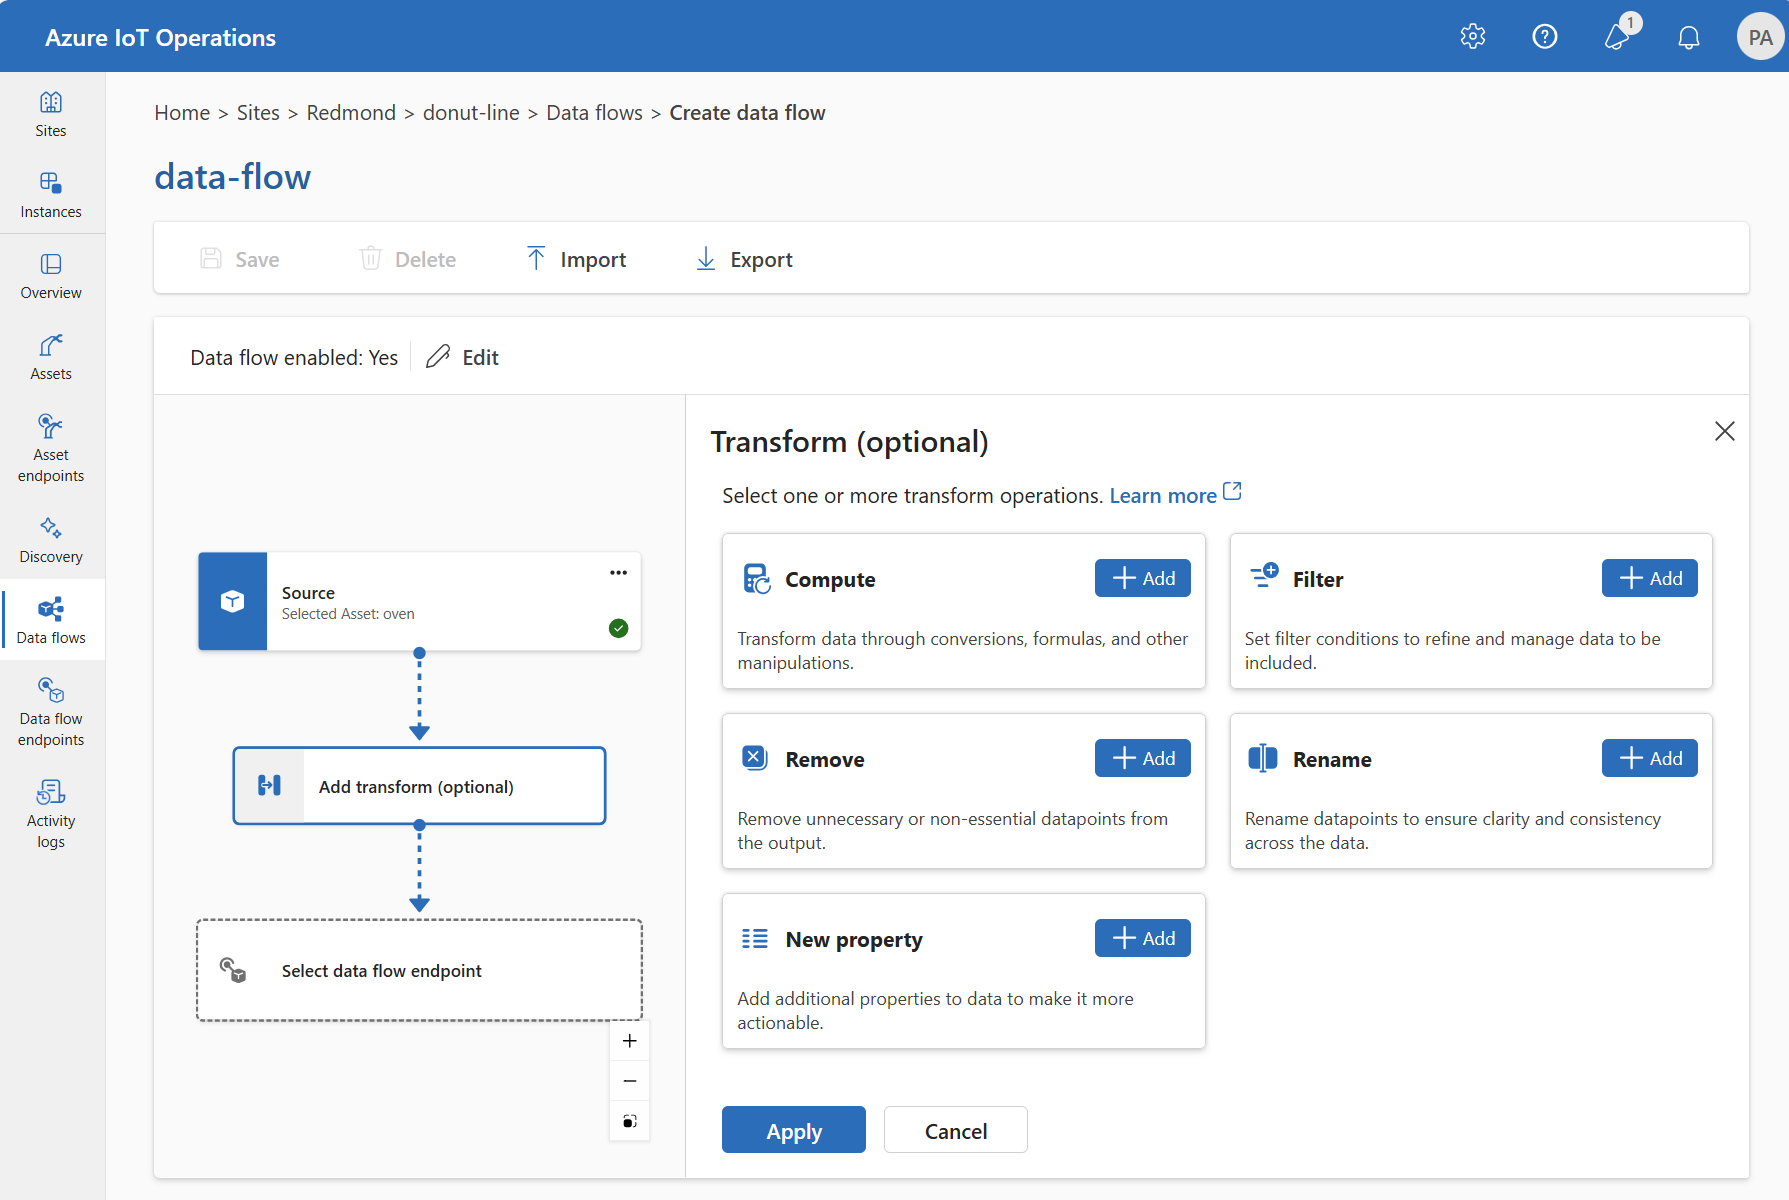
In the operations experience, select Data flow > Add transform (optional).
{
  "operationType": "BuiltInTransformation",
  "builtInTransformationSettings": {
    "datasets": [
      // See section on enriching data
    ],
    "filter": [
      // See section on filtering data
    ],
    "map": [
      // See section on mapping data
    ]
  }
}
builtInTransformationSettings: {
  datasets: [
    // See section on enriching data
  ]
  filter: [
    // See section on filtering data
  ]
  map: [
    // See section on mapping data
  ]
}
Important
The use of Kubernetes deployment manifests isn't supported in production environments and should only be used for debugging and testing.
builtInTransformationSettings:
  datasets:
    # See section on enriching data
  filter:
    # See section on filtering data
  map:
    # See section on mapping data
Enrich: Add reference data
To enrich the data, first add a reference dataset in the Azure IoT Operations state store. The dataset adds extra data to the source data based on a condition. The condition is specified as a field in the source data that matches a field in the dataset.
You can load sample data into the state store by using the state store CLI. Key names in the state store correspond to a dataset in the data flow configuration.
Currently, the Enrich stage isn't supported in the operations experience.
To enrich the data, use the builtInTransformationSettings property in the data flow configuration. Use the datasets property to specify the datasets for enrichment.
{
  "operationType": "BuiltInTransformation",
  "builtInTransformationSettings": {
    "datasets": [
      {
        "key": "<DATASET_KEY>",
        "inputs": [
          "$source.<SOURCE_FIELD>" // ---------------- $1
          "$context(<DATASET_KEY>).<DATASET_FIELD>" // - $2
        ],
        "expression": "$1 == $2"
      }
    ]
  }
}
This example shows how you can use the deviceId field in the source data to match the asset field in the dataset:
builtInTransformationSettings: {
  datasets: [
    {
      key: 'assetDataset'
      inputs: [
        '$source.deviceId' // ---------------- $1
        '$context(assetDataset).asset' // ---- $2
      ]
      expression: '$1 == $2'
    }
  ]
}
Important
The use of Kubernetes deployment manifests isn't supported in production environments and should only be used for debugging and testing.
For example, you could use the deviceId field in the source data to match the asset field in the dataset:
builtInTransformationSettings:
  datasets:
  - key: assetDataset
    inputs:
      - $source.deviceId # ------------- $1
      - $context(assetDataset).asset # - $2
    expression: $1 == $2
If the dataset has a record with the asset field, similar to:
{
  "asset": "thermostat1",
  "location": "room1",
  "manufacturer": "Contoso"
}
The data from the source with the deviceId field matching thermostat1 has the location and manufacturer fields available in filter and map stages.
For more information about condition syntax, see Enrich data by using data flows
Filter: Filter data based on a condition
Use the filter stage to drop messages that don't meet a condition. You can define multiple filter rules with input fields and boolean expressions.
For complete configuration details and examples, see Filter data in a data flow.
Map: Move data from one field to another
To map the data to another field with optional conversion, use the map operation. Specify the conversion as a formula that uses the fields in the source data.
In the operations experience, you can currently map data by using Compute, Rename, and New property transforms.
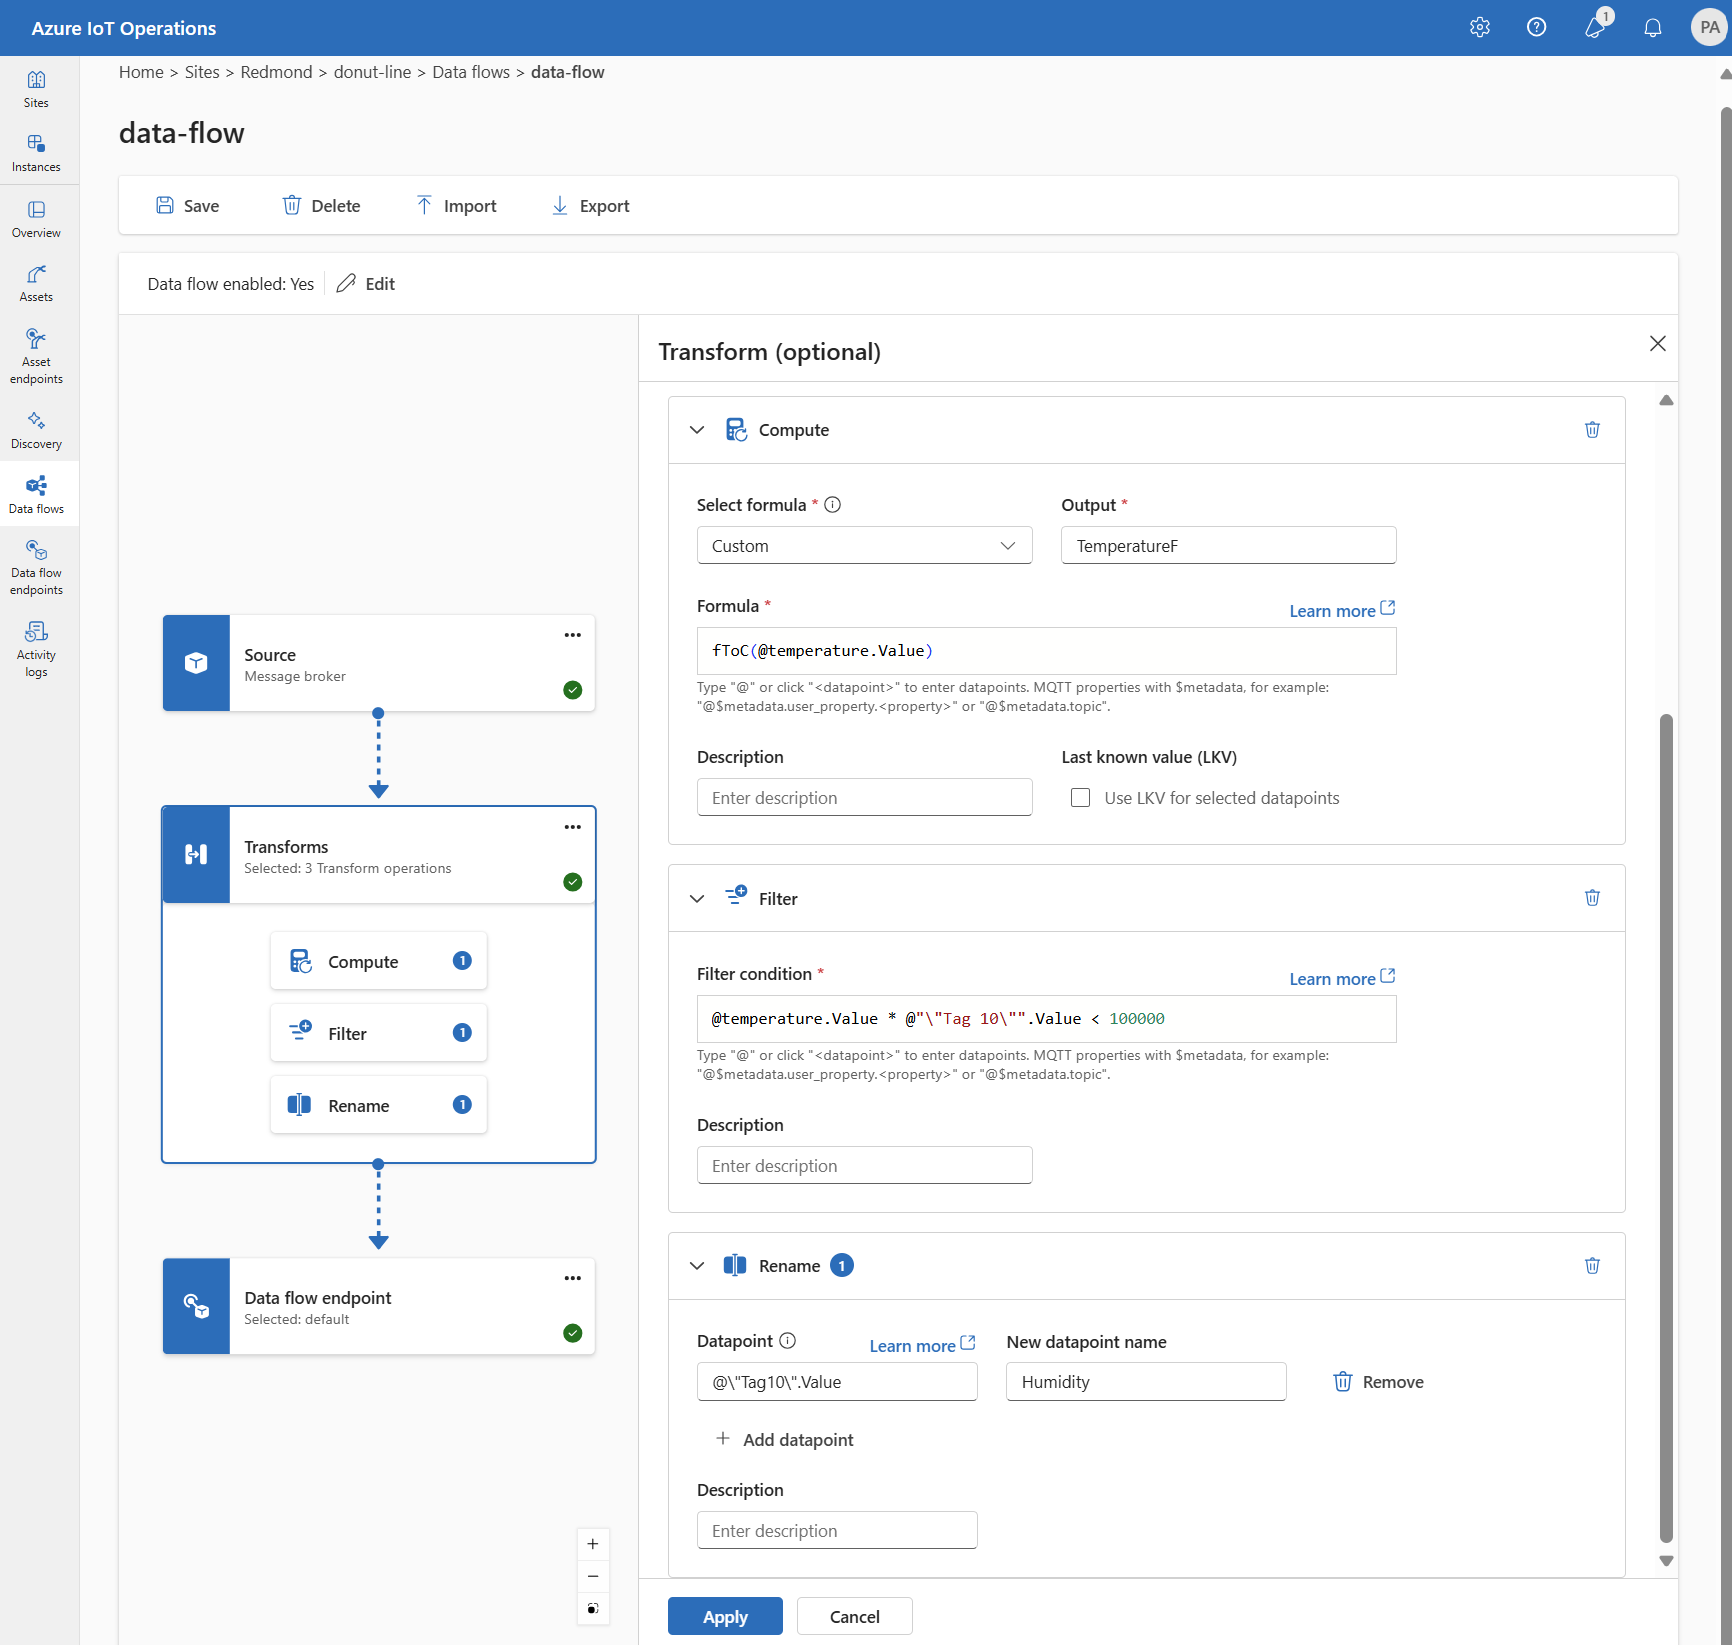
Compute
Use the Compute transform to apply a formula to the source data. This operation applies a formula to the source data and stores the result in a field.
Under Transform (optional), select Compute > Add.
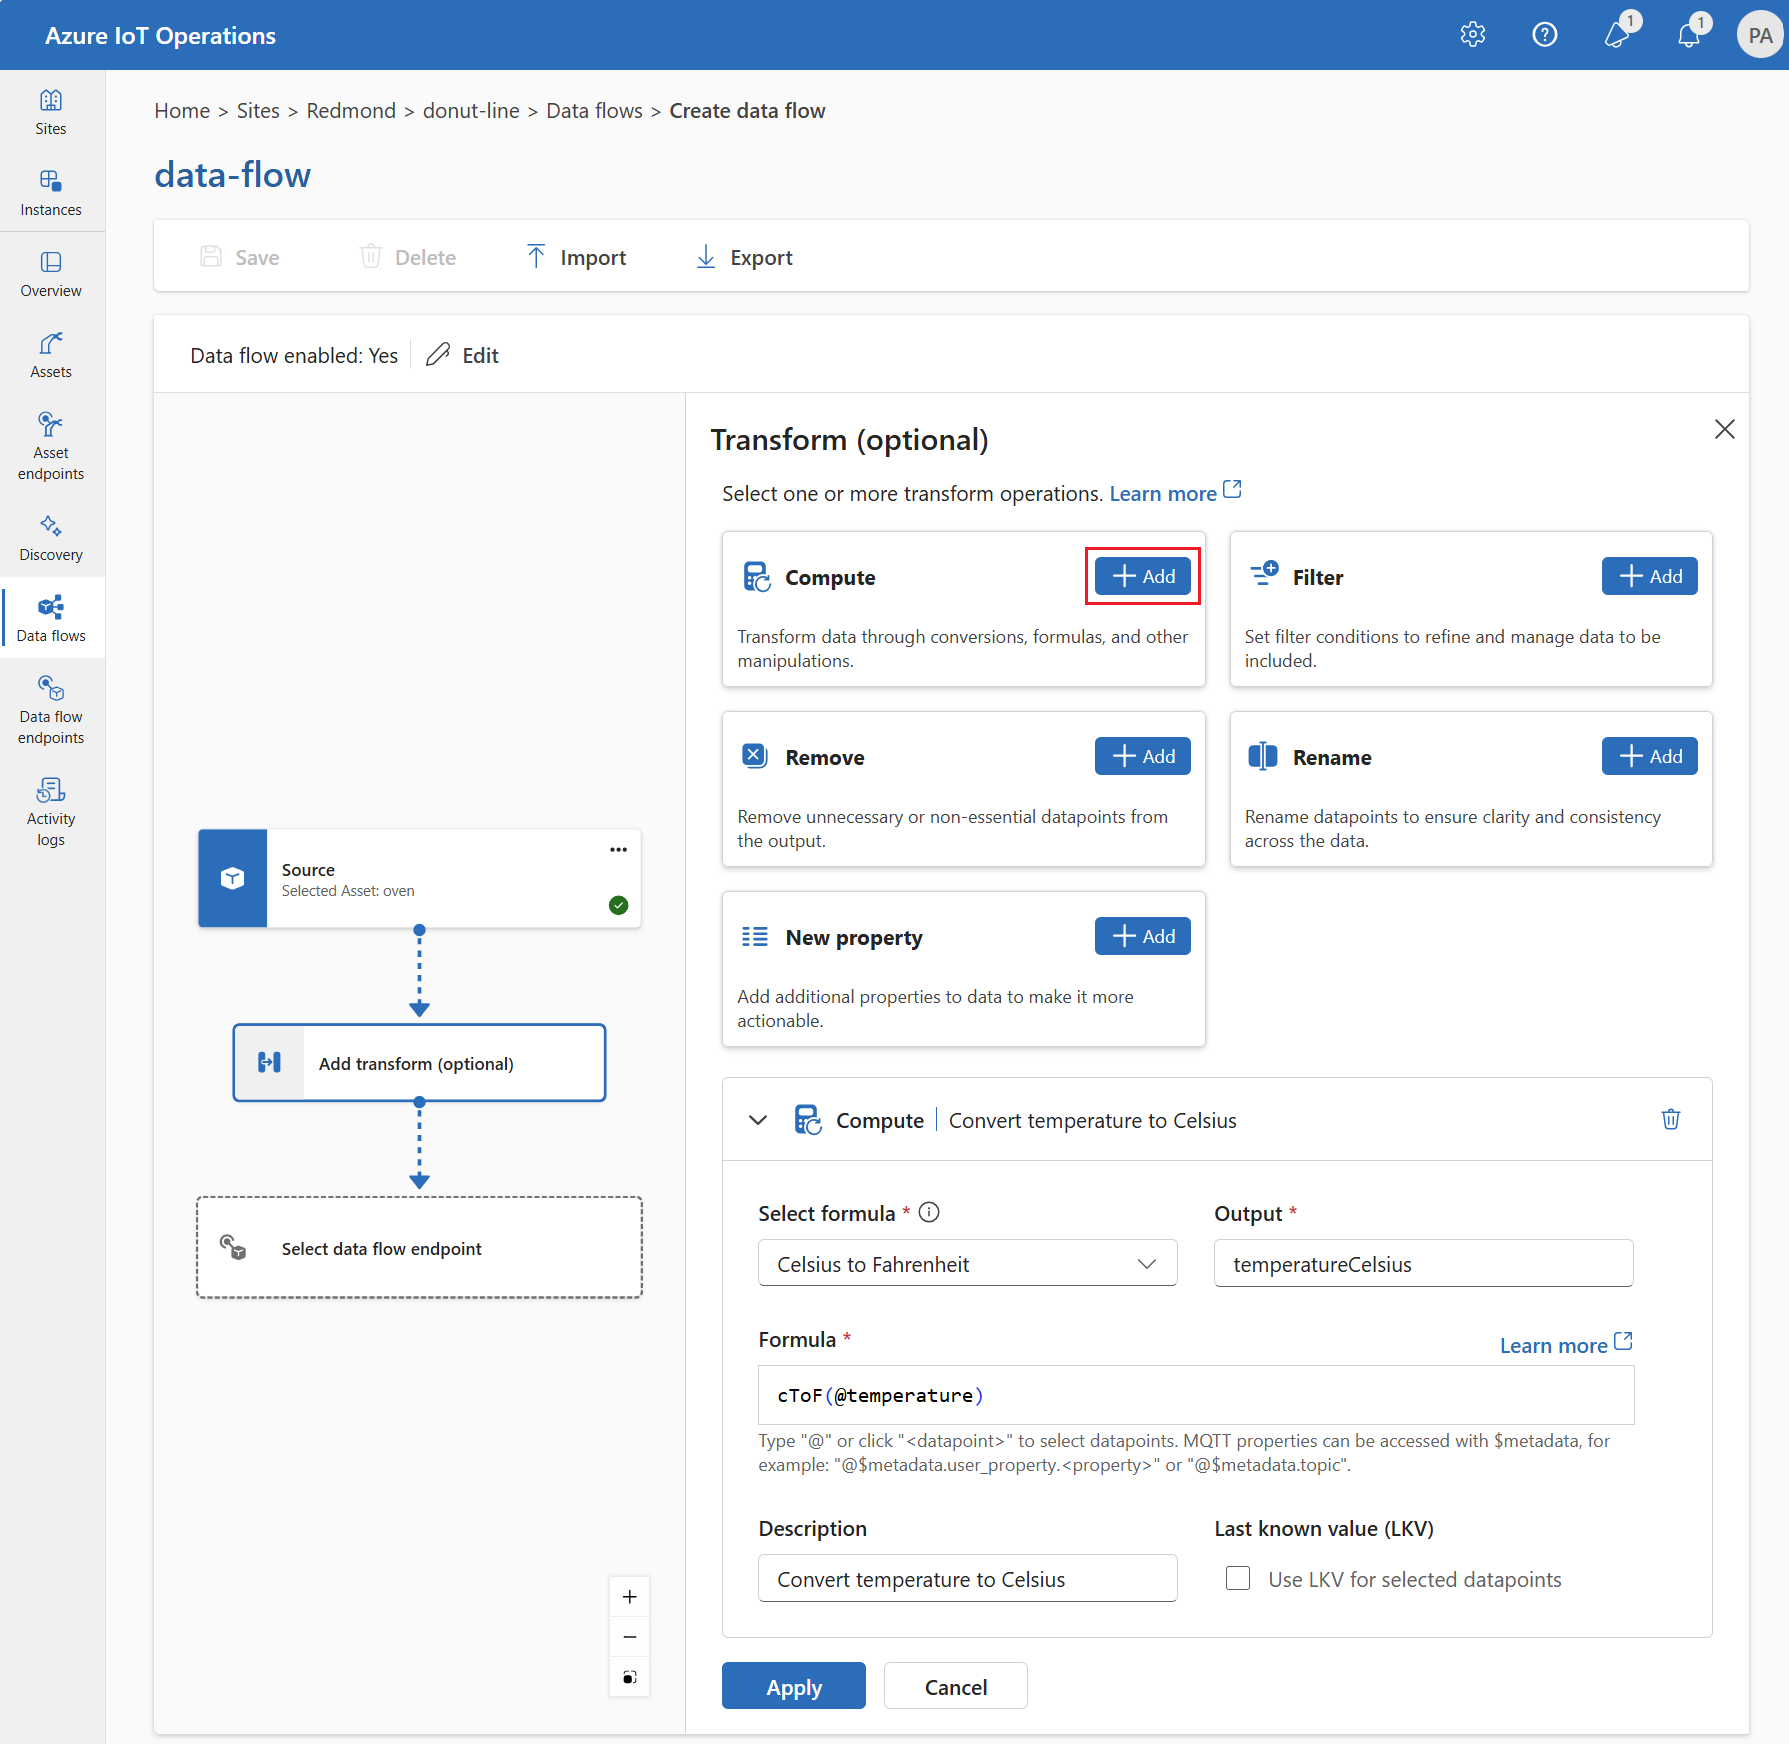
Enter the required settings.
| Setting |
Description |
| Select formula |
Choose an existing formula from the dropdown or select Custom to enter a formula manually. |
| Output |
Specify the output display name for the result. |
| Formula |
Enter the formula to be applied to the source data. |
| Description |
Provide a description for the transformation. |
| Last known value |
Optionally, use the last known value if the current value isn't available. |
Enter or edit a formula in the Formula field. The formula can use the fields in the source data. Enter @ or select Ctrl + Space to choose datapoints from a dropdown. For built-in formulas, select the <dataflow> placeholder to see the list of available datapoints.
Enter MQTT metadata properties by using the format @$metadata.user_properties.<property> or @$metadata.topic. Enter $metadata headers by using the format @$metadata.<header>. The $metadata syntax is only needed for MQTT properties that are part of the message header. For more information, see field references.
The formula can use the fields in the source data. For example, you could use the temperature field in the source data to convert the temperature to Celsius and store it in the temperatureCelsius output field.
Select Apply.
Rename
Use the Rename transform to rename a datapoint. This operation renames a datapoint in the source data to a new name. Use the new name in the subsequent stages of the data flow.
Under Transform (optional), select Rename > Add.

Enter the required settings.
| Setting |
Description |
| Datapoint |
Select a datapoint from the dropdown or enter a $metadata header. |
| New datapoint name |
Enter the new name for the datapoint. |
| Description |
Provide a description for the transformation. |
Enter MQTT metadata properties by using the format @$metadata.user_properties.<property> or @$metadata.topic. Enter $metadata headers by using the format @$metadata.<header>. The $metadata syntax is only needed for MQTT properties that are part of the message header. For more information, see field references.
Select Apply.
New property
Use the New property transform to add a new property to the source data. This operation adds a new property to the source data. Use the new property in the subsequent stages of the data flow.
Under Transform (optional), select New property > Add.

Enter the required settings.
| Setting |
Description |
| Property key |
Enter the key for the new property. |
| Property value |
Enter the value for the new property. |
| Description |
Provide a description for the new property. |
Select Apply.
For example, you can use the temperature field in the source data to convert the temperature to Celsius and store it in the temperatureCelsius field. Enrich the source data with the location field from the contextualization dataset:
{
  "operationType": "BuiltInTransformation",
  "builtInTransformationSettings": {
    "map": [
      {
        "inputs": [
          "$source.temperature ? $last" // ---------------- $1
        ],
        "output": "temperatureCelsius",
        "expression": "($1 - 32) * 5/9"
      },
      {
        "inputs": [
          "$context(assetDataset).location" // - $2
        ],
        "output": "location"
      }
    ]
  }
}
You can access MQTT metadata properties by using the format $metadata.user_properties.<property> or $metadata.topic. You can also enter $metadata headers by using the format $metadata.<header>. For more information, see field references.
For example, you can use the temperature field in the source data to convert the temperature to Celsius and store it in the temperatureCelsius field. Enrich the source data with the location field from the contextualization dataset:
builtInTransformationSettings: {
  map: [
    {
      inputs: [
        'temperature'
      ]
      output: 'temperatureCelsius'
      expression: '($1 - 32) * 5/9'
    }
    {
      inputs: [
        '$context(assetDataset).location'
      ]
      output: 'location'
    }
  ]
}
Important
The use of Kubernetes deployment manifests isn't supported in production environments and should only be used for debugging and testing.
You can access MQTT metadata properties by using the format $metadata.user_properties.<property> or $metadata.topic. You can also enter $metadata headers by using the format $metadata.<header>. For more information, see field references.
For example, you can use the temperature field in the source data to convert the temperature to Celsius and store it in the temperatureCelsius field. Enrich the source data with the location field from the contextualization dataset:
builtInTransformationSettings:
  map:
    - inputs:
      - temperature # - $1
      expression: "($1 - 32) * 5/9"
      output: temperatureCelsius
    - inputs:
      - $context(assetDataset).location
      output: location
To learn more, see Map data by using data flows.
Remove
By default, the output schema includes all datapoints. Remove any datapoint from the destination by using the Remove transform.
Under Transform (optional), select Remove.
Select the datapoint to remove from the output schema.
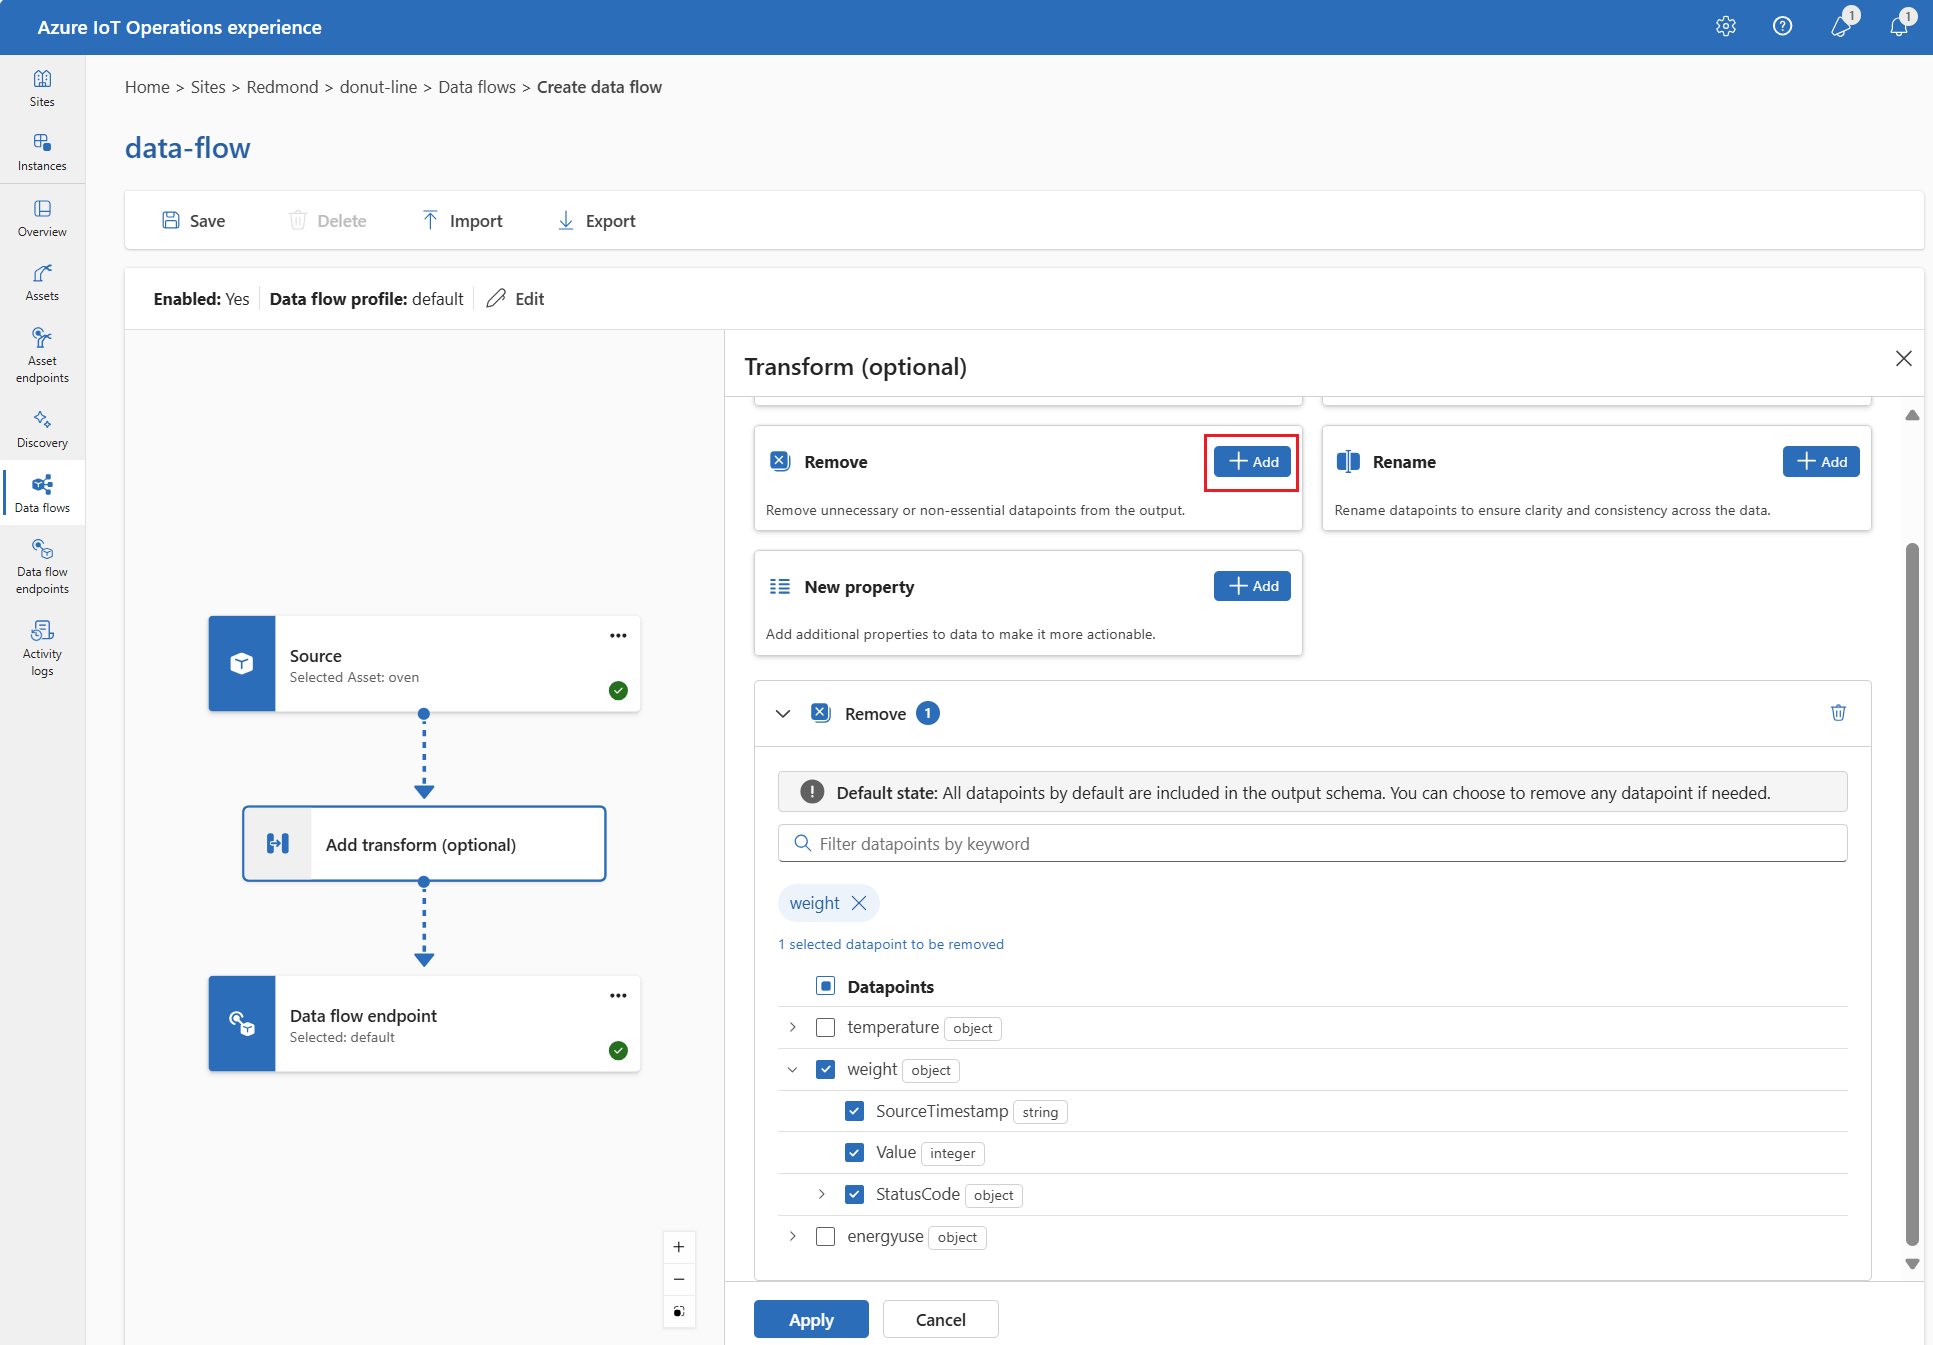
Select Apply.
To remove a datapoint from the output schema, use the builtInTransformationSettings property in the data flow configuration. Use the map property to specify the datapoints to remove.
{
  "operationType": "BuiltInTransformation",
  "builtInTransformationSettings": {
    "map": [
      {
        "inputs": [
          "*"
        ],
        "output": "*"
      },
      {
        "inputs": [
          "weight"
        ],
        "output": ""
      }
      {
          "inputs": [
          "weight.SourceTimestamp"
          ],
          "output": ""
      },
      {
          "inputs": [
          "weight.Value"
          ],
          "output": ""
      },
      {
          "inputs": [
          "weight.StatusCode"
          ],
          "output": ""
      },
      {
          "inputs": [
          "weight.StatusCode.Code"
          ],
          "output": ""
      },
      {
          "inputs": [
          "weight.StatusCode.Symbol"
          ],
          "output": ""
      }
    ]
  }
}
builtInTransformationSettings: {
  map: [
    {
      inputs: [
        '*'
      ]
      output: '*'
    }
    {
      inputs: [
        'weight'
      ]
      output: ''
    }
    {
      inputs: [
        'weight.SourceTimestamp'
      ]
      output: ''
    }
    {
      inputs: [
        'weight.Value'
      ]
      output: ''
    }
    {
      inputs: [
        'weight.StatusCode'
      ]
      output: ''
    }
    {
      inputs: [
        'weight.StatusCode.Code'
      ]
      output: ''
    }
    {
      inputs: [
        'weight.StatusCode.Symbol'
      ]
      output: ''
    }
  ]
}
Important
The use of Kubernetes deployment manifests isn't supported in production environments and should only be used for debugging and testing.
builtInTransformationSettings:
  map:
    - type: PassThrough
      inputs:
        - "*"
      output: "*"
    - inputs:
        - weight
      output: ""
    - inputs:
        - weight.SourceTimestamp
      output: ""
    - inputs:
        - weight.Value
      output: ""
    - inputs:
        - weight.StatusCode
      output: ""
    - inputs:
        - weight.StatusCode.Code
      output: ""
    - inputs:
        - weight.StatusCode.Symbol
      output: ""
To learn more, see Map data by using data flows.
Serialize data according to a schema
If you want to serialize the data before sending it to the destination, specify a schema and serialization format. For details, see Serialize the output with a schema.
Destination
Configure the destination endpoint and data destination (topic, container, or table) for the data flow. You can use any supported endpoint type as the destination, including MQTT, Kafka, Azure Data Lake Storage, Microsoft Fabric, Azure Data Explorer, and local storage.
For complete configuration details, including the data destination table, dynamic destination topics, and output serialization, see Configure a data flow destination.
To send data to a destination other than the local MQTT broker, create a data flow endpoint. To learn how, see Configure data flow endpoints.
Example
The following example is a data flow configuration that uses the MQTT endpoint for the source and destination. The source filters the data from the MQTT topic azure-iot-operations/data/thermostat. The transformation converts the temperature to Fahrenheit and filters the data where the temperature multiplied by the humidity is less than 100000. The destination sends the data to the MQTT topic factory.
Use the az iot ops dataflow apply command to create or change a data flow.
az iot ops dataflow apply --resource-group <ResourceGroupName> --instance <AioInstanceName> --profile <DataflowProfileName> --name <DataflowName> --config-file <ConfigFilePathAndName>
The --config-file parameter is the path and file name of a JSON configuration file containing the resource properties.
In this example, assume a configuration file named data-flow.json with the following content is stored in the user's home directory:
{
    "mode": "Enabled",
    "operations": [
      {
        "operationType": "Source",
        "sourceSettings": {
          "dataSources": [
            "thermostats/+/sensor/temperature/#",
            "humidifiers/+/sensor/humidity/#"
          ],
          "endpointRef": "default",
          "serializationFormat": "Json"
        }
      },
      {
        "builtInTransformationSettings": {
          "datasets": [],
          "filter": [
            {
              "expression": "$1 * $2 < 100000",
              "inputs": [
                "temperature.Value",
                "\"Tag 10\".Value"
              ],
              "type": "Filter"
            }
          ],
          "map": [
            {
              "inputs": [
                "*"
              ],
              "output": "*",
              "type": "PassThrough"
            },
            {
              "expression": "fToC($1)",
              "inputs": [
                "Temperature.Value"
              ],
              "output": "TemperatureF",
              "type": "Compute"
            },
            {
              "inputs": [
                "@\"Tag 10\".Value"
              ],
              "output": "Humidity",
              "type": "Rename"
            }
          ],
          "serializationFormat": "Json"
        },
        "operationType": "BuiltInTransformation"
      },
      {
        "destinationSettings": {
          "dataDestination": "factory",
          "endpointRef": "default"
        },
        "operationType": "Destination"
      }
    ]
}
Here's an example command to create or update a data flow using the default dataflow profile:
az iot ops dataflow apply --resource-group myResourceGroup --instance myAioInstance --profile default --name data-flow --config-file ~/data-flow.json
Here's another example using dynamic topic translation to route messages from different thermostats to device-specific topics:
{
    "mode": "Enabled",
    "operations": [
      {
        "operationType": "Source",
        "sourceSettings": {
          "dataSources": [
            "thermostats/+/sensor/temperature"
          ],
          "endpointRef": "default",
          "serializationFormat": "Json"
        }
      },
      {
        "destinationSettings": {
          "dataDestination": "processed/device/${inputTopic.2}/temperature",
          "endpointRef": "default"
        },
        "operationType": "Destination"
      }
    ]
}
This configuration processes messages from thermostats/device1/sensor/temperature and sends them to processed/device/device1/temperature.
param aioInstanceName string = '<AIO_INSTANCE_NAME>'
param customLocationName string = '<CUSTOM_LOCATION_NAME>'
param dataflowName string = '<DATAFLOW_NAME>'

resource aioInstance 'Microsoft.IoTOperations/instances@2024-11-01' existing = {
  name: aioInstanceName
}

resource customLocation 'Microsoft.ExtendedLocation/customLocations@2021-08-31-preview' existing = {
  name: customLocationName
}

// Pointer to the default data flow endpoint
resource defaultDataflowEndpoint 'Microsoft.IoTOperations/instances/dataflowEndpoints@2024-11-01' existing = {
  parent: aioInstance
  name: 'default'
}

// Pointer to the default data flow profile
resource defaultDataflowProfile 'Microsoft.IoTOperations/instances/dataflowProfiles@2024-11-01' existing = {
  parent: aioInstance
  name: 'default'
}

resource dataflow 'Microsoft.IoTOperations/instances/dataflowProfiles/dataflows@2024-11-01' = {
  // Reference to the parent data flow profile, the default profile in this case
  // Same usage as profileRef in Kubernetes YAML
  parent: defaultDataflowProfile
  name: dataflowName
  extendedLocation: {
    name: customLocation.id
    type: 'CustomLocation'
  }
  properties: {
    mode: 'Enabled'
    operations: [
      {
        operationType: 'Source'
        sourceSettings: {
          // Use the default MQTT endpoint as the source
          endpointRef: defaultDataflowEndpoint.name
          // Filter the data from the MQTT topic azure-iot-operations/data/thermostat
          dataSources: [
            'azure-iot-operations/data/thermostat'
          ]
        }
      }
      // Transformation optional
      {
        operationType: 'BuiltInTransformation'
        builtInTransformationSettings: {
          // Filter the data where temperature * "Tag 10" < 100000
          filter: [
            {
              inputs: [
                'temperature.Value'
                '"Tag 10".Value'
              ]
              expression: '$1 * $2 < 100000'
            }
          ]
          map: [
            // Passthrough all values by default
            {
              inputs: [
                '*'
              ]
              output: '*'
            }
            // Convert temperature to Fahrenheit and output it to TemperatureF
            {
              inputs: [
                'temperature.Value'
              ]
              output: 'TemperatureF'
              expression: 'cToF($1)'
            }
          // Extract the "Tag 10" value and output it to Humidity
            {
              inputs: [
                '"Tag 10".Value'
              ]
              output: 'Humidity'
            }
          ]
        }
      }
      {
        operationType: 'Destination'
        destinationSettings: {
          // Use the default MQTT endpoint as the destination
          endpointRef: defaultDataflowEndpoint.name
          // Send the data to the MQTT topic factory
          dataDestination: 'factory'
        }
      }
    ]
  }
}
Important
The use of Kubernetes deployment manifests isn't supported in production environments and should only be used for debugging and testing.
apiVersion: connectivity.iotoperations.azure.com/v1
kind: Dataflow
metadata:
  name: my-dataflow
  namespace: azure-iot-operations
spec:
  # Reference to the default data flow profile
  profileRef: default
  mode: Enabled
  operations:
    - operationType: Source
      sourceSettings:
        # Use the default MQTT endpoint as the source
        endpointRef: default
        # Filter the data from the MQTT topic azure-iot-operations/data/thermostat
        dataSources:
          - azure-iot-operations/data/thermostat
    # Transformation optional
    - operationType: builtInTransformation
      builtInTransformationSettings:
        # Filter the data where temperature * "Tag 10" < 100000
        filter:
          - inputs:
              - 'temperature.Value'
              - '"Tag 10".Value'
            expression: '$1 * $2 < 100000'
        map:
          # Passthrough all values by default
          - inputs:
              - '*'
            output: '*'
          # Convert temperature to Fahrenheit and output it to TemperatureF
          - inputs:
              - temperature.Value
            output: TemperatureF
            expression: cToF($1)
          # Extract the "Tag 10" value and output it to Humidity
          - inputs:
              - '"Tag 10".Value'
            output: 'Humidity'
    - operationType: Destination
      destinationSettings:
        # Use the default MQTT endpoint as the destination
        endpointRef: default
        # Send the data to the MQTT topic factory
        dataDestination: factory
To see more examples of data flow configurations, see Azure REST API - Data flow and the quickstart Bicep.
Verify a data flow is working
To verify the data flow is working, follow Tutorial: Bi-directional MQTT bridge to Azure Event Grid.
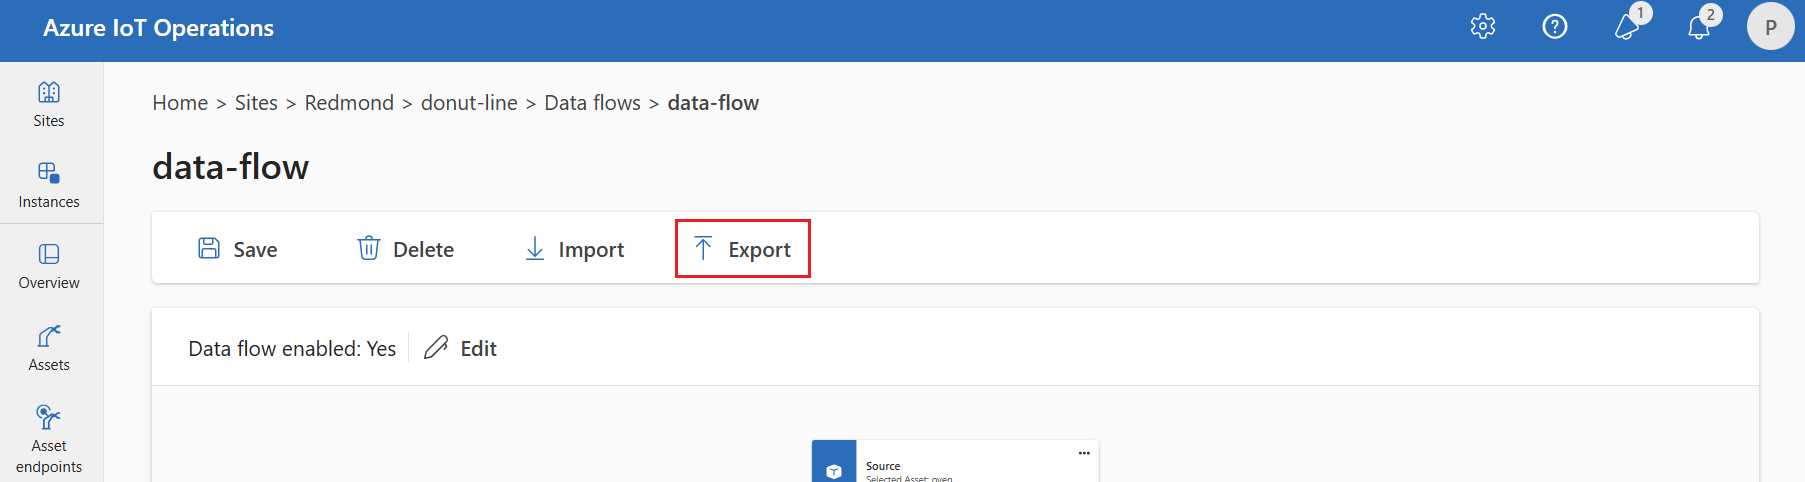
Export data flow configuration
To export the data flow configuration, use the operations experience or export the data flow custom resource.
Select the data flow you want to export, then select Export from the toolbar.
Use the az iot ops dataflow show command to export a data flow.
az iot ops dataflow show --resource-group <ResourceGroupName> --instance <AioInstanceName> --name <DataflowName> --profile <DataflowProfileName> --output json > my-dataflow.json
Here's an example command to export a data flow named data-flow to a JSON file named data-flow.json:
az iot ops dataflow show --resource-group myResourceGroup --instance myAioInstance --profile default --name data-flow --output json > data-flow.json
Important
The use of Kubernetes deployment manifests isn't supported in production environments and should only be used for debugging and testing.
kubectl get dataflow my-dataflow -o yaml > my-dataflow.yaml
Proper data flow configuration
To ensure the data flow works as expected, verify the following conditions:
- The default MQTT data flow endpoint must be used as either the source or destination.
- The data flow profile exists and is referenced in the data flow configuration.
- The source is either an MQTT endpoint, Kafka endpoint, or an asset. You can't use storage type endpoints as a source.
- When you use Event Grid as the source, you set the dataflow profile instance count to 1 because Event Grid MQTT broker doesn't support shared subscriptions.
- When you use Event Hubs as the source, each event hub in the namespace is a separate Kafka topic and you must specify each as the data source.
- Transformation, if used, is configured with proper syntax, including proper escaping of special characters.
- When you use storage type endpoints as destination, a schema is specified.
- When you use dynamic destination topics for MQTT endpoints, ensure that topic variables reference valid segments.
Next steps
