Merk
Tilgang til denne siden krever autorisasjon. Du kan prøve å logge på eller endre kataloger.
Tilgang til denne siden krever autorisasjon. Du kan prøve å endre kataloger.
This guide shows how to grant VPN users access to your resources by using Microsoft Entra Conditional Access. By using Microsoft Entra Conditional Access for virtual private network (VPN) connectivity, you can help protect the VPN connections. Conditional Access is a policy-based evaluation engine that you can use to create access rules for any Microsoft Entra connected application.
Prerequisites
Before you start configuring Conditional Access for your VPN, complete the following prerequisites:
- Review Conditional Access in Microsoft Entra ID.
- Administrators who interact with Conditional Access must have one of the following role assignments depending on the tasks they're performing. To follow the Zero Trust principle of least privilege, consider using Privileged Identity Management (PIM) to just-in-time activate privileged role assignments.
- Security Reader access to read Conditional Access policies and configurations.
- Conditional Access Administrator access to create or modify Conditional Access policies.
- Administrators who interact with Conditional Access must have one of the following role assignments depending on the tasks they're performing. To follow the Zero Trust principle of least privilege, consider using Privileged Identity Management (PIM) to just-in-time activate privileged role assignments.
- Configure VPN and Conditional Access.
- Set up the Always On VPN infrastructure in your environment, or complete Tutorial: Deploy Always On VPN - Setup infrastructure for Always On VPN.
- Configure your Windows client computer with a VPN connection by using Intune. For details, see Deploy Always On VPN profile to Windows clients with Microsoft Intune.
Configure EAP-TLS to ignore Certificate Revocation List (CRL) checking
An EAP-TLS client can't connect unless the Network Policy Server (NPS) completes a revocation check of the certificate chain (including the root certificate). Cloud certificates issued to the user by Microsoft Entra ID don't have a CRL because they're short-lived certificates with a lifetime of one hour. You need to configure EAP on NPS to ignore the absence of a CRL. Since the authentication method is EAP-TLS, you only need to add this registry value under EAP\13. If you use other EAP authentication methods, add the registry value under those methods as well.
In this section, you add IgnoreNoRevocationCheck and NoRevocationCheck. By default, IgnoreNoRevocationCheck and NoRevocationCheck are set to 0 (disabled).
To learn more about NPS CRL registry settings, see Configure Network Policy Server Certificate Revocation List check registry settings.
Important
If a Windows Routing and Remote Access Server (RRAS) uses NPS to proxy RADIUS calls to a second NPS, then you must set IgnoreNoRevocationCheck=1 on both servers.
If you don't implement this registry change, IKEv2 connections using cloud certificates with PEAP fail, but IKEv2 connections using Client Auth certificates issued from the on-premises CA continue to work.
Open regedit.exe on the NPS.
Go to HKEY_LOCAL_MACHINE\SYSTEM\CurrentControlSet\Services\RasMan\PPP\EAP\13.
Select Edit > New and select DWORD (32-bit) Value. Enter IgnoreNoRevocationCheck.
Double-click IgnoreNoRevocationCheck and set the Value data to 1.
Select Edit > New and select DWORD (32-bit) Value. Enter NoRevocationCheck.
Double-click NoRevocationCheck and set the Value data to 1.
Select OK and reboot the server. Restarting the RRAS and NPS services isn't enough.
| Registry Path | EAP Extension |
|---|---|
| HKLM\SYSTEM\CurrentControlSet\Services\RasMan\PPP\EAP\13 | EAP-TLS |
| HKLM\SYSTEM\CurrentControlSet\Services\RasMan\PPP\EAP\25 | PEAP |
Create root certificates for VPN authentication with Microsoft Entra ID
In this section, you configure conditional access root certificates for VPN authentication with Microsoft Entra ID. When you create the first certificate, Microsoft Entra ID automatically creates a cloud app called VPN Server in the tenant. An administrator must grant admin consent for this application once before VPN connectivity is fully operational. To configure conditional access for VPN connectivity, complete the following steps:
Create a VPN certificate in the Azure portal.
Download the VPN certificate.
Deploy the certificate to your VPN and NPS servers.
Important
When you create a VPN certificate in the Azure portal, Microsoft Entra ID immediately starts using it to issue short-lived certificates to the VPN client. To avoid any problems with credential validation for the VPN client, it's critical to immediately deploy the VPN certificate to the VPN server.
When a user attempts a VPN connection, the VPN client makes a call into the Web Account Manager (WAM) on the Windows client. WAM makes a call to the VPN Server cloud app. When the Conditions and Controls in the Conditional Access policy are satisfied, Microsoft Entra ID issues a token in the form of a short-lived (one-hour) certificate to the WAM. The WAM places the certificate in the user's certificate store and passes control to the VPN client.
The VPN client then sends the certificate issued by Microsoft Entra ID to the VPN for credential validation.
Note
Microsoft Entra ID uses the most recently created certificate in the VPN connectivity pane as the Issuer. Microsoft Entra Conditional Access VPN connection leaf certificates now support strong certificate mappings, a certificate-based authentication requirement introduced by KB5014754. VPN connection leaf certificates now include a SID extension of (1.3.6.1.4.1.311.25.2), which contains an encoded version of the user's SID obtained from the onPremisesSecurityIdentifier attribute.
Create root certificates
Sign in to your Azure portal as a Global Administrator.
On the left menu, select Microsoft Entra ID.
On the Microsoft Entra ID page, in the Manage section, select Security.
On the Security page, in the Protect section, select Conditional Access.
On the Conditional Access | Policies page, in the Manage section, select VPN Connectivity.
On the VPN connectivity page, select New certificate.
On the New page:
- For Select duration, select 1, 2, or 3 years.
- Select Create.
For the first VPN certificate you create in your tenant, a warning banner appears requesting admin consent for the VPN Server application. Select Grant admin consent (requires the Global Administrator role) and accept the requested permissions. You must take this action only once per tenant. Subsequent certificate operations don't require consent again.
Note
If you don't see the consent banner, the VPN Server application has the required permissions.
Configure the Conditional Access policy
In this section, you configure the conditional access policy for VPN connectivity. When you create the first root certificate in the VPN connectivity pane, you automatically create a VPN Server cloud application in the tenant.
Create a Conditional Access policy to assign to the VPN users group and scope the Cloud app to VPN Server:
- Users: VPN Users
- Cloud App: VPN Server
- Grant (access control): Require multifactor authentication. You can use other controls if desired.
Procedure: This step covers creation of the most basic Conditional Access policy. If desired, you can add more Conditions and Controls.
On the Conditional Access page, on the toolbar at the top, select Add.

On the New page, in the Name box, enter a name for your policy. For example, enter VPN policy.

In the Assignment section, select Users and groups.

On the Users and groups page:
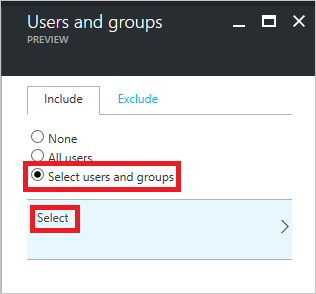
Select Select users and groups.
Select Select.
On the Select page, select the VPN users group, and then select Select.
On the Users and groups page, select Done.
On the New page:

In the Assignments section, select Cloud apps.
On the Cloud apps page, select Select apps.
Select Select.
On the Select page, select VPN Server.
On the New page, to open the Grant page, in the Controls section, select Grant.

On the Grant page:

Select Require multi-factor authentication.
Select Select.
On the New page, set Enable policy to On.

On the New page, select Create.
Deploy Conditional Access root certificates to on-premises AD
In this section, you deploy a trusted root certificate for VPN authentication to your on-premises AD.
On the VPN connectivity page, select Download certificate.
Note
The Download base64 certificate option is available for some configurations that require base64 certificates for deployment.
Sign in to a domain-joined computer with Enterprise Admin rights and run these commands from an Administrator command prompt to add the cloud root certificates into the Enterprise NTauth store:
Note
For environments where the VPN server isn't joined to the Active Directory domain, you must add the cloud root certificates to the Trusted Root Certification Authorities store manually.
Command Description certutil -dspublish -f VpnCert.cer RootCACreates two Microsoft VPN root CA gen 1 containers under the CN=AIA and CN=Certification Authorities containers, and publishes each root certificate as a value on the cACertificate attribute of both Microsoft VPN root CA gen 1 containers. certutil -dspublish -f VpnCert.cer NTAuthCACreates one CN=NTAuthCertificates container under the CN=AIA and CN=Certification Authorities containers, and publishes each root certificate as a value on the cACertificate attribute of the CN=NTAuthCertificates container. gpupdate /forceExpedites adding the root certificates to the Windows server and client computers. Verify that the root certificates are present in the Enterprise NTauth store and show as trusted:
Sign in to a server with Enterprise Admin rights that has the Certificate Authority Management Tools installed.
Note
By default, the Certificate Authority Management Tools are installed on Certificate Authority servers. You can install them on other members' servers as part of the Role Administration Tools in Server Manager.
From the Start menu, enter pkiview.msc to open the Enterprise PKI dialog box.
Right-click Enterprise PKI and select Manage AD Containers.
Verify that each Microsoft VPN root CA gen 1 certificate is present under:
- NTAuthCertificates
- AIA Container
- Certificate Authorities Container
Create OMA-DM based VPNv2 profiles for Windows 10 devices
In this section, you create OMA-DM based VPNv2 profiles by using Intune to deploy a VPN Device Configuration policy.
In the Azure portal, select Intune > Device Configuration > Profiles and select the VPN profile you created in Configure the VPN client by using Intune.
In the policy editor, select Properties > Settings > Base VPN. Extend the existing EAP Xml to include a filter that gives the VPN client the logic it needs to retrieve the Microsoft Entra Conditional Access certificate from the user's certificate store instead of using the first certificate discovered.
Note
Without this filter, the VPN client might retrieve the user certificate issued from the on-premises certificate authority, resulting in a failed VPN connection.

Locate the section that ends with </AcceptServerName></EapType> and insert the following string between these two values to provide the VPN client with the logic to select the Microsoft Entra Conditional Access Certificate:
<TLSExtensions xmlns="http://www.microsoft.com/provisioning/EapTlsConnectionPropertiesV2"><FilteringInfo xmlns="http://www.microsoft.com/provisioning/EapTlsConnectionPropertiesV3"><EKUMapping><EKUMap><EKUName>AAD Conditional Access</EKUName><EKUOID>1.3.6.1.4.1.311.87</EKUOID></EKUMap></EKUMapping><ClientAuthEKUList Enabled="true"><EKUMapInList><EKUName>AAD Conditional Access</EKUName></EKUMapInList></ClientAuthEKUList></FilteringInfo></TLSExtensions>In the Conditional Access pane, set Conditional access for this VPN connection to Enable.
Enabling this setting changes the <DeviceCompliance><Enabled>true</Enabled> setting in the VPNv2 Profile XML.
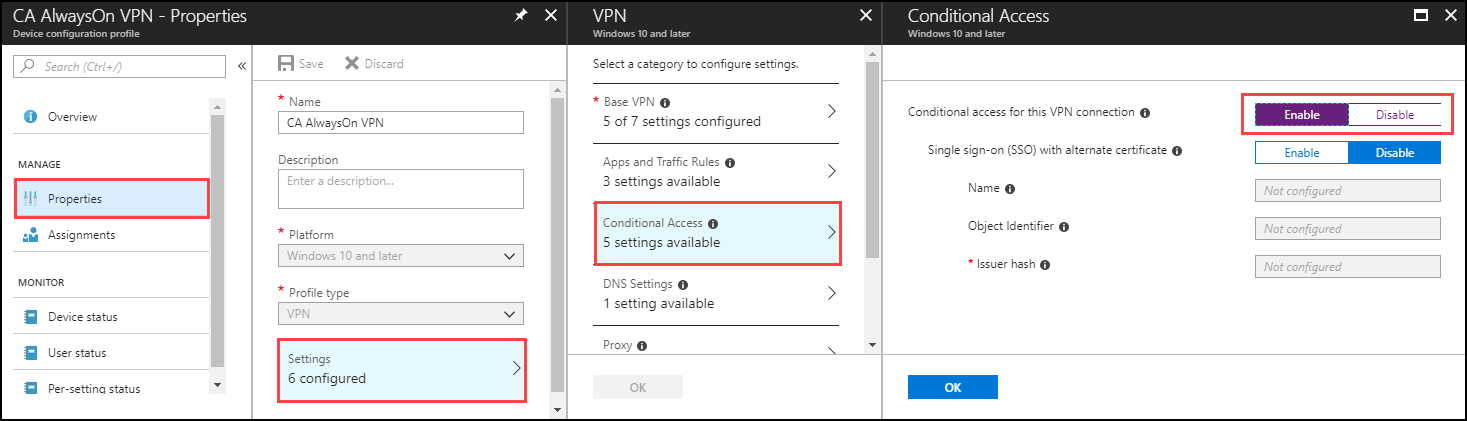
Select OK.
Select Assignments. On the Include tab, select Select groups to include.
Select the correct group that receives this policy and select Save.


Force MDM policy sync on the client
If the VPN profile doesn't show up on the client device, under Settings > Network & internet > VPN, you can force MDM policy to sync.
Sign in to a domain-joined client computer as a member of the VPN Users group.
On the Start menu, enter account, and press Enter.
In the left navigation pane, select Access work or school.
Under Access work or school, select Connected to <\domain> MDM, and then select Info.
Select Sync and verify the VPN profile appears under Settings > Network & internet > VPN.
Related content
To learn more about how conditional access works with VPNs, see VPN and conditional access.
To learn more about the advanced VPN features, see Advanced VPN Features.
To see an overview of VPNv2 CSP, see VPNv2 CSP.