Merk
Tilgang til denne siden krever autorisasjon. Du kan prøve å logge på eller endre kataloger.
Tilgang til denne siden krever autorisasjon. Du kan prøve å endre kataloger.
Applies to: ![]() SQL Server
SQL Server ![]() Azure SQL Database
Azure SQL Database ![]() Azure SQL Managed Instance
Azure SQL Managed Instance ![]() SQL database in Microsoft Fabric
SQL database in Microsoft Fabric
SQL projects contain declarative (CREATE statement) files for all the objects in a database, such as tables, views, and stored procedures. You can use these files to create new databases, update existing databases, or track the database in source control. Often, you start with a SQL project when you have an existing database and want to create objects in the SQL project that match the database with minimal effort.
Some SQL project tools include a single step for creating a new SQL project from an existing database. Other tools require a few steps to create a new SQL project and then import objects from an existing database. Except for the Visual Studio (SQL Server Data Tools) instructions, this guide focuses on SDK-style SQL projects.
With option 1 in this tutorial, you:
- Step 1: Create a new SQL project from an existing database
- Step 2: Build the SQL project
With option 2 in this tutorial, you:
- Step 1: Create a new empty SQL project
- Step 2: Import objects from an existing database
- Step 3: Build the SQL project
Prerequisites
- .NET 8 SDK
- Visual Studio 2022 Community, Professional, or Enterprise
- SQL Server Data Tools, SDK-style (preview)
- SqlPackage CLI
# install SqlPackage CLI
dotnet tool install -g Microsoft.SqlPackage
# install SqlPackage CLI
dotnet tool install -g Microsoft.SqlPackage

# install Microsoft.Build.Sql.Templates
dotnet new install Microsoft.Build.Sql.Templates
Note
To complete the tutorial, you need access to an Azure SQL or SQL Server instance. You can develop locally for free with SQL Server developer edition on Windows or in containers.
Option 1: Create a new SQL project from an existing database
Step 1: Create a new SQL project from an existing database
From the SQL Server Object Explorer in Visual Studio, right-click the database you want to create a project from and select Create New Project....
In the Create New Project dialog, enter a project name. The project name doesn't need to match a database name. Verify and modify the project location as needed. The default import settings import the objects into folders by schema, then object type. You can modify the import settings to change the folder structure or to include permissions in the objects being imported. Start the import.
The Import Database dialog displays the import progress as messages. When the import finishes, you can see the imported objects in the Solution Explorer. The process stores the logs in a file in the project directory under Import Schema Logs. Select Finish.
Option 1 isn't available for SDK-style SQL projects in Visual Studio. Use option 2 instead.
In the database object explorer view in Visual Studio Code, select a database you want to create a project from. Right-click the database and select Create Project from Database.
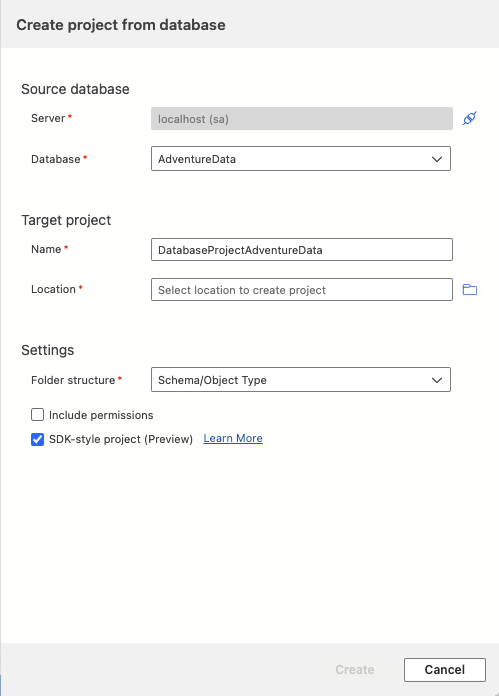
In Visual Studio Code, the Create project from database dialog requires the project name and location. The default import settings import the objects into folders by schema, then object type. You can select a different folder structure or choose to include permissions in the objects being imported before selecting Create.
Open the Database Projects view to see the new project and imported object definitions.
Option 1 isn't available for SQL Server Management Studio. Use option 2 instead.
Option 1 isn't available for the command line. Use option 2 instead.
Step 2: Build the SQL project
The build process validates the relationships between objects and the syntax against the target platform specified in the project file. The artifact output from the build process is a .dacpac file, which you can use to deploy the project to a target database. This file contains the compiled model of the database schema.
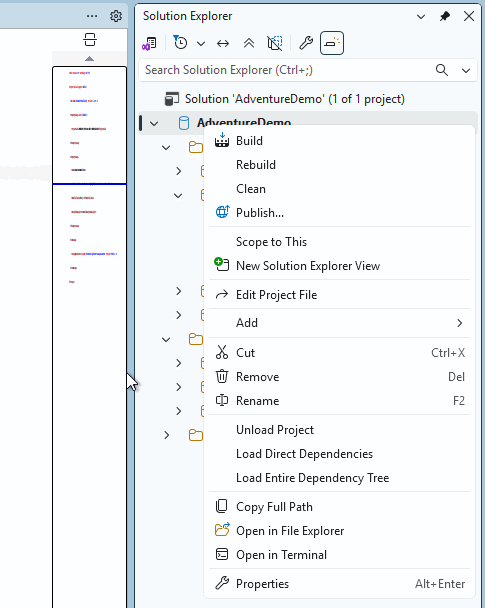
In Solution Explorer, right-click the project node and select Build.
The output window automatically opens to display the build process. If there are errors or warnings, the output window displays them. On a successful build, the build artifact (.dacpac file) is created and its location is included in the build output (default is bin\Debug\projectname.dacpac).
Option 1 isn't available for SDK-style SQL projects in Visual Studio. Use option 2 instead.
In the Database Projects view of Visual Studio Code, right-click the project node and select Build.
The output window automatically opens to display the build process. If there are errors or warnings, the output window displays them. On a successful build, the build artifact (.dacpac file) is created and its location is included in the build output (default is bin/Debug/projectname.dacpac).
Option 1 isn't available for SQL Server Management Studio. Use option 2 instead.
Option 1 isn't available for the command line. Use option 2 instead.
Option 2: Create a new empty SQL project and import objects from an existing database
Alternatively, you can separate the project creation and object import steps.
Step 1: Create a new empty SQL project
Start your project by creating a new SQL database project before importing your objects to it.
Select File, New, and then Project.
In the New Project dialog box, use the term SQL Server in the search box. The top result is SQL Server Database Project.

Select Next to proceed to the next step. Enter a project name, which doesn't need to match a database name. Verify and modify the project location as needed.
Select Create to create the project. The empty project opens and is visible in the Solution Explorer for editing.
Select File, New, and then Project.
In the New Project dialog box, use the term SQL Server in the search box. The top result is SQL Server Database Project, SDK-style (preview).

Select Next to proceed to the next step. Enter a project name, which doesn't need to match a database name. Verify and modify the project location as needed.
Select Create to create the project. The empty project opens and is visible in the Solution Explorer for editing.
In the Database Projects view of Visual Studio Code, select the New Project button.

The first prompt determines which project template to use, primarily based on whether the target platform is SQL Server or Azure SQL. If prompted to select a specific version of SQL, choose the version that matches the target database. If you don't know the target database version, choose the latest version as the value can be modified later.
Enter a project name in the text input that appears, which doesn't need to match a database name.
In the Select a Folder dialog that appears, select a directory for the project's folder, .sqlproj file, and other contents to reside in.
When prompted whether to create an SDK-style project, select Yes.
When completed, the empty project opens and is visible in the Database Projects view for editing.
Select File, New, and then Project.
In the New Project dialog box, select SQL Database Project.

Select Next to proceed to the next step. Enter a project name, which doesn't need to match a database name. Verify and modify the project location as needed.
Select Create to create the project. The empty project opens and is visible in the Solution Explorer for editing.
When you install the .NET templates for Microsoft.Build.Sql projects, you can create a new SQL database project from the command line. The -n option specifies the name of the project, and the -tp option specifies the project target platform.
Use the -h option to see all available options.
# create a new SQL database project
dotnet new sqlproj -n MyDatabaseProject
Step 2: Import objects from an existing database
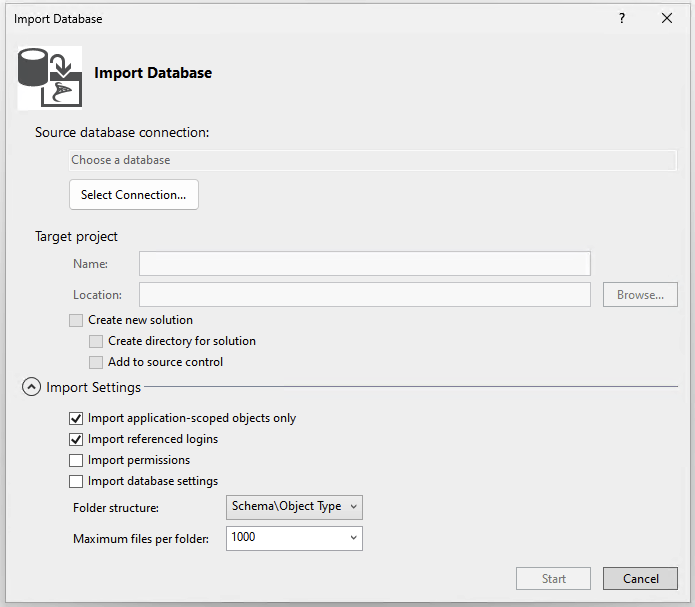
In Solution Explorer, right-click the project node and select Import -> Database.... If this option is disabled, your database project might have objects created in it. You can delete the objects or create a new project.
In the Import Database dialog, select the connection to the database you want to import objects from. If you connected to the database in SQL Server Object Explorer, it appears in the history list.
The default import settings import the objects into folders by schema, then object type. You can modify the import settings to change the folder structure or to include permissions in the objects being imported. Start the import.
While the import proceeds, progress is displayed as messages in the Import Database dialog. When the import is complete, the imported objects are visible in the Solution Explorer and the logs are stored in a file in the project directory under Import Schema Logs. Select Finish to return to the project.
Use the SqlPackage CLI to import objects from an existing database to the new SQL database project you created in Visual Studio in step 1. The following SqlPackage command imports the schema of a database to a folder MyDatabaseProject organized by nested schema and object type folders.
sqlpackage /a:Extract /ssn:localhost /sdn:MyDatabase /tf:MyDatabaseProject /p:ExtractTarget=SchemaObjectType
When you place these folders in an SDK-style SQL database project folder, they're automatically included in the project without the need to import them or modify the SQL project file.
In the SQL Database Projects extension in Visual Studio Code, open the Database Projects view. Right-click the project node and select Update project from database.
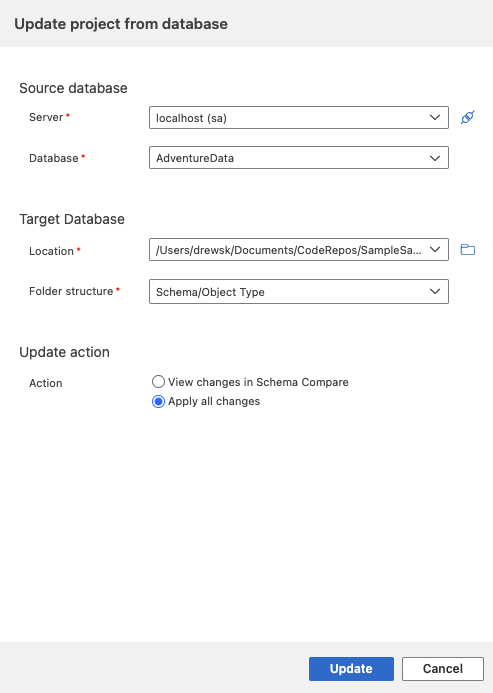
In the Update Database dialog, select the connection to the database you want to import objects from. If you connected to the database in the Connections view, it appears in the history list.
Select either View changes in schema compare to review and choose a subset of objects to import or Apply all changes to import all objects.
In Solution Explorer, right-click the project node and select Import From Database....
In the Import Database dialog, select the connection to the database you want to import objects from.
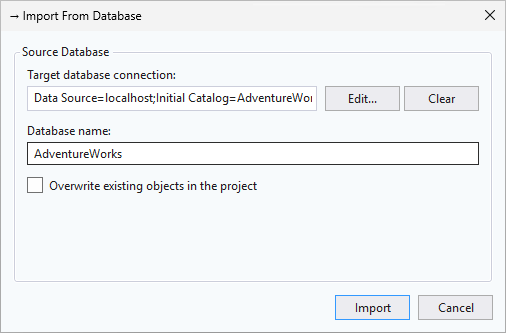
The default import settings import all objects from the database into the project and arrange them in folders by schema and object type, but cancel the import if any objects in the project are overwritten. You can modify the import to update the project with objects from the database by selecting Overwrite existing objects in the project. Select Import to begin the import.
When the import completes, Solution Explorer is updated with the imported objects.
Use the SqlPackage CLI to extract the schema of an existing database to a .dacpac file or individual .sql files. The following SqlPackage command extracts the schema of a database to .sql files organized by nested schema and object type folders.
sqlpackage /a:Extract /ssn:localhost /sdn:MyDatabase /tf:MyDatabaseProject /p:ExtractTarget=SchemaObjectType
When you place these folders in an SDK-style SQL database project folder, they're automatically included in the project without the need to import them or modify the SQL project file.
Step 3: Build the SQL project
The build process validates the relationships between objects and the syntax against the target platform specified in the project file. The artifact output from the build process is a .dacpac file, which you can use to deploy the project to a target database. This file contains the compiled model of the database schema.
In Solution Explorer, right-click the project node and select Build.
The output window automatically opens to display the build process. If there are errors or warnings, the output window displays them. On a successful build, the build artifact (.dacpac file) is created and its location is included in the build output (default is bin\Debug\projectname.dacpac).
In the Database Projects view of Visual Studio Code, right-click the project node and select Build.
The output window automatically opens to display the build process. If there are errors or warnings, the output window displays them. On a successful build, the build artifact (.dacpac file) is created and its location is included in the build output (default is bin/Debug/projectname.dacpac).
In Solution Explorer, right-click the project node and select Build.
The output window automatically opens to display the build process. If there are errors or warnings, the output window displays them. On a successful build, the build artifact (.dacpac file) is created and its location is included in the build output (default is bin\Debug\projectname.dacpac).
You can build SQL database projects from the command line using the dotnet build command.
dotnet build

# optionally specify the project file
dotnet build MyDatabaseProject.sqlproj
The build output includes any errors or warnings and the specific files and line numbers where they occur. On a successful build, the build artifact (.dacpac file) is created and its location is included in the build output (default is bin/Debug/projectname.dacpac).