Note
Access to this page requires authorization. You can try signing in or changing directories.
Access to this page requires authorization. You can try changing directories.
Note
Consider using the Power Query Dataverse Connector with dataflows rather than the OData connector. Dataflows are the recommended method to migrate data between Dataverse environments. For more information, see What are dataflows?
Dataverse Web API works with any technology that supports OData and OAuth. You can use many options to move data in and out of Dataverse. The OData connector is one of the dataflows. It's designed to support migration and synchronization of large datasets in Dataverse.
In this article, you learn how to migrate data between Dataverse environments by using the dataflows OData connector.
Prerequisites
- System Administrator or System Customizer security role permission on both the source and target environments.
- Power Apps, Power Automate, or Dataverse license (per app or per user).
- Two Dataverse environments with database.
Scenarios
- You need a one-time cross-environment or cross-tenant migration (for example, geo-migration).
- You need to update an app that's used in production. You need test data in your development environment to easily build out changes.
Step 1: Plan the dataflow
Identify the source and target environments.
- The source environment is where you migrate data from.
- The target environment is where you migrate data to.
Ensure that the target environment already has the tables defined. Ideally, both environments should have the same tables defined within the same solution.
Importing relationships requires multiple dataflows.
Tables with one (parent/independent) to many (children/dependent) relationships need separate dataflows. Configure the parent dataflow to run before any child tables, since the data in the parent needs to load first to correctly map to the columns in the corresponding child tables. Additionally, you must create an alternate key in the parent table before you can set a lookup column on the child table. Without a key defined on a parent table, you can't populate lookup columns on any child tables.
Step 2: Get the OData endpoint for the source environment
Dataverse provides an OData endpoint that doesn't require extra configuration to authenticate by using the dataflows connector. You can easily connect to the source environment.
This article shows you how to set up a new dataflow by using the OData connector. For information about connecting to all data sources that dataflows support, see Create and use dataflows.
Get the OData endpoint for the source environment:
Sign in to Power Apps.
Select the source environment you need from the upper-right corner.
Select the Settings (gear) icon in the upper-right corner, and then select Advanced Settings.
On the Settings page, select the drop-down arrow next to Settings, and then select Customizations.
On the Customizations page, select Developer Resources.
Copy the Service Root URL to Notepad.

Step 3: Create a new OData dataflow
In the target environment, create a new dataflow with the OData connector.
Sign in to Power Apps.
Select the required target environment from the upper-right corner.
In the left navigation pane, expand the Data menu, and then select Dataflows.
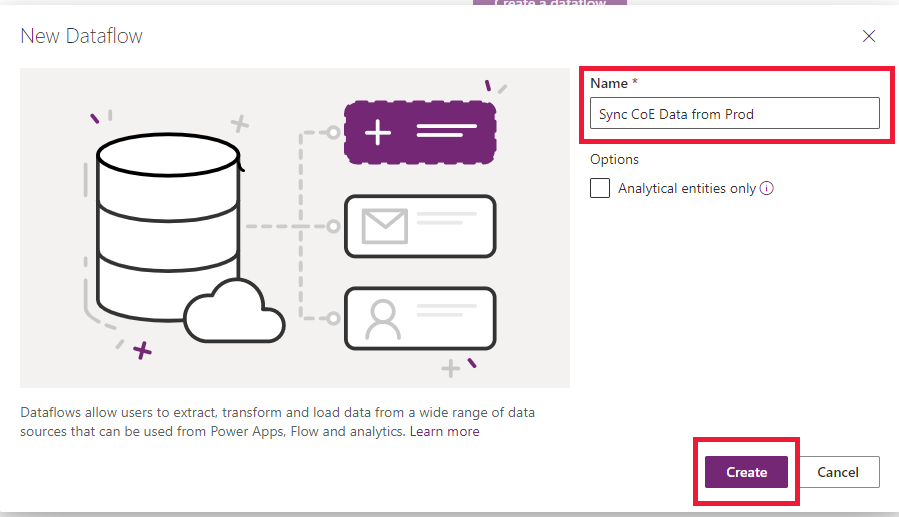
Select New dataflow to create a new dataflow. Provide a meaningful name for the dataflow. Select Create.
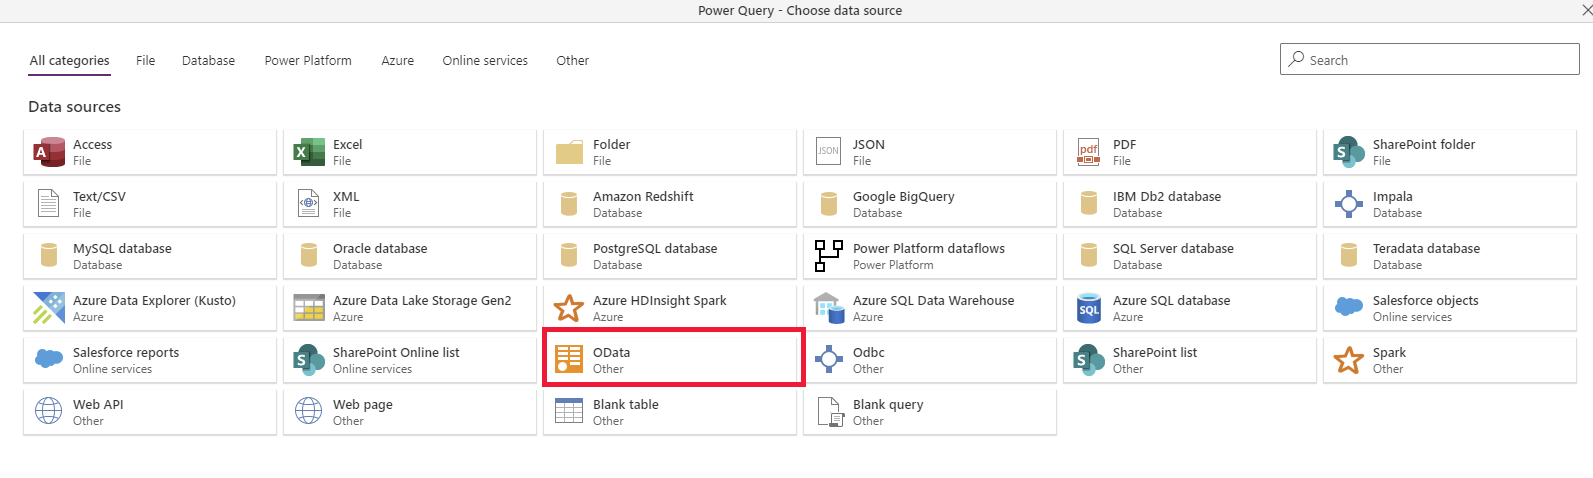
Select the OData connector.
In the Connection settings dialog box, type the column values:
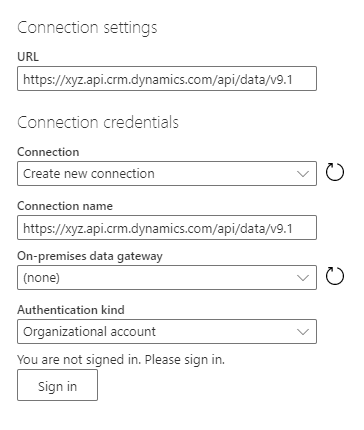
Column Description URL Provide the Service Root URL in the URL column of the connection settings. Connection Create new connection. This value is automatically chosen if you didn't previously make an OData connection in dataflows. Connection name Optionally, rename the connection name, but a value is automatically populated. On-premises data gateway None. An on-premises data gateway isn't needed for connections to this cloud service. Authentication kind Organizational account. Select Sign in to open the sign-in dialog that authenticates the account associated with the connection. Important
Disable pop-up and cookie blockers in your browser to configure the Microsoft Entra ID authentication. This requirement is similar to the fact that you're using the Dataverse OData endpoint or any other OAuth-based authentication data source.
Select Next in the lower right.
Step 4: Select and transform data with Power Query
Use Power Query to select the tables and transform data as needed.
First, select the tables that you want to transfer. You can browse all tables in the source environment and preview some of the data in each table.
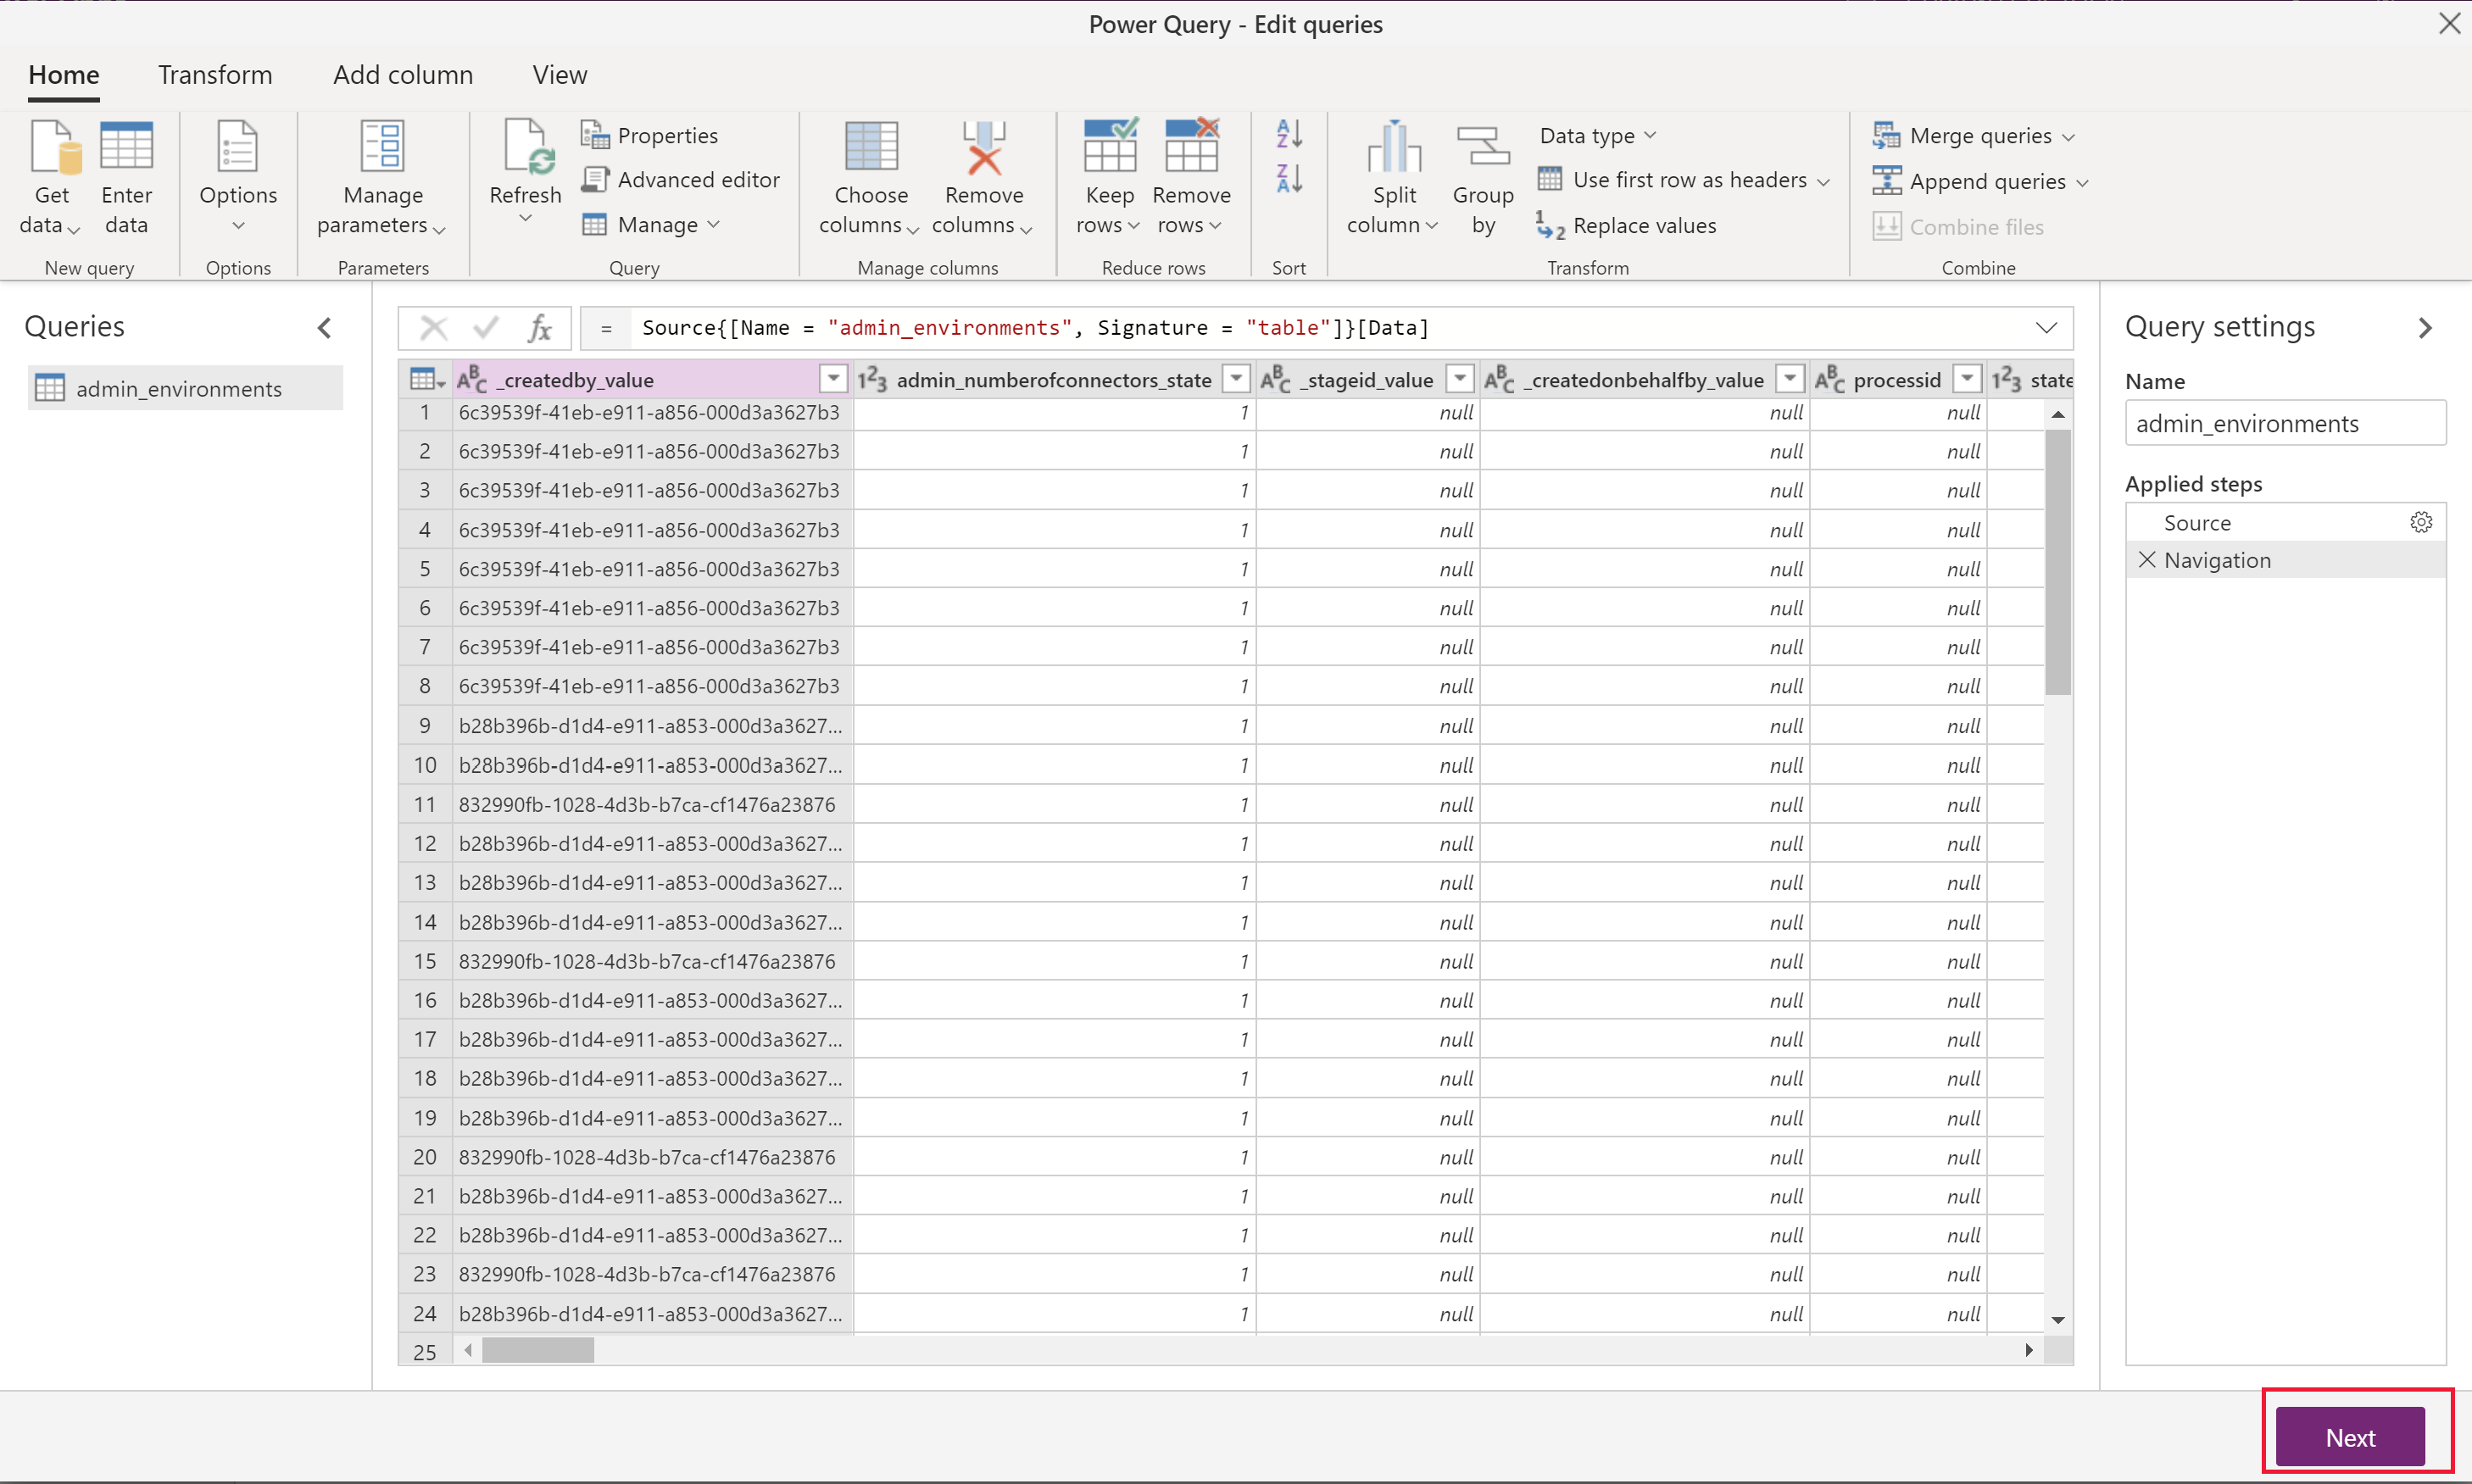
Select one or multiple tables as needed, and then select Transform data.
Note
When importing relationships, remember to import the parent table dataflow before the child ones. The child dataflow data requires the parent table data for correct mapping, otherwise it might throw an error.
In the Power Query - Edit queries window, you can transform the query before import.
If you are only migrating data, there should not be a need to modify anything here.
Reducing the number of unnecessary columns will improve the dataflow performance for larger data sets.
Tip
You can go back to choose more tables in the Get data ribbon option for the same OData connector.
Select Next in the lower right.
Step 5: Configure target environment settings
This section describes how to define the target environment settings.
Step 5.1: Map tables
For each table you choose, select the behavior for importing that table in these settings and then select Next.
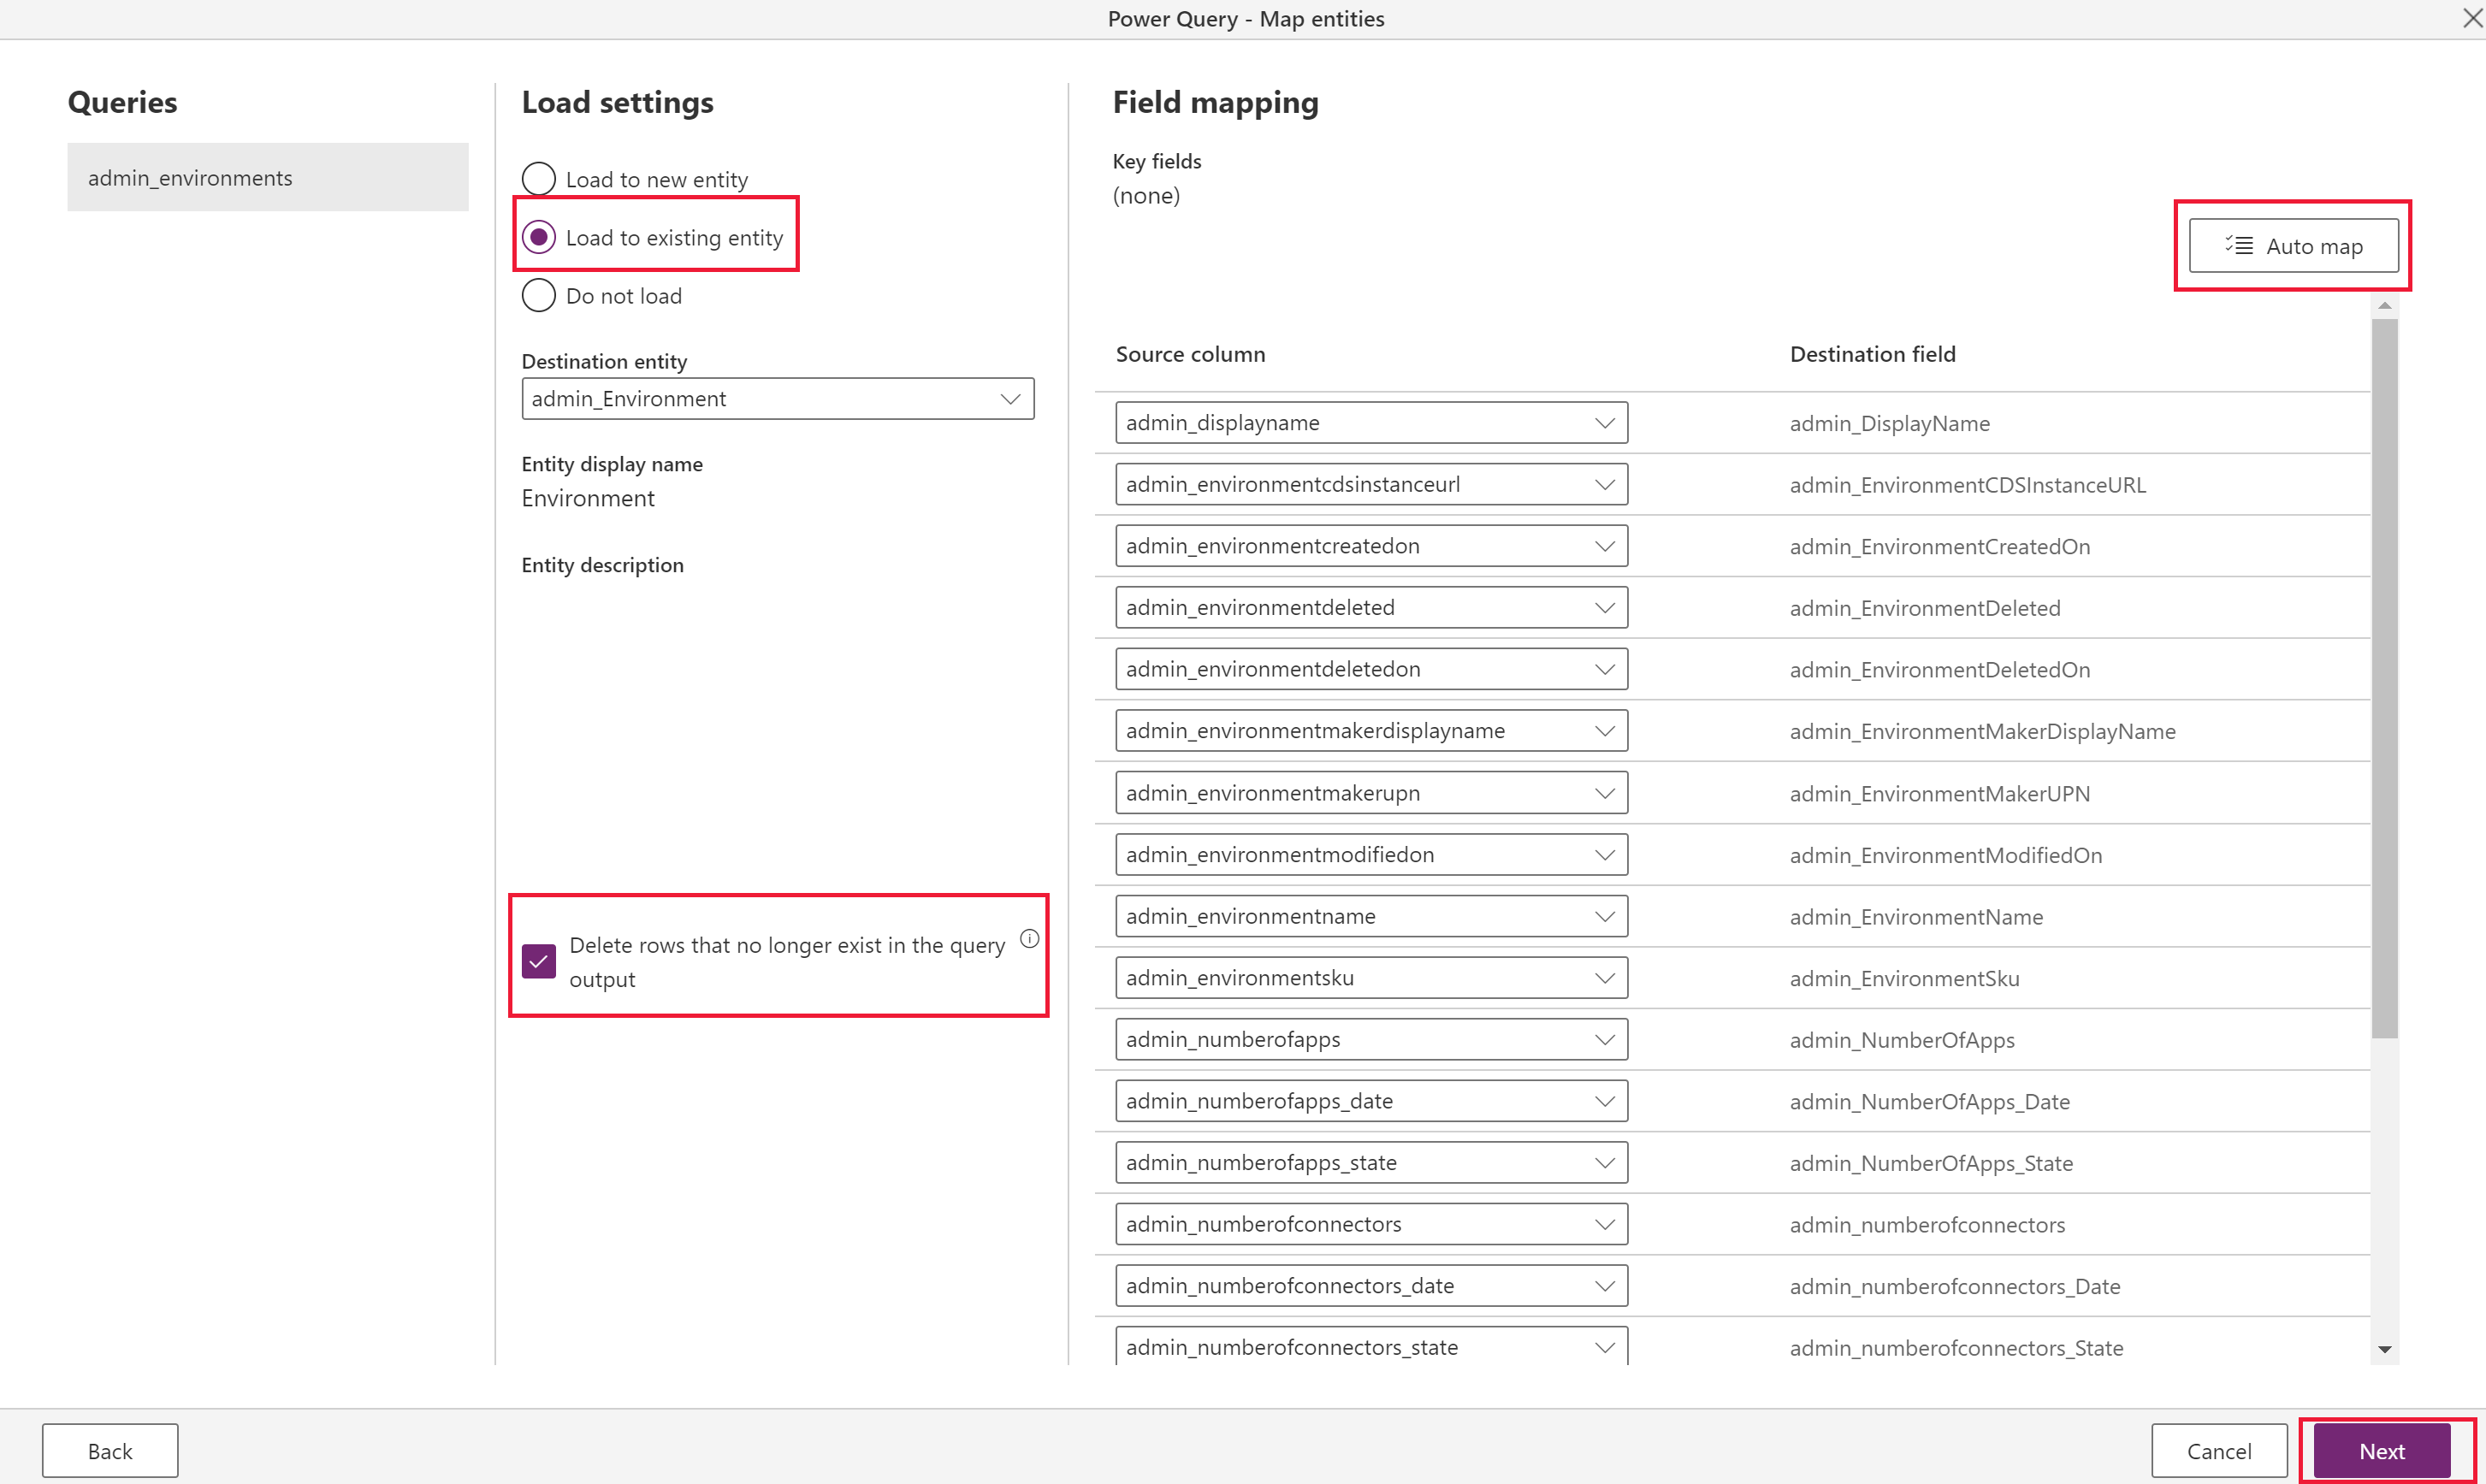
Load to existing table (recommended)
The dataflow syncs data from the source environment's table to the target environment, and the same table schema is already defined in the target environment.
Ideally, use the same solution in both target and source environments to make data transfer seamless. Another advantage to having a predefined table is more control over which solution the table is defined in and the prefix.
Choose Delete rows that no longer exist in the query output. This option ensures that the relationships map correctly because it maintains the values for the lookups. To use this feature, you must first define an Define alternate keys to reference rows on the target/existing table so the dataflow can determine whether to update existing records or create new ones.
Note
Use this option only if you want to make data in source and target the same. If another process in the destination environment adds data to the same table (or if there's other existing data in the table) this dataflow deletes it.
If the schema is identical in both source and target tables, select Auto map to quickly map the columns.
Requires a key configuration in the target environment (as the unique identifier columns aren't available to modify).
Important
The Delete rows option is only available when a key is specified. It's possible to have a table without a key, but a key is required when you want to update or delete records since it's the unique identifier the system uses to perform these tasks. You can add a key directly in the Dataverse table if your table doesn't have a key and you want to use the delete or update functionality provided by Dataflows.
More information: Define alternate keys using Power Apps portal.
Load to new table (not recommended)
- Ideally, you should define a table in the target environment from the same solution import as the source environment. However, there are cases where this approach isn't feasible, so this option exists if there's no existing table to load to.
- It creates a new custom table in the target environment's default solution.
There's an option to Do not load, but don't include tables in the dataflow that aren't being loaded. You can select Back from this menu to return to the Power Query menu and remove the tables that you don't need.
Step 5.2: Refresh settings
Select Refresh manually since this migration runs only once, and then select Create.
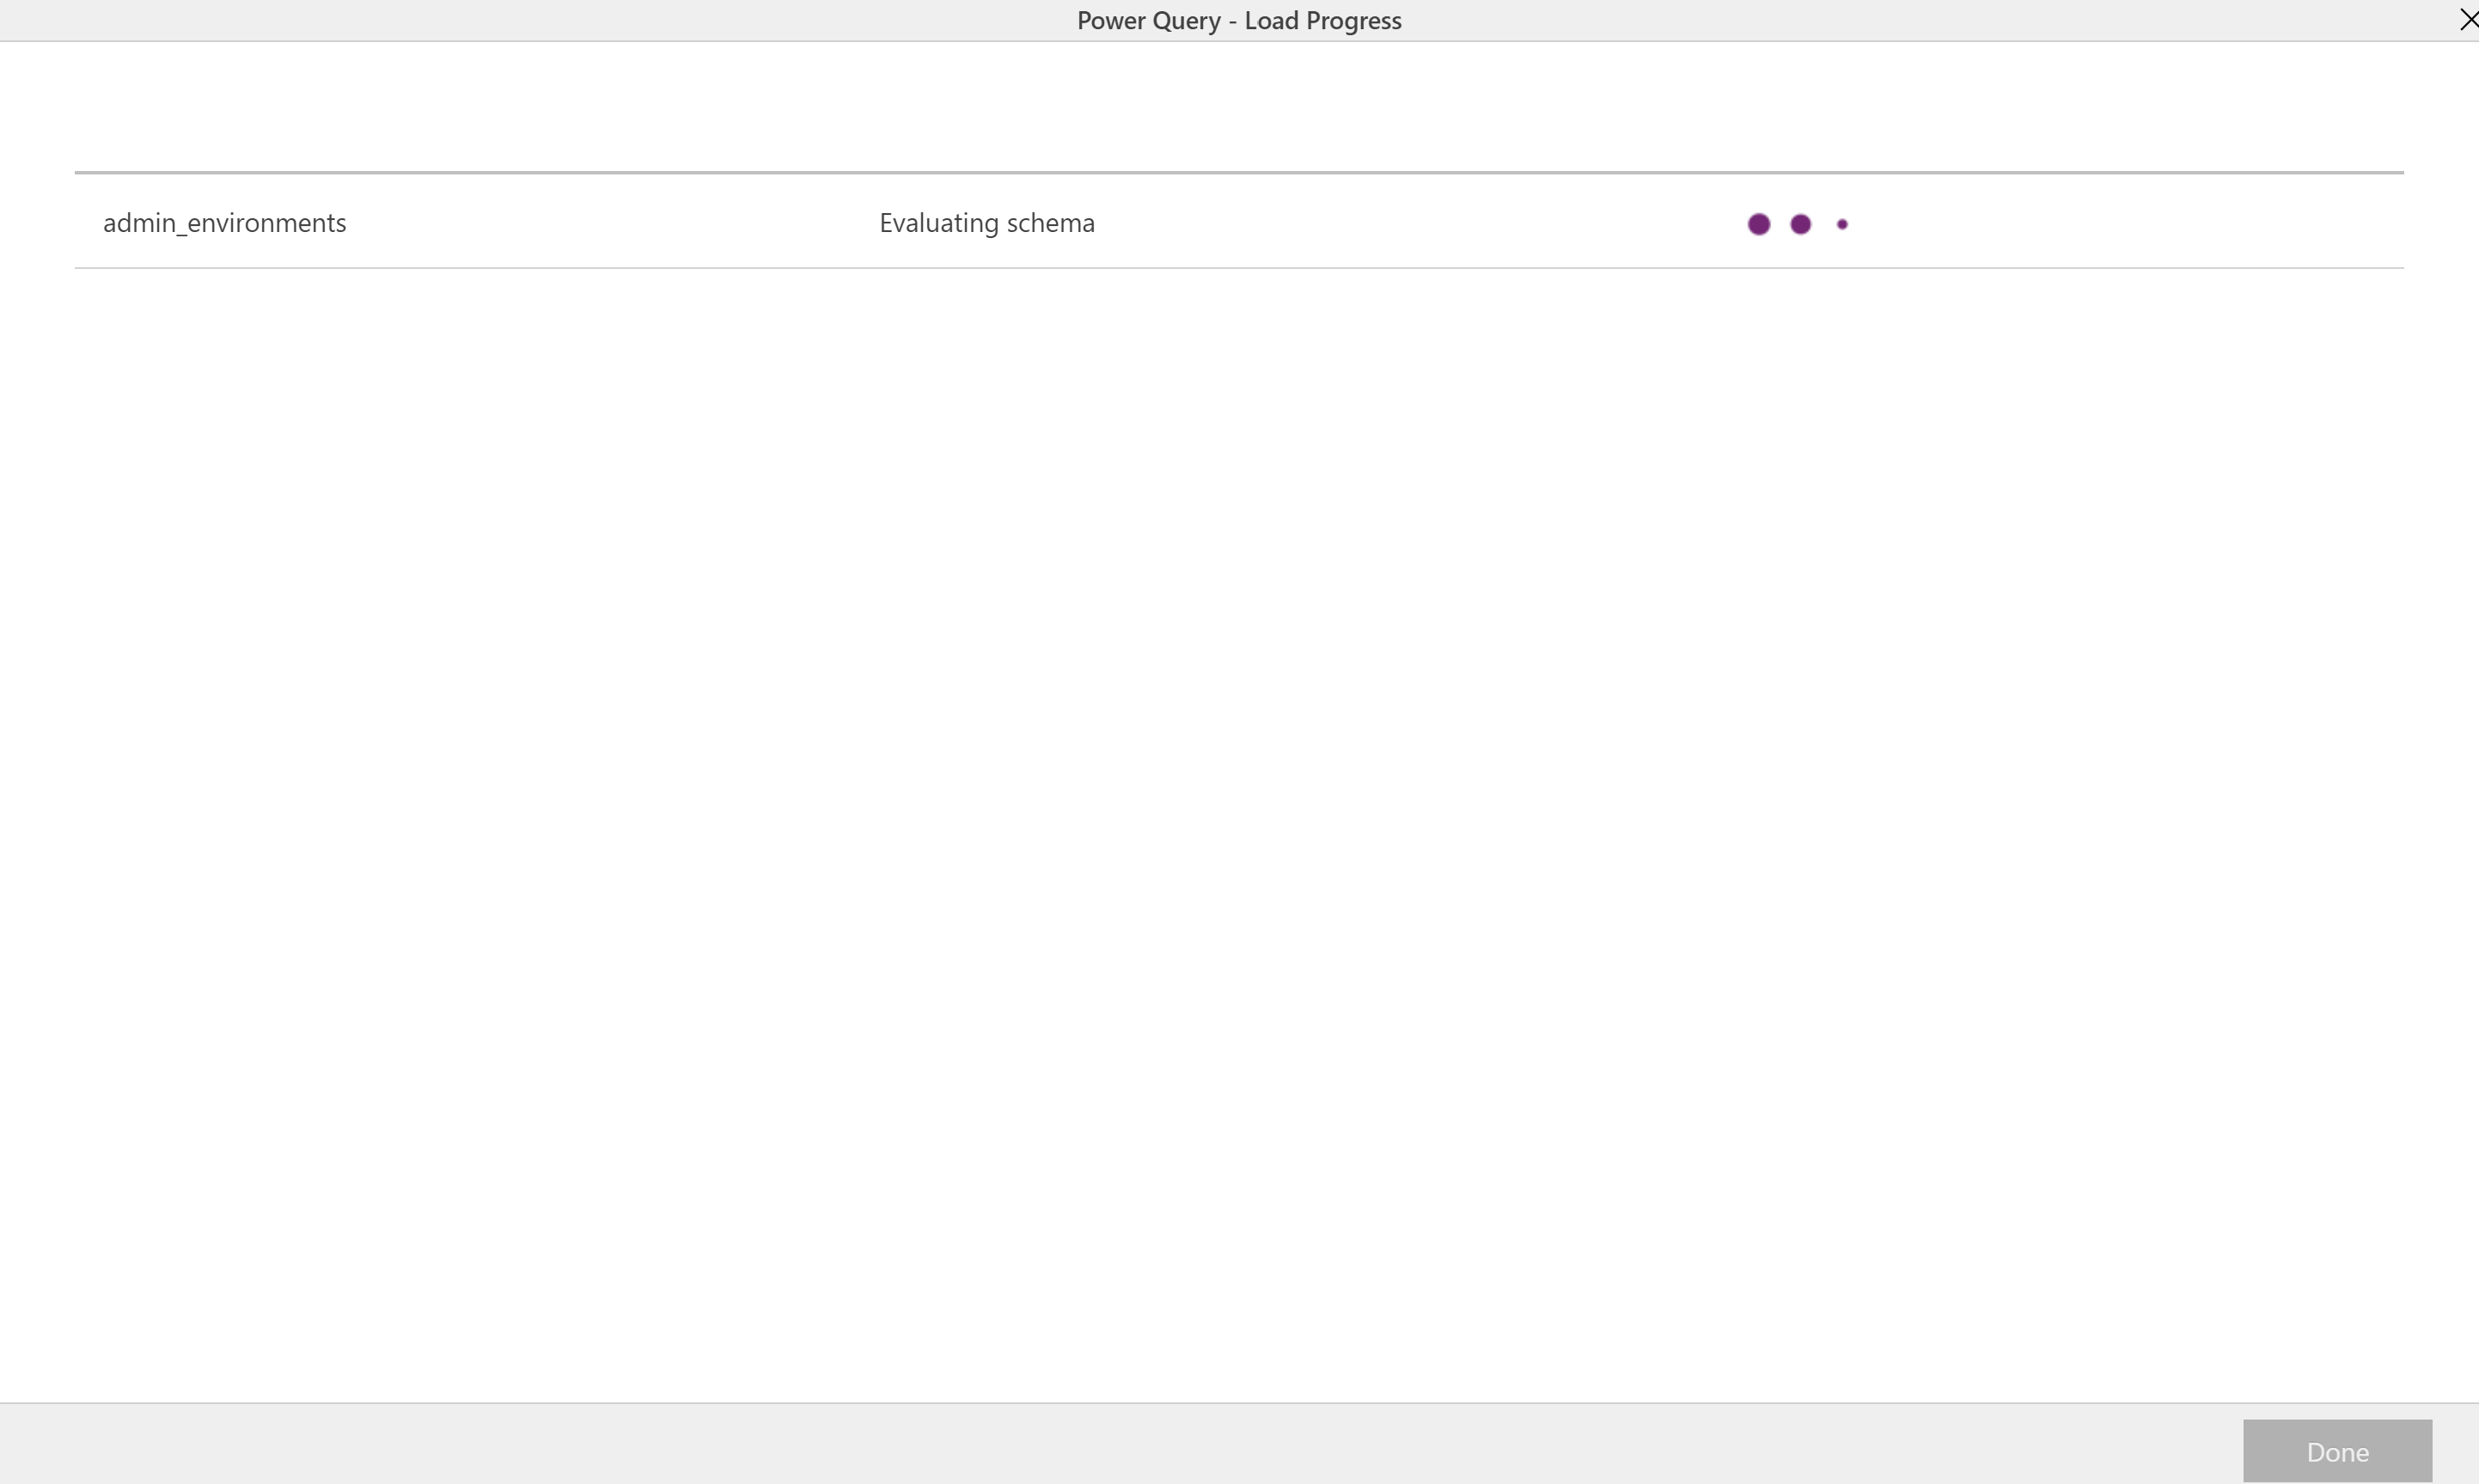
Step 6: Run the dataflow
When you select Create, you start the initial dataflow load.
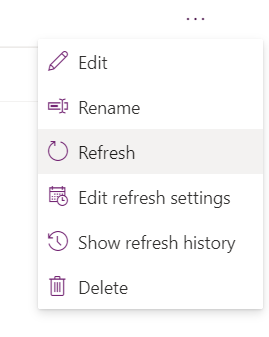
You can manually start a dataflow by selecting (...) in the dataflows list. Make sure to run dependent dataflows after the parent flows finish.
Tips
- Try one table first to walk through the steps, and then build out all the dataflows.
- If you have tables with large amounts of data, consider configuring multiple separate dataflows for individual tables.
- One-to-many relationships need separate dataflows for each table. Run the parent (one, or independent) table dataflow before the child table.
- If errors occur during the dataflow refresh, view the refresh history in the (...) menu in the dataflows list, and download each refresh log.
Limitations
- You can't import many-to-many relationship data.
- You need to manually configure parent dataflows to run before child dataflows.
- You can't map to Status and Status Reason fields. For more field mapping limitations, see Field mapping considerations for standard dataflows > Known limitations.