Note
Access to this page requires authorization. You can try signing in or changing directories.
Access to this page requires authorization. You can try changing directories.
Important
The Customer Summary form is renamed as Active Conversation form.
One of the major challenges that customers face when contacting customer support is repeatedly giving the same information about the issue to each customer support representative (support representative or representative) they talk to. And if they want to review the status of their request later, they have to share the same information with another support representative to explain the context of the engagement. To avoid this situation, representatives need access to all the information the customer has provided, including details about the product or service, issue, case history, related cases, and location.
Having this information ready can help representatives reduce the hold time that they spend retrieving customer information, reduce average handling time, and increase customer satisfaction by resolving issues faster.
What is Active Conversation?
Active Conversation (formerly Customer Summary) is a page that appears when you accept an incoming request from any channel and gives you complete information about a customer. The Active Conversation view provides the following sections:
- Customer (Contact or Account)
- Conversation summary
- Case
- Disposition code
- Recent cases
- Timeline
For active conversations, you can view the Active Conversation form on the representative dashboard of the Copilot Service workspace app. The Active Conversation form doesn't display details of closed conversations. To view closed conversations, use the Closed work items section of the representative dashboard. More information: View representative dashboard and conversations
If your administrator enabled the Customise active conversation form in Copilot Service admin center, you see the following options on the Active Conversation page:
- Save: You can edit and save standard and custom field values added to the Active Conversation form by your administrator. However, the following Logical column names aren't supported. If a default value is already set for a field, the value appears on the form automatically.
- Refresh: Refreshes the data in the form.
- Queue: The queue through which the conversation was assigned to you.
- Start time: The time when you started the conversation.
- Related: To select and navigate to the required entities.
Depending on the settings that are enabled for you, you see one of the following layouts:
If your administrator enabled the Enhanced Active conversation form in Copilot Service admin center, you see the enhanced Active Conversation page. The application displays the customer or account, and case details cards with inline edit capabilities. You can also view the Recent cases card with color coded priority and status fields.
Note
- The form selector to switch between Active Conversation and Closed Conversation is hidden. You can't switch to closed conversation form from the Active Conversation form while the conversation is still active or vice versa.
- You can see the form selector on the enhanced Active Conversation form if your administrator enabled it for you. More information: Display the form selector on Active Conversation form. However, if you use the form selector to switch to the closed conversation form, you see errors.


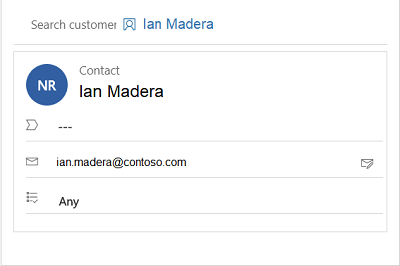
View customer details
This section provides details such as the contact name or account name. For a contact, you can view the location, email, and other details. For an account, you can view location, telephone number, and primary contact person for the account.
Use the customer section to search for an existing contact or account record, and select the record to link it to the conversation. If the record doesn't exist, you can create a new contact or account record by using the Add Contact or Add Account button, respectively. After you create it, search for the record and then select it to link it to the conversation.
Depending on the settings that are enabled for you, one of the following layouts is available:
- Enhanced Active Conversation—Customer Details
- Default Active Conversation—Customer(Contact or Account)
Displays the customer or account details. The fields displayed on this card are based on your administrator's configuration. For more information, go to Add the Customer 360 component to a case form.
You can edit the customer or account details inline, without navigating to another tab. However, if you see the default Customer(Contact or Account) card, the enhanced Customer Details experience for the Active Conversation form is disabled.

View case details
Use the Case section to search for an existing case, and select the case to link it to the conversation. If the record doesn't exist, you can create a new case by using the Add Case button. After you create it, search for the record and then select it to link it to the conversation. More information: Case management in multisession apps
Depending on the settings that are enabled for you, one of the following layouts is available:
Displays the details, configured by the owner of the case linked to the conversation. You can edit case details inline, without navigating to another tab. However, if you see the default Issue Snapshot card, the enhanced Case Details experience for the Active Conversation form isn't available for you.


Set disposition codes
If your administrator enables disposition codes, the Disposition Code section appears on the form. During the conversation, do the following steps:
Set Category to filter the available codes.
In Search codes, select the disposition code that best describes the outcome of the conversation.

Things to consider
In a consult or transfer scenario, the primary representative only in the conversation can add disposition codes.
You can select disposition codes associated with a specific workstream or those that are globally available in all workstreams.
You can select up to the maximum number of disposition codes set by your administrator. In transfer scenarios, the maximum number of disposition codes allowed is applicable to all primary representatives who are involved in the conversation journey. For example, the maximum number of disposition codes is two. Representative A adds two disposition codes and then transfers the chat to representative B who now becomes the primary representative. Representative B also can add two disposition codes.
Supervisors who join a conversation to monitor can't set disposition codes and the UI appears as disabled.
If disposition code is mandatory for closing a session and you're the primary representative, you must select a disposition code before you end the conversation.
For a closed conversation, you can view the disposition codes in the Conversation Form.
View recent cases
This section displays recent cases related to the customer.
Depending on the settings that are enabled for you, one of the following layouts appears:
Displays the recent cases raised by the customer. The fields displayed on this card are based on your administrator's configuration. For more information, go to Customize recent cases.
However, if you see the default Recent cases card, your administrator disabled the enhanced recent case experience for the Active Conversation form.


View Conversation summary
Conversation summary changes.
The Conversation summary section provides detailed information about the conversation between the representative and customer. The information shown in the Conversation details area includes the following:
Engagement channel: The channel, such as live chat or custom channel, through which the conversation is taking place.
Waiting time: The time the customer had to wait before the conversation was assigned to the representative.
Skills: The skills that had been attached for routing the conversation. If your administrator has enabled the setting for representatives to update skills, you can add or remove skills.
Queue: The queue through which the conversation has been assigned to you.
Start time: The time when you started the conversation.

In addition, the Conversation summary section includes several tabs:
- Pre-chat survey
- Self service
- Visitor details
- Other details, if they've been configured and other context variables are available
These tabs are described in the following sections.
View Pre-chat survey
The Pre-chat survey tab displays the customer's answers to the survey questions that were posed by your organization, which helps your interaction with the customer.
View Self service
The Self service tab displays information about the activities that the customer performed before starting a conversation with a representative. This information helps you understand why the customer reached out and helps you provide a personalized service for enhanced customer satisfaction. The activity information, which is categorized into the following action types, appears in reverse chronological order.
| Action type | Description |
|---|---|
| Page visited | The page visited on the portal, with time stamp. |
| Phrase searched | The keyword or phrase that was searched for, with time stamp. |
| Knowledge article viewed | The knowledge article viewed, with time stamp. |
| Custom action performed | Any other custom action that's tracked by your organization, with time stamp. |
To configure the appearance of the Self service tab, see Enable self-service settings for customer actions in a conversation summary.
View Visitor details
The Visitor details tab provides information such as whether the customer is authenticated, the browser the customer used to contact support, the operating system used by the customer, the customer's location, and the language used during the interaction.
If the customer has signed in to the portal to initiate the chat with a representative, the Authenticated field value is Yes; otherwise, the Authenticated field value is No.


To learn more, see Create chat authentication settings.
View Additional details
If your administrator or developer configured the Additional details tab and if any other context variables exist, they're displayed on the Additional details tab for live chat channels.
To learn more, see setContextProvider.
View Timeline
This section displays case-related and customer-related activities in the form of a timeline. You can create quick notes based on your discussion with the customer. Use the Linked records field to switch the timeline based on the case, contact, or account record linked to the conversation.
The Linked records field shows the record that's linked to the conversation. For example, if you link a contact and case to the conversation, the Linked records dropdown list shows Contact and Case, respectively.

Related information
Search for and share knowledge articles
View communication panel
Monitor real-time customer sentiment
View active conversation for an incoming conversation request
setContextProvider