Note
Access to this page requires authorization. You can try signing in or changing directories.
Access to this page requires authorization. You can try changing directories.
This tutorial shows how to create a Stream Analytics job that writes to a Delta table in Azure Data Lake Storage Gen2. In this tutorial, you learn how to:
- Deploy an event generator that sends sample data to your event hub
- Create a Stream Analytics job
- Configure Azure Data Lake Storage Gen2 with a Delta table
- Run the Stream Analytics job
Prerequisites
Before you start, complete the following steps:
- If you don't have an Azure subscription, create a free account.
- Deploy the TollApp event generator to Azure. Use this link to Deploy TollApp Azure Template. Set the
intervalparameter to 1. Create and use a new resource group for this step. - Create a Data Lake Storage Gen2 account.
Create a Stream Analytics job
Sign in to the Azure portal.
Select All services in the left menu.
Move the mouse over Stream Analytics jobs in the Analytics section, and select + (plus).

Select Create a resource in the upper left corner of the Azure portal.
Select Analytics > Stream Analytics job from the results list.
On New Stream Analytics job, follow these steps:
- For Subscription, select your Azure subscription.
- For Resource group, select the same resource that you used earlier in the TollApp deployment.
- For Name, enter a name for the job. Stream Analytics job name can contain alphanumeric characters, hyphens, and underscores only. It must be between 3 and 63 characters long.
- For Hosting environment, confirm that Cloud is selected.
- For Stream units, select 1. Streaming units represent the computing resources that are required to execute a job. To learn about scaling streaming units, see understanding and adjusting streaming units.

Select Review + create at the bottom of the page.
On Review + create, review settings, and select Create to create a Stream Analytics job.
On the deployment page, select Go to resource to go to the Stream Analytics job page.
Configure job input
The next step is to define an input source for the job to read data by using the event hub created in the TollApp deployment.
Find the Stream Analytics job created in the previous section.
In the Job Topology section of the Stream Analytics job, select Inputs.
Select + Add input and Event hub.

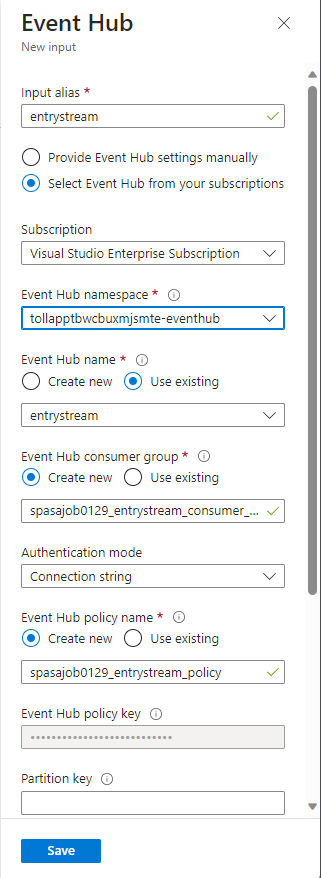
Fill out the input form with the following values created through TollApp Azure Template:
For Input alias, enter entrystream.
Choose Select Event Hub from your subscriptions.
For Subscription, select your Azure subscription.
For Event Hub namespace, select the event hub namespace you created in the previous section.
Use default options on the remaining settings and select Save.
Configure job output
The next step is to define an output sink where the job can write data. In this tutorial, you write output to a Delta table in Azure Data Lake Storage Gen2.
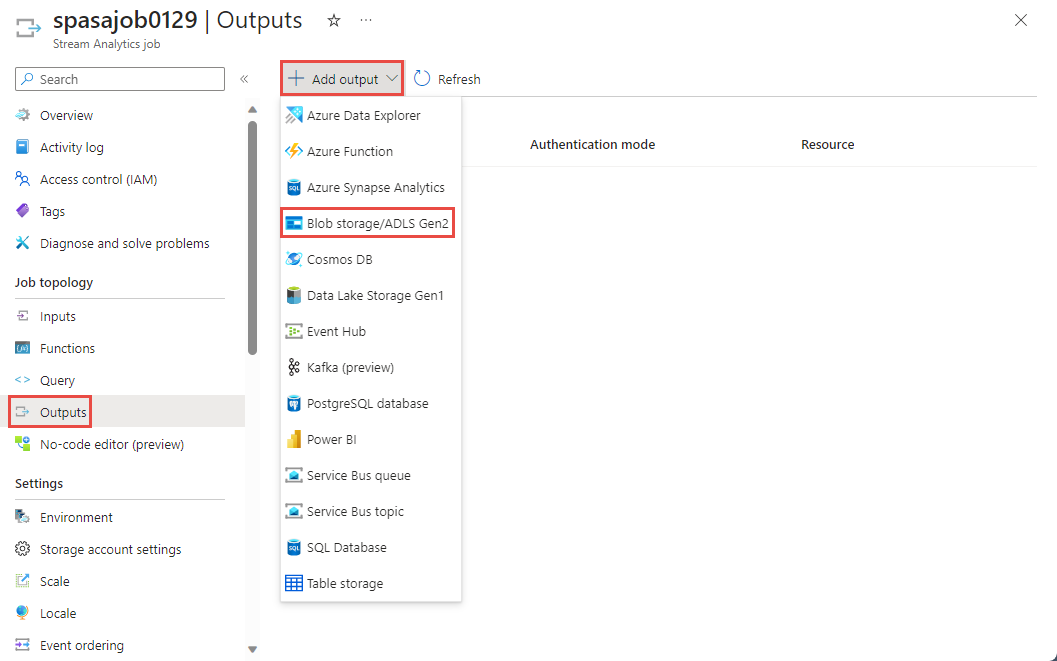
In the Job Topology section of the Stream Analytics job, select the Outputs option.
Select + Add output > Blob storage/ADLS Gen2.
Fill the output form with the following details and select Save:
For Output alias, enter DeltaOutput.
Choose Select Blob storage/ADLS Gen2 from your subscriptions.
For Subscription, select your Azure subscription.
For Storage account, choose the ADLS Gen2 account (the one that starts with tollapp) you created.
For container, select Create new and provide a unique container name.
For Event Serialization Format, select Delta Lake. Although Delta Lake is listed as one of the options here, it isn't a data format. Delta Lake uses versioned Parquet files to store your data. To learn more about Delta lake.
For Delta table path, enter tutorial folder/delta table.
Use default options on the remaining settings and select Save.

Create queries
At this point, you set up a Stream Analytics job to read an incoming data stream. The next step is to create a query that analyzes the data in real time. The queries use a SQL-like language that has some extensions specific to Stream Analytics.
Select Query under Job topology in the left menu.
Enter the following query into the query window. In this example, the query reads the data from Event Hubs and copies selected values to a Delta table in ADLS Gen2.
 SELECT State, CarModel.Make, TollAmount
 INTO DeltaOutput
 FROM EntryStream TIMESTAMP BY EntryTime
Select Save query on the toolbar.

Start the Stream Analytics job and check the output
Return to the job overview page in the Azure portal, and select Start.

On the Start job page, confirm that Now is selected for Job output start time, and then select Start at the bottom of the page.

After a few minutes, in the portal, find the storage account and the container that you configured as output for the job. You can now see the delta table in the folder specified in the container. The job takes a few minutes to start for the first time. After it starts, it continues to run as the data arrives.


Clean up resources
When you no longer need the resources, delete the resource group, the Stream Analytics job, and all related resources. Deleting the job stops billing for the streaming units the job consumes. If you plan to use the job in the future, you can stop it and restart it later when you need. If you aren't going to continue to use this job, delete all resources that you created in this tutorial by using the following steps:
- From the left-hand menu in the Azure portal, select Resource groups and then select the name of the resource you created.
- On your resource group page, select Delete, type the name of the resource to delete in the text box, and then select Delete.
Next steps
In this tutorial, you created a simple Stream Analytics job, filtered the incoming data, and wrote results in a Delta table in ADLS Gen2 account. To learn more about Stream Analytics jobs, see: