Note
Access to this page requires authorization. You can try signing in or changing directories.
Access to this page requires authorization. You can try changing directories.
In this article, you learn how to use an Azure Machine Learning AutoML Open Neural Network Exchange (ONNX) model to make predictions in a C# console application using ML.NET. ML.NET is an open-source, cross-platform, machine learning framework for the .NET ecosystem that lets you train and consume custom machine learning models. ML.NET supports a code-first approach like C# or F#, or low-code tooling like Model Builder and the ML.NET CLI.
The ML.NET framework is extensible so you can use other popular machine learning frameworks like TensorFlow and ONNX. ONNX is an open-source format for AI models that supports interoperability between frameworks. You can train a model in a popular machine learning framework like PyTorch, convert it into ONNX format, and consume the ONNX model in a different framework like ML.NET.
Prerequisites
- .NET 6 SDK or later.
- A command shell and text editor or an IDE such as Visual Studio or Visual Studio Code.
- An ONNX model. You can follow the NYC taxi data regression notebook to create an example model.
- Optionally, a tool like
Netronto inspect the ONNX model.
Create a C# console application
This example uses the .NET CLI to build your application. You can also use Visual Studio or another IDE.
Open a new terminal and create a new C# .NET console application named
AutoMLONNXConsoleApp. A directory with that name is created for your application.dotnet new console -o AutoMLONNXConsoleAppChange to the AutoMLONNXConsoleApp directory.
cd AutoMLONNXConsoleApp
Add software packages
ML.NET provides an API that uses the ONNX runtime for predictions. The Microsoft.ML, Microsoft.ML.OnnxRuntime, and Microsoft.ML.OnnxTransformer NuGet packages contain the dependencies required to use an ONNX model in a .NET application.
Install the packages.
dotnet add package Microsoft.ML
dotnet add package Microsoft.ML.OnnxRuntime
dotnet add package Microsoft.ML.OnnxTransformer
Edit the Program.cs file to add the following
usingdirectives at the top.using System.Linq; using Microsoft.ML; using Microsoft.ML.Data; using Microsoft.ML.Transforms.Onnx;
Add a reference to the ONNX model
Add a reference to your ONNX model file to your application. One way for the application to access the ONNX model is through the build output directory. For more information about MSBuild common items, see the MSBuild guide.
Copy your ONNX model and paste it into your application's AutoMLONNXConsoleApp root directory.
Edit the AutoMLONNXConsoleApp.csproj file to add the following code inside the
Projectnode. In this case, the name of the ONNX model file is automl-model.onnx.<ItemGroup> <None Include="automl-model.onnx"> <CopyToOutputDirectory>PreserveNewest</CopyToOutputDirectory> </None> </ItemGroup>Edit the Program.cs file to add the following line inside the
Programclass.static string ONNX_MODEL_PATH = "automl-model.onnx";Create a new instance of
MLContextin theMainmethod of theProgramclass.MLContext mlContext = new MLContext();
The MLContext class is a starting point for all ML.NET operations. Initializing mlContext creates a new ML.NET environment that can be shared across the model lifecycle. The class is conceptually similar to DbContext in Entity Framework.
Define the model data schema
A model expects input and output data in a specific format. ML.NET lets you define the format of your data via classes. The following table shows a sample from a model that uses data from the NYC Taxi Trip dataset.
| vendor_id | rate_code | passenger_count | trip_time_in_secs | trip_distance | payment_type | fare_amount |
|---|---|---|---|---|---|---|
VTS |
1 | 1 | 1140 | 3.75 | CRD |
15.5 |
VTS |
1 | 1 | 480 | 2.72 | CRD |
10.0 |
VTS |
1 | 1 | 1680 | 7.8 | CSH |
26.5 |
Inspect the ONNX model
If you don't already know what your data format looks like, you can use a tool like Netron to inspect the ONNX model. To use Netron to inspect your model's inputs and outputs:
Open
Netron.In the top menu bar, select File > Open and use the file browser to select your model.
Your model opens. For example, the structure of the
automl-model.onnxmodel looks like the following screenshot: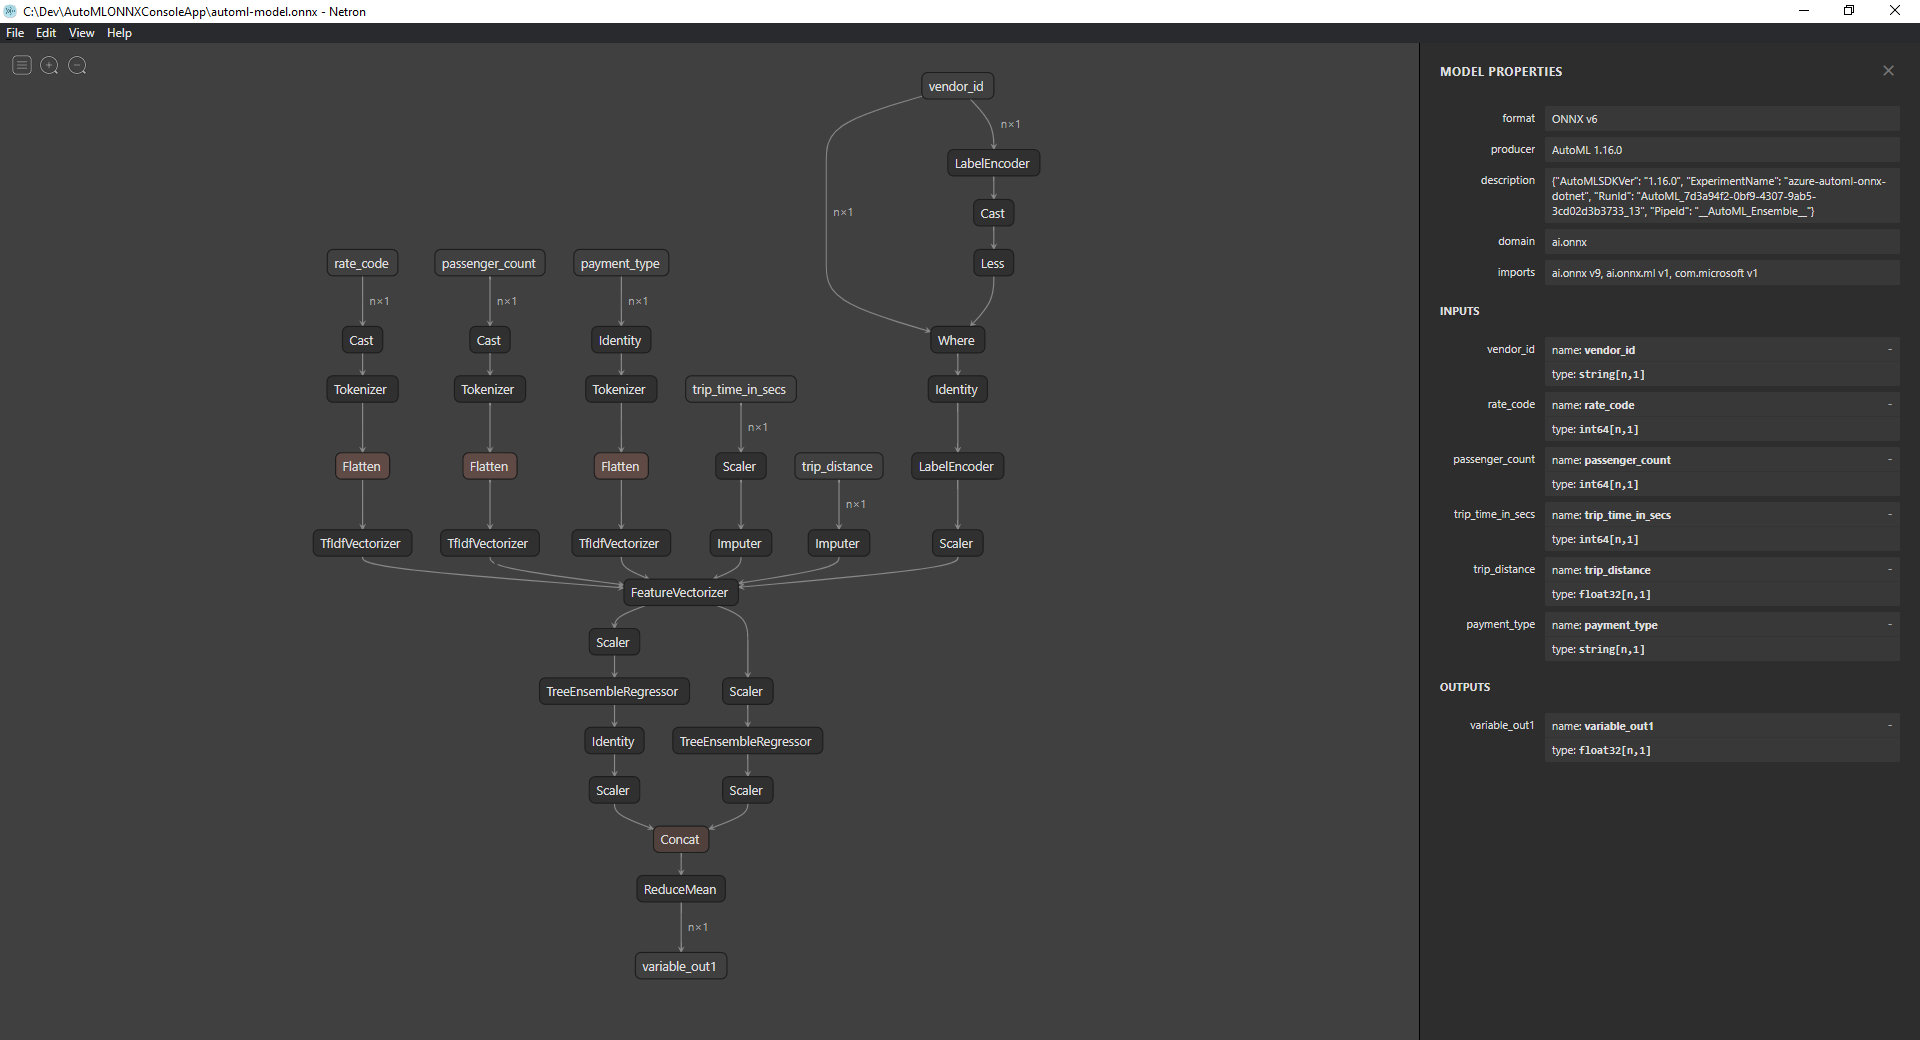
Select the last node at the bottom of the graph,
variable_out1in this case, to display the model's metadata. The inputs and outputs on the sidebar show you the model's expected inputs, outputs, and data types. Use this information to define the input and output schema of your model.

Define model input schema
In your Program.cs file, create a new class called OnnxInput with the following properties:
public class OnnxInput
{
    [ColumnName("vendor_id")]
    public string VendorId { get; set; }

    [ColumnName("rate_code"),OnnxMapType(typeof(Int64),typeof(Single))]
    public Int64 RateCode { get; set; }

    [ColumnName("passenger_count"), OnnxMapType(typeof(Int64), typeof(Single))]
    public Int64 PassengerCount { get; set; }

    [ColumnName("trip_time_in_secs"), OnnxMapType(typeof(Int64), typeof(Single))]
    public Int64 TripTimeInSecs { get; set; }

    [ColumnName("trip_distance")]
    public float TripDistance { get; set; }

    [ColumnName("payment_type")]
    public string PaymentType { get; set; }
}
Use data attributes
Each property maps to a column in the dataset. The properties are further annotated with attributes.
The
ColumnNameattribute lets you specify how ML.NET should reference the column when it operates on the data. For example, although theTripDistanceproperty follows standard .NET naming conventions, the model only has a column or feature calledtrip_distance. To address this naming discrepancy, theColumnNameattribute maps theTripDistanceproperty to the column or feature namedtrip_distance.For numerical values, ML.NET operates only on
Singlevalue types, but the original data types of some of the columns are integers. TheOnnxMapTypeattribute maps types between ONNX and ML.NET.
For more information about data attributes, see the ML.NET load data guide.
Define model output schema
Once the data is processed, it produces an output of a certain format. To define your data output schema, create a new class called OnnxOutput in the Program.cs file with the following properties:
public class OnnxOutput
{
    [ColumnName("variable_out1")]
    public float[] PredictedFare { get; set; }
}
Similar to OnnxInput, use the ColumnName attribute to map the variable_out1 output to the more descriptive name PredictedFare.
Define a prediction pipeline
A pipeline in ML.NET is typically a series of chained transformations that operate on the input data to produce an output. For more information about data transformations, see the ML.NET data transformation guide.
Create a new method called
GetPredictionPipelineinside theProgramclass.static ITransformer GetPredictionPipeline(MLContext mlContext) { }To define the input and output column names, add the following code inside the
GetPredictionPipelinemethod.var inputColumns = new string [] { "vendor_id", "rate_code", "passenger_count", "trip_time_in_secs", "trip_distance", "payment_type" }; var outputColumns = new string [] { "variable_out1" };Add code that defines your pipeline. An
IEstimatorprovides a blueprint of the operations and the input and output schemas of your pipeline.var onnxPredictionPipeline = mlContext .Transforms .ApplyOnnxModel( outputColumnNames: outputColumns, inputColumnNames: inputColumns, ONNX_MODEL_PATH);In this case,
ApplyOnnxModelis the only transform in the pipeline, which takes in the names of the input and output columns and the path to the ONNX model file.An
IEstimatoronly defines the set of operations to apply to your data. Use theFitmethod to create anITransformerfrom youronnxPredictionPipelineto operate on your data.var emptyDv = mlContext.Data.LoadFromEnumerable(new OnnxInput[] {}); return onnxPredictionPipeline.Fit(emptyDv);The
Fitmethod expects anIDataViewinput to perform the operations on. AnIDataViewrepresents data in ML.NET using a tabular format. In this case, the pipeline is only for predictions, so you can provide an emptyIDataViewto give theITransformerthe necessary input and output schema information. The fittedITransformeris then returned for further use in your application.Tip
This sample defines and uses the pipeline within the same application. However, it's best to use separate applications to define and use your pipeline for predictions. In ML.NET, your pipelines can be serialized and saved for further use in other .NET end-user applications.
ML.NET supports various deployment targets, such as desktop applications, web services, and WebAssembly applications. For more information about saving pipelines, see the ML.NET save and load trained models guide.
Inside the
Mainmethod, call theGetPredictionPipelinemethod with the required parameters.var onnxPredictionPipeline = GetPredictionPipeline(mlContext);
Use the model to make predictions
Now that you have a pipeline, you can use it to make predictions. ML.NET provides a convenience API for making predictions on a single data instance called PredictionEngine.
Inside the
Mainmethod, create aPredictionEngineby using theCreatePredictionEnginemethod.var onnxPredictionEngine = mlContext.Model.CreatePredictionEngine<OnnxInput, OnnxOutput>(onnxPredictionPipeline);Create a test data input.
var testInput = new OnnxInput
{
    VendorId = "CMT",
    RateCode = 1,
    PassengerCount = 1,
    TripTimeInSecs = 1271,
    TripDistance = 3.8f,
    PaymentType = "CRD"
};
Use the
onnxPredictionEngineto make predictions based on the newtestInputdata using thePredictmethod.var prediction = onnxPredictionEngine.Predict(testInput);Write the result of your prediction to the console.
Console.WriteLine($"Predicted Fare: {prediction.PredictedFare.First()}");Use the .NET CLI to run your application.
dotnet runThe result should look similar to the following output:
Predicted Fare: 15.621523
For more information about making predictions in ML.NET, see Use a model to make predictions.