Note
Access to this page requires authorization. You can try signing in or changing directories.
Access to this page requires authorization. You can try changing directories.
This article explains how to deploy IoT Hub with Azure Device Registry (ADR) integration and Microsoft-backed X.509 certificate management.
Important
Azure IoT Hub with ADR integration and Microsoft-backed X.509 certificate management is in public preview and isn't recommended for production workloads. For more information, see the FAQ: What is new in IoT Hub?
Prerequisites
- An active Azure subscription. If you don't have an Azure subscription, create a free account.
- Ensure that you have the privilege to perform role assignments within your target scope. Performing role assignments in Azure requires a privileged role, such as Owner or User Access Administrator at the appropriate scope.
- Select a supported region to deploy instances of IoT Hub, Azure Device Registry, and Device Provisioning Service.
Choose a deployment method
To use certificate management, you must also set up IoT Hub, ADR, and the Device Provisioning Service (DPS). If you prefer, you can choose not to enable certificate management and configure only IoT Hub with ADR.
To set up your IoT Hub with ADR integration and certificate management, you can use the Azure portal, Azure CLI, or a script that automates the setup process.
| Deployment method | Description |
|---|---|
| Select Azure portal at the top of the page | Use the Azure portal to create a new IoT Hub, DPS instance, and ADR namespace and configure all necessary settings. |
| Select Azure CLI at the top of the page | Use the Azure CLI to create a new IoT Hub, DPS instance, and ADR namespace and configure all necessary settings. |
| Select PowerShell script at the top of the page | Use a PowerShell script (Windows only) to automate the creation of a new IoT Hub, DPS instance, and ADR namespace and configure all necessary settings. |
Additional prerequisites for Azure portal
Before you begin, make sure you have:
- An Azure resource group to organize your IoT hub and related resources. Create the resource group and resources in a supported region. For more information, see Create a resource group.
- Assigned the Contributor role to the Azure IoT Hub service at the resource group level. When you select members during the role assignment, search for and select Azure IoT Hub from the list of service principals. For more information, see Assign Azure roles using the Azure portal.
Overview
Use the Azure portal to create an IoT hub with Azure Device Registry and certificate management integration.
The setup process in this article includes the following steps:
- Set up your ADR namespace with system-assigned managed identity and assign necessary roles.
- Create a custom credential policy for your namespace.
- Create an IoT hub linked to your ADR namespace with a user-assigned managed identity.
- Create a DPS instance and link it to your ADR namespace.
- Link your IoT hub to the DPS instance.
- Sync credential policies from your namespace to your IoT hubs.
- Create an enrollment group and assign a policy to enable device onboarding.
Important
During the preview period, IoT Hub with ADR integration and certificate management features enabled on top of IoT Hub are available free of charge. Device Provisioning Service (DPS) is billed separately and isn't included in the preview offer. For details on DPS pricing, see Azure IoT Hub pricing.
Set up your ADR namespace
In this section, you set up your Azure Device Registry (ADR) namespace, enable managed identities, assign the necessary contributor role, and create a custom credential policy. These steps prepare your environment to securely manage device identities and certificates, and ensure your IoT hub can use ADR for device onboarding and certificate management.
Create an ADR namespace with system-assigned managed identity
When you create a namespace with a system-assigned managed identity, the process also creates a credential known as root CA and a default policy known as intermediate CA. Certificate management uses these credentials and policies to onboard devices to the namespace.
Sign in to the Azure portal.
Search for and select Azure Device Registry.
Select Namespaces > Create.
On the Basics tab, fill in the fields as follows:
Property Value Subscription Select the subscription to use for your ADR namespace. Resource group Select or create the resource group that you want to use for your IoT hub. Name Enter a name for your ADR namespace. Your namespace name can only contain lowercase letters and hyphens ('-') in the middle of the name, but not at the beginning or end. For example, the name "msft-namespace" is valid. Region ADR integration and certificate management functionalities are in preview and only available in certain regions. See the supported regions. Select the region, closest to you, where you want your hub to be located. 
Select Next.
In the Identity tab, enable a system-assigned managed identity and a credential resource for your namespace. For more information about how ADR works with managed identities and credential resources, see What is certificate management.
- Managed identities allow your namespace to authenticate to Azure services without storing credentials in your code.
- Credential resources securely store and manage device authentication credentials, such as API keys or certificates, for devices connecting to your namespace. When you enable this feature, you can set policies to control how certificates are issued and managed for your devices.

Select Next.
In the Tags tab, you can optionally add tags to organize your ADR namespace. Tags are key-value pairs that help you manage and identify your resources. Use tags to filter and group your resources in the Azure portal.
Select Next.
Review your settings, then select Create to create your ADR namespace.
Note
The creation of the namespace with system-assigned managed identity might take up to five minutes.
Get the principal ID for your namespace
To complete some configuration steps after you create the IoT hub, you need the principal ID for your ADR namespace. This value is used to grant permissions and link resources securely.
- In the Azure portal, go to the ADR namespace you created.
- On the Overview page, at the top right-hand side, select JSON view.
- Locate the identity section and find the value for
principalId. - Copy the principal ID value to use with role assignments for your IoT hub instance.
Assign roles to your managed identity
After you create your ADR namespace, grant the required permissions to your user-assigned managed identity. The user-assigned managed identity is used to securely access other Azure resources, such as ADR namespace and DPS. If you don't have a user-assigned managed identity, create one in the Azure portal. For more information, see Create a user-assigned managed identity in the Azure portal.
First grant your user-managed identity the Azure Device Registry Onboarding role:
- In the same Access control (IAM) pane for your ADR namespace, select + Add > Add role assignment again.
- In the Role field, search for and select Azure Device Registry Onboarding. This role allows your managed identity to onboard devices using ADR credential policies.
- Select Next.
- In Assign access to, choose Managed identity.
- Select Select members, then choose User-assigned managed identity. Search for your identity and select it.
- Select Review + assign to finish. After the assignment propagates, your managed identity will have the necessary onboarding permissions.
Repeat these steps to assign the Azure Device Registry Contributor role:
- In the Azure portal, go to Home > Azure Device Registry > select your ADR namespace.
- In the left pane, select Access control (IAM).
- Select + Add > Add role assignment.
- In the Role field, search for and select Azure Device Registry Contributor. This role gives your managed identity the permissions ADR needs for setup and operation.
- Select Next.
- In Assign access to, choose Managed identity.
- Select Select members, then choose User-assigned managed identity. Search for your identity and select it.
- Select Review + assign to finish. After the assignment propagates, you can select the user-assigned managed identity when you create your IoT hub.
Create a custom policy for your namespace
Create custom policies within your ADR namespace to define how certificates are issued and managed for your devices. Policies allow you to set parameters such as certificate validity periods and subjects. Editing or disabling a policy isn't supported in preview.
In the Azure portal, search for and select Azure Device Registry.
Go to the Namespaces page.
Select your ADR namespace.
In the namespace page, under Namespace resources, select Credential policies (Preview).

Select Enable credential resource to turn on credential policies for your namespace, if they aren't already active.
In the Credential policies page, select + Create to create a new policy.
A pane appears where you can configure the policy settings. In the Basics tab, complete the fields as follows:
Property Value Name Enter a unique name for your policy. The name must be between 3 and 50 alphanumeric characters and can include hyphens ( '-').Validity period (days) Enter the number of days the issued certificates are valid. Select Next > Create.
After it's created, select Go to resource and select the namespace.
To review the policy, select Credential policies to see the policy name and validity period.

Create an IoT hub in Azure portal
In this section, you create a new IoT hub instance with the ADR namespace and your user-assigned managed identity.
In the Azure portal, search for and select Azure IoT Hub.
In the IoT Hub page, select + Create to create a new IoT hub.
On the Basics tab, complete the fields as follows:
Important
Because the IoT hub will be publicly discoverable as a DNS endpoint, be sure to avoid entering any sensitive or personally identifiable information when you name it.
Property Value Subscription Select the subscription to use for your hub. Resource group Select a resource group or create a new one. To create a new one, select Create new and fill in the name you want to use. IoT hub name Enter a name for your hub. This name must be globally unique, with a length between 3 and 50 alphanumeric characters. The name can also include the dash ( '-') character.Region ADR integration and certificate management functionalities are in preview and only available in certain regions. See the supported regions. Select the region, closest to you, where you want your hub to be located. Tier Select the Preview tier. To compare the features available to each tier, select Compare tiers. Daily message limit Select the maximum daily quota of messages for your hub. The available options depend on the tier you select for your hub. To see the available messaging and pricing options, select See all options and select the option that best matches the needs of your hub. For more information, see IoT Hub quotas and throttling. Device registry namespace Select the ADR namespace you created in the previous section. User-managed identity Select the user-assigned managed identity you associated to the ADR namespace and link it to your IoT hub. 
Note
Prices shown are for example purposes only.
Configure the networking, management, and add-ons settings
After you complete the Basics tab, configure your IoT hub by following these steps:
Select Next: Networking to continue creating your hub.
On the Networking tab, complete the fields as follows:
Property Value Connectivity configuration Choose the endpoints that devices can use to connect to your IoT hub. Accept the default setting, Public access, for this example. You can change this setting after the IoT hub is created. For more information, see IoT Hub endpoints. Minimum TLS Version Select the minimum TLS version supported by your IoT hub. Once the IoT hub is created, you can't change this value. Accept the default setting, 1.2, for this example. 
Select Next: Management to continue creating your hub.
On the Management tab, accept the default settings. If desired, you can modify any of the following fields:
Property Value Permission model Part of role-based access control, this property decides how you manage access to your IoT hub. Allow shared access policies or choose only role-based access control. For more information, see Control access to IoT Hub by using Microsoft Entra ID. Assign me You might need access to IoT Hub data APIs to manage elements within an instance. If you have access to role assignments, select IoT Hub Data Contributor role to grant yourself full access to the data APIs.
To assign Azure roles, you must haveMicrosoft.Authorization/roleAssignments/writepermissions, such as User Access Administrator or Owner.Device-to-cloud partitions This property relates the device-to-cloud messages to the number of simultaneous readers of the messages. Most IoT hubs need only four partitions. 
Select Next: Add-ons to continue to the next screen.
On the Add-ons tab, accept the default settings. If desired, you can modify any of the following fields:
Property Value Enable Device Update for IoT Hub Turn on Device Update for IoT Hub to enable over-the-air updates for your devices. If you select this option, you're prompted to provide information to provision a Device Update for IoT Hub account and instance. For more information, see What is Device Update for IoT Hub? Enable Defender for IoT Turn Defender for IoT on to add an extra layer of protection to IoT and your devices. This option isn't available for hubs in the free tier. For more information, see Security recommendations for IoT Hub in Microsoft Defender for IoT documentation. 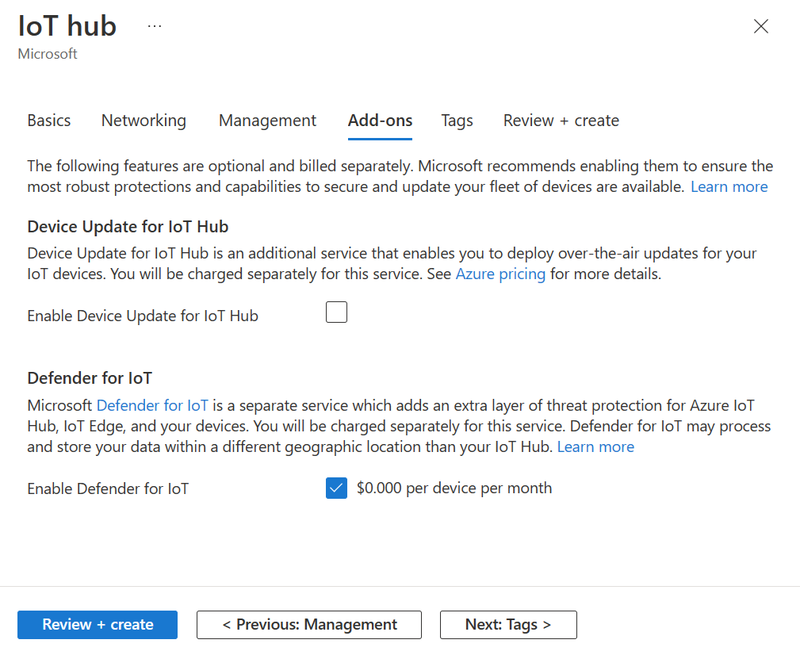
Note
Prices shown are for example purposes only.
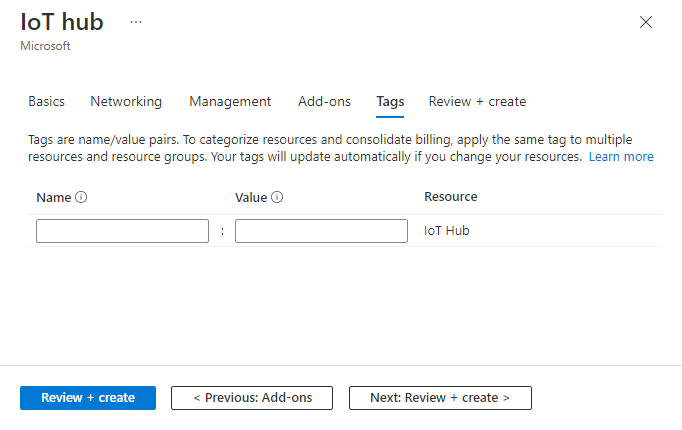
Select Next: Tags to continue to the next screen.
Tags are name/value pairs. You can assign the same tag to multiple resources and resource groups to categorize resources and consolidate billing. In this article, you don't add any tags. For more information, see Use tags to organize your Azure resources and management hierarchy.
Select Next: Review + create to review your choices.
Select Create to start the deployment of your new hub. Your deployment might progress for a few minutes while the hub is being created. Once the deployment is complete, select Go to resource to open the new hub.
Link your user-assigned managed identity to the IoT hub
After you create your IoT hub, you need to associate your user-assigned managed identity with the hub. This step enables the IoT hub to use the managed identity for secure access to other Azure resources, such as the ADR namespace.
- In the Azure portal, go to your IoT hub resource.
- In the left pane, under Security settings, select Identity.
- At the top of the Identity pane, select the User-assigned tab.
- Select Associate.
- Choose the user-assigned managed identity you used with your namespace and select Add.
Assign roles to the ADR namespace principal ID on your IoT hub
To enable secure integration between your IoT hub and ADR namespace, assign roles to the ADR namespace principal ID on your IoT hub instance. This step ensures the ADR namespace can manage device identities and registry operations in your hub.
- In the Azure portal, go to your IoT hub resource.
- In the left pane, select Access control (IAM).
- Select + Add > Add role assignment.
- In the Role field, select the Privileged administrator roles tab.
- Search for and select Contributor.
- Select Next.
- Select Select members, then paste in the ADR namespace principal ID you copied in a previous step. Select the matching identity.
- Select Review + assign to finish.
Repeat these steps to assign the IoT Hub Registry Contributor role:
- Select + Add > Add role assignment again.
- In the Role field, search for and select IoT Hub Registry Contributor.
- Select Next.
- In Assign access to, choose Managed identity.
- Select Select members, then paste in the ADR namespace principal ID you copied in a previous step. Select the matching identity.
- Select Review + assign to finish.
Create a DPS instance
After you create your IoT hub and your namespace, create a new DPS instance.
In the Azure portal, search for and select Device Provisioning Service.
In Device Provisioning Services, select + Create to create a new DPS instance.
On the Basics tab, complete the fields as follows:
Property Value Subscription Select the subscription to use for your Device Provisioning Service instance. Resource group Select the same resource group that contains the IoT hub that you created in the previous steps. By putting all related resources in a group together, you can manage them together. Name Provide a unique name for your new Device Provisioning Service instance. If the name you enter is available, a green check mark appears. Region Select the same region where you created your IoT hub and ADR namespace in the previous steps. 
Select Review + create to validate your provisioning service.
Select Create to start the deployment of your Device Provisioning Service instance.
After the deployment completes, select Go to resource to view your Device Provisioning Service instance.

Add your namespace to DPS
After you create your DPS instance, link it to your ADR namespace so devices can be provisioned using ADR credential policies.
In the Azure portal, go to the DPS instance you just created.
On the Overview page, find the ADR namespace section.
Select the link to add the namespace.

Select your ADR namespace and the user-assigned managed identity.
Select Save.

After the link is established, your DPS instance can use the ADR namespace for device provisioning and certificate management.
Link the IoT hub and your Device Provisioning Service instance
Add a configuration to the DPS instance that sets the IoT hub to which the instance provisions IoT devices.
In the Settings menu of your DPS instance, select Linked IoT hubs.
Select Add.
On the Add link to IoT hub panel, provide the following information:
Property Value Subscription Select the subscription containing the IoT hub that you want to link with your new Device Provisioning Service instance. IoT hub Select the IoT hub to link with your new Device Provisioning System instance. Access Policy Select iothubowner (RegistryWrite, ServiceConnect, DeviceConnect) as the credentials for establishing the link with the IoT hub. 
Select Save.
Select Refresh. You should now see the selected hub under the list of Linked IoT hubs.
Sync policies to IoT hubs
Synchronize a policy you created within your ADR namespace to the IoT hub linked to that namespace. This synchronization enables IoT Hub to trust any devices authenticating with a leaf certificate issued by the policy's issuing CA (ICA).
- In the Azure portal, go to the ADR namespace resource you created earlier.
- In the left pane, select Namespace resources > Credential policies (Preview).
- In the list, select the credential policy you want to synchronize.
- At the top, select Sync all.
- Wait for the confirmation message that indicates the synchronization succeeded.
If you select to sync more than one policy, the process syncs policies to their respective IoT hubs. You can't undo a sync operation.
Create an enrollment group and assign a policy
To provision devices with leaf certificates, you need to create an enrollment group and assign the policy you created within your ADR namespace. The allocation-policy defines the onboarding authentication mechanism DPS uses before issuing a leaf certificate. The default attestation mechanism is a symmetric key.
In the Azure portal, search for and select Device Provisioning Services.
Search for and select the DPS instance you created previously.
In the Settings menu of your DPS instance, select Manage enrollments.
In the Manage enrollments page, select either the Enrollment groups or Individual enrollments tab based on your provisioning needs.
Select + Add enrollment group or + Add individual enrollment to create a new enrollment.
In the Registration + provisioning page, complete the fields as follows:
Property Value Attestation mechanism Select X.509 intermediate certificate as the attestation method. X.509 certificate settings Upload the intermediate certificate files. Enrollments have one or two certificates, known as primary and secondary certificate files. Group name Enter a name for your enrollment group. Skip this field if you're creating an individual enrollment. Provisioning status Select Enabled to enable the enrollment from provisioning. Reprovision policy Specify the reprovisioning policy for the enrollment. This policy determines how the enrollment behaves during device reprovisioning. Select and complete IoT hubs and Device settings tabs as appropriate for your environment.
Select the Credential policies (Preview) tab and the Policy you want to assign to the enrollment group or individual enrollment.

Select Review + create and Create to finalize the enrollment.

Additional prerequisites for Azure CLI
Before you begin, make sure you have:
Azure CLI installed. Follow the steps to install the Azure CLI.
Installed the Azure IoT CLI extension with previews enabled to access the ADR integration and certificate management functionalities for IoT Hub:
Check for existing Azure CLI extension installations.
az extension listRemove any existing azure-iot installations.
az extension remove --name azure-iotInstall the azure-iot extension from the index with previews enabled,
az extension add --name azure-iot --allow-previewor download the .whl file from the GitHub releases page to install the extension manually.
az extension add --upgrade --source https://github.com/Azure/azure-iot-cli-extension/releases/download/v0.30.0b1/azure_iot-0.30.0b1-py3-none-any.whlAfter the install, validate your azure-iot extension version is at least 0.30.0b1.
az extension list
Overview
Use the Azure CLI commands to create an IoT Hub with ADR integration and certificate management.
The setup process in this article includes the following steps:
- Create a resource group
- Configure the necessary app privileges
- Create a user-assigned managed identity
- Create an ADR namespace with system-assigned managed identity
- Create a credential (root CA) and policy (issuing CA) scoped to that namespace
- Create an IoT Hub (preview) with linked namespace and managed identity
- Create a DPS with linked IoT Hub and namespace
- Sync your credential and policies (CA certificates) to IoT Hub
- Create an enrollment group and link to your policy to enable certificate provisioning
Important
During the preview period, IoT Hub with ADR integration and certificate management features enabled on top of IoT Hub are available free of charge. Device Provisioning Service (DPS) is billed separately and isn't included in the preview offer. For details on DPS pricing, see Azure IoT Hub pricing.
Prepare your environment
To prepare your environment to use Azure Device Registry, complete the following steps:
Open a terminal window.
To sign in to your Azure account, run
az login.To list all subscriptions and tenants you have access to, run
az account list.If you have access to multiple Azure subscriptions, set your active subscription where your IoT devices are created by running the following command.
az account set --subscription "<your subscription name or ID>"To display your current account details, run
az account show. Copy both of the following values from the output of the command, and save them to a safe location.- The
idGUID. You use this value to provide your Subscription ID. - The
tenantIdGUID. You use this value to update your permissions using Tenant ID.
- The
Configure your resource group, permissions, and managed identity
To create a resource group, role, and permissions for your IoT solution, complete the following steps:
Create a resource group for your environment.
az group create --name <RESOURCE_GROUP_NAME> --location <REGION>Assign a Contributor role to IoT Hub on the resource group level. The
AppIdvalue, which is the principal ID for IoT Hub, is89d10474-74af-4874-99a7-c23c2f643083and it's the same for all Hub apps.az role assignment create --assignee "89d10474-74af-4874-99a7-c23c2f643083" --role "Contributor" --scope "/subscriptions/<SUBSCRIPTION_ID>/resourceGroups/<RESOURCE_GROUP_NAME>"Create a new user-assigned managed identity (UAMI).
az identity create --name <USER_IDENTITY> --resource-group <RESOURCE_GROUP_NAME> --location <REGION>Retrieve the resource ID of the managed identity. You need the resource ID to assign roles, configure access policies, or link the identity to other resources.
UAMI_RESOURCE_ID=$(az identity show --name <USER_IDENTITY> --resource-group <RESOURCE_GROUP_NAME> --query id -o tsv)
Create a new ADR namespace
In this section, you create a new ADR namespace with a system-assigned managed identity. This process automatically generates a root CA credential and an issuing CA policy for the namespace. For more information on how credentials and policies are used to sign device leaf certificates during provisioning, see Certificate Management.
Note
Credentials are optional. You can also create a namespace without a managed identity by omitting the --enable-credential-policy and --policy-name flags.
Create a new ADR namespace. Your namespace
namemay only contain lowercase letters and hyphens ('-') in the middle of the name, but not at the beginning or end. For example, the name "msft-namespace" is valid.
The--enable-credential-policycommand creates credential (root CA) and default policy (issuing CA) for this namespace. You can configure the name for this policy using the--policy-namecommand. By default, a policy can issue certificates with a validity of 30 days.az iot adr ns create --name <NAMESPACE_NAME> --resource-group <RESOURCE_GROUP_NAME> --location <REGION> --enable-credential-policy true --policy-name <POLICY_NAME>Tip
You can optionally create a custom policy by adding the
--cert-subjectand--cert-validity-daysparameters. For more information, see Create a custom policy.Note
The creation of the ADR namespace with system-assigned managed identity might take up to 5 minutes.
Verify that the namespace with a system-assigned managed identity, or principal ID, is created.
az iot adr ns show --name <NAMESPACE_NAME> --resource-group <RESOURCE_GROUP_NAME>Verify that a credential and policy named are created.
az iot adr ns credential show --namespace <NAMESPACE_NAME> --resource-group <RESOURCE_GROUP_NAME>
az iot adr ns policy show --namespace <NAMESPACE_NAME> --resource-group <RESOURCE_GROUP_NAME> --name <POLICY_NAME>
Note
If you did not assign a policy name, the policy is created with the name "default".
Assign UAMI role to access the ADR namespace
In this section, you assign the Azure Device Registry Contributor role to the managed identity and scope it to the namespace. This custom role allows for full access to IoT devices within the ADR namespace.
Retrieve the principal ID of the User-Assigned Managed Identity. This ID is needed to assign roles to the identity.
UAMI_PRINCIPAL_ID=$(az identity show --name <USER_IDENTITY> --resource-group <RESOURCE_GROUP> --query principalId -o tsv)Retrieve the Resource ID of the ADR Namespace. This ID is used as the scope for the role assignment.
NAMESPACE_RESOURCE_ID=$(az iot adr ns show --name <NAMESPACE_NAME> --resource-group <RESOURCE_GROUP> --query id -o tsv)Assign the Azure Device Registry Contributor role to the managed identity. This role grants the managed identity the necessary permissions, scoped to the namespace.
az role assignment create --assignee $UAMI_PRINCIPAL_ID --role "a5c3590a-3a1a-4cd4-9648-ea0a32b15137" --scope $NAMESPACE_RESOURCE_ID
Create an IoT Hub with ADR integration
Create a new IoT Hub that is linked to the ADR namespace and with the UAMI created earlier.
az iot hub create --name <HUB_NAME> --resource-group <RESOURCE_GROUP> --location <HUB_LOCATION> --sku GEN2 --mi-user-assigned $UAMI_RESOURCE_ID --ns-resource-id $NAMESPACE_RESOURCE_ID --ns-identity-id $UAMI_RESOURCE_IDImportant
Because the IoT hub will be publicly discoverable as a DNS endpoint, be sure to avoid entering any sensitive or personally identifiable information when you name it.
Verify that the IoT Hub has correct identity and ADR properties configured.
az iot hub show --name <HUB_NAME> --resource-group <RESOURCE_GROUP> --query identity --output json
Assign IoT Hub roles to access the ADR namespace
Retrieve the principal ID of the ADR namespace's managed identity. This identity needs permissions to interact with the IoT Hub.
ADR_PRINCIPAL_ID=$(az iot adr ns show --name <NAMESPACE_NAME> --resource-group <RESOURCE_GROUP> --query identity.principalId -o tsv)Retrieve the resource ID of the IoT Hub. This ID is used as the scope for role assignments.
HUB_RESOURCE_ID=$(az iot hub show --name <HUB_NAME> --resource-group <RESOURCE_GROUP> --query id -o tsv)Assign the "Contributor" role to the ADR identity. This grants the ADR namespace's managed identity Contributor access to the IoT Hub. This role allows broad access, including managing resources, but not assigning roles.
az role assignment create --assignee $ADR_PRINCIPAL_ID --role "Contributor" --scope $HUB_RESOURCE_IDAssign the "IoT Hub Registry Contributor" role to the ADR identity. This grants more specific permissions to manage device identities in the IoT Hub. This is essential for ADR to register and manage devices in the hub.
az role assignment create --assignee $ADR_PRINCIPAL_ID --role "IoT Hub Registry Contributor" --scope $HUB_RESOURCE_ID
Create a Device Provisioning Service instance with ADR integration
Create a new DPS instance linked to your ADR namespace created in the previous sections. Your DPS instance must be located in the same region as your ADR namespace.
az iot dps create --name <DPS_NAME> --resource-group <RESOURCE_GROUP> --location <LOCATION> --mi-user-assigned $UAMI_RESOURCE_ID --ns-resource-id $NAMESPACE_RESOURCE_ID --ns-identity-id $UAMI_RESOURCE_IDVerify that the DPS has the correct identity and ADR properties configured.
az iot dps show --name <DPS_NAME> --resource-group <RESOURCE_GROUP> --query identity --output json
Link your IoT Hub to the Device Provisioning Service instance
Link the IoT Hub to your DPS.
az iot dps linked-hub create --dps-name <DPS_NAME> --resource-group <RESOURCE_GROUP> --hub-name <HUB_NAME>Verify that the IoT Hub appears in the list of linked hubs for the DPS.
az iot dps linked-hub list --dps-name <DPS_NAME> --resource-group <RESOURCE_GROUP>
Run ADR credential synchronization
Synchronize your credential and policies to the IoT Hub. This step ensures that the IoT Hub registers the CA certificates and trusts any leaf certificates issued by your configured policies.
az iot adr ns credential sync --namespace <NAMESPACE_NAME> --resource-group <RESOURCE_GROUP>
Validate the hub CA certificate
Validate that your IoT Hub has registered its CA certificate.
az iot hub certificate list --hub-name <HUB_NAME> --resource-group <RESOURCE_GROUP>
Create an enrollment in DPS
To provision devices using leaf certificates, create an enrollment group in DPS and assign it to the appropriate credential policy with the --credential-policy parameter.
The following command creates an enrollment group, using symmetric key attestation by default:
Note
If you created a policy with a different name from "default", ensure that you use that policy name after the --credential-policy parameter.
az iot dps enrollment-group create --dps-name <DPS_NAME> --resource-group <RESOURCE_GROUP> --enrollment-id <ENROLLMENT_ID> --credential-policy <POLICY_NAME>
Your IoT Hub with ADR integration and certificate management is now set up and ready to use.
Optional commands
The following commands help you manage your ADR namespaces, disable devices, create custom policies, and delete resources when they are no longer needed.
Manage your namespaces
List all namespaces in your resource group.
az iot adr ns list --resource-group <RESOURCE_GROUP_NAME>Show details of a specific namespace.
az iot adr ns show --name <NAMESPACE_NAME> --resource-group <RESOURCE_GROUP_NAME>List all policies in your namespace.
az iot adr ns policy list --namespace <NAMESPACE_NAME> --resource-group <RESOURCE_GROUP_NAME>Show details of a specific policy.
az iot adr ns policy show --namespace <NAMESPACE_NAME> --resource-group <RESOURCE_GROUP_NAME> --name <POLICY_NAME>List all credentials in your namespace.
az iot adr ns credential list --namespace <NAMESPACE_NAME> --resource-group <RESOURCE_GROUP_NAME>
Disable devices
List all devices in your IoT Hub.
az iot hub device-identity list --hub-name <HUB_NAME> --resource-group <RESOURCE_GROUP_NAME>Disable a device by updating its status to
disabled. Make sure to replace<MY_DEVICE_ID>with the device ID you want to disable.az iot hub device-identity update --hub-name <HUB_NAME> --resource-group <RESOURCE_GROUP_NAME> -d <MY_DEVICE_ID> --status disabledRun the device again and verify that it is unable to connect to an IoT Hub.
Create a custom policy
Create a custom policy using the az iot adr ns policy create command. Set the name, certificate subject, and validity period for the policy following these rules:
- The policy
namevalue must be unique within the namespace. If you try to create a policy with a name that already exists, you receive an error message. - The certificate subject
cert-subjectvalue must be unique across all policies in the namespace. If you try to create a policy with a subject that already exists, you receive an error message. - The validity period
cert-validity-daysvalue must be between 1 and 30 days. If you try to create a policy with a validity period outside this range, you receive an error message.
The following example creates a policy named "custom-policy" with a subject of "CN=TestDevice" and a validity period of 30 days.
az iot adr ns policy create --name "custom-policy" --namespace <NAMESPACE_NAME> --resource-group <RESOURCE_GROUP_NAME> --cert-subject "CN=TestDevice" --cert-validity-days "30"
Delete resources
To delete your ADR namespace, you must first delete any IoT Hubs linked to the namespace.
az iot hub delete --name <HUB_NAME> --resource-group <RESOURCE_GROUP_NAME>
az iot adr ns delete --name <NAMESPACE_NAME> --resource-group <RESOURCE_GROUP_NAME>
az iot dps delete --name <DPS_NAME> --resource-group <RESOURCE_GROUP_NAME>
az identity delete --name <USER_IDENTITY> --resource-group <RESOURCE_GROUP_NAME>
Overview
Use the provided PowerShell script to automate the setup of your IoT Hub with Azure Device Registry integration. The script performs all the necessary steps to create the required resources and link them together, including:
- Create a resource group
- Configure the necessary app privileges
- Create a user-assigned managed identity
- Create an ADR namespace with system-assigned managed identity
- Create a credential (root CA) and policy (issuing CA) scoped to that namespace
- Create an IoT Hub (preview) with linked namespace and managed identity
- Create a DPS with linked IoT Hub and namespace
- Sync your credential and policies (CA certificates) to IoT Hub
- Create an enrollment group and link to your policy to enable certificate provisioning
Important
During the preview period, IoT Hub with ADR integration and certificate management features enabled on top of IoT Hub are available free of charge. Device Provisioning Service (DPS) is billed separately and isn't included in the preview offer. For details on DPS pricing, see Azure IoT Hub pricing.
Prepare your environment
- Download PowerShell 7 for Windows.
- Navigate to the GitHub repository and download the Scripts folder, which contains the script file,
iothub-adr-certs-setup-preview.ps1.
Customize the script variables
Open the script file in a text editor and modify the following variables to match your desired configuration.
TenantId: Your tenant ID. You can find this value by runningaz account showin your terminal.SubscriptionId: Your subscription ID. You can find this value by runningaz account showin your terminal.ResourceGroup: The name of your resource group.Location: The Azure region where you want to create your resources. Check out the available locations for preview features in the Supported regions section.NamespaceName: Your namespace name may only contain lowercase letters and hyphens ('-') in the middle of the name, but not at the beginning or end. For example, "msft-namespace" is a valid name.HubName: Your hub name can only contain lowercase letters and numerals.DpsName: The name of your Device Provisioning Service instance.UserIdentity: The user-assigned managed identity for your resources.WorkingFolder: The local folder where your script is located.
Important
Because the IoT hub will be publicly discoverable as a DNS endpoint, be sure to avoid entering any sensitive or personally identifiable information when you name it.
Run the script interactively
Open the script and run in PowerShell 7+ as an administrator. Navigate to the folder containing your script and run
.\iothub-adr-certs-setup-preview.ps1.If you run into an execution policy issue, try running
powershell -ExecutionPolicy Bypass -File .\iothub-adr-certs-setup-preview.ps1.Follow the guided prompts:
- Press
Enterto proceed with a step - Press
sorSto skip a step - Press
Ctrl+Cto abort
- Press
Note
The creation of your ADR namespace, IoT Hub, DPS, and other resources may take up to 5 minutes each.
Monitor execution and validate the resources
The script continues execution when warnings are encountered and only stops if a command returns a non-zero exit code. Monitor the console for red ERROR messages, which indicate issues that require attention.
Once the script completes, validate the creation of your resources by visiting your new Resource Group on the Azure portal. You should see the following resources created:
- IoT Hub instance
- Device Provisioning Service (DPS) instance
- Azure Device Registry (ADR) namespace
- User-Assigned Managed Identity (UAMI)
Next steps
At this point, your IoT Hub with ADR integration and certificate management is set up and ready to use. You can now start onboarding your IoT devices to the hub using the Device Provisioning Service (DPS) instance and manage your IoT devices securely using the policies and enrollments you have set up.
New: Certificate management is supported across select DPS Device SDKs. You can now onboard devices using Microsoft-backed X.509 certificate management with the following SDK samples: