Note
Access to this page requires authorization. You can try signing in or changing directories.
Access to this page requires authorization. You can try changing directories.
This article provides a brief overview of management features for Azure Local virtual machine (VM) for disconnected operations. It covers the benefits, components, and high-level workflow. This feature closely mirrors Azure Local VM capabilities and references many Azure Local VM articles for connected operations. You learn about key differences and limitations of disconnected operations.
Overview
Azure Local VM management lets you set up and manage VMs in your on-premises Azure Local environment. IT admins can use Azure management tools to let users manage VMs and automate deployment.
For more information, see What is Azure Local VM management?
Supported operating system versions
Here's a list of supported OS versions:
- Windows Server 2022 and Windows Server 2025
- Windows 10 Enterprise
- Ubuntu 22.04 and 24.04 LTS
Limitations
Azure Local VMs running disconnected operations have the following limitations:
| Resource | Description |
|---|---|
| VM images | Create VM images from a local share. Marketplace, Azure storage account, and images from an existing Azure Local VM aren't supported. |
| Network interfaces | Create network interfaces in Azure CLI. This release doesn't support network interface creation in the Azure portal. |
| Storage paths | To delete storage paths from Azure CLI or portal, first delete any resources (VMs, images, disks) that are on the storage path. |
| Logical networks | You can see and use logical networks, but they might not fully load in the portal. |
| Proxy servers | Proxy servers aren't supported for outbound internet connections. |
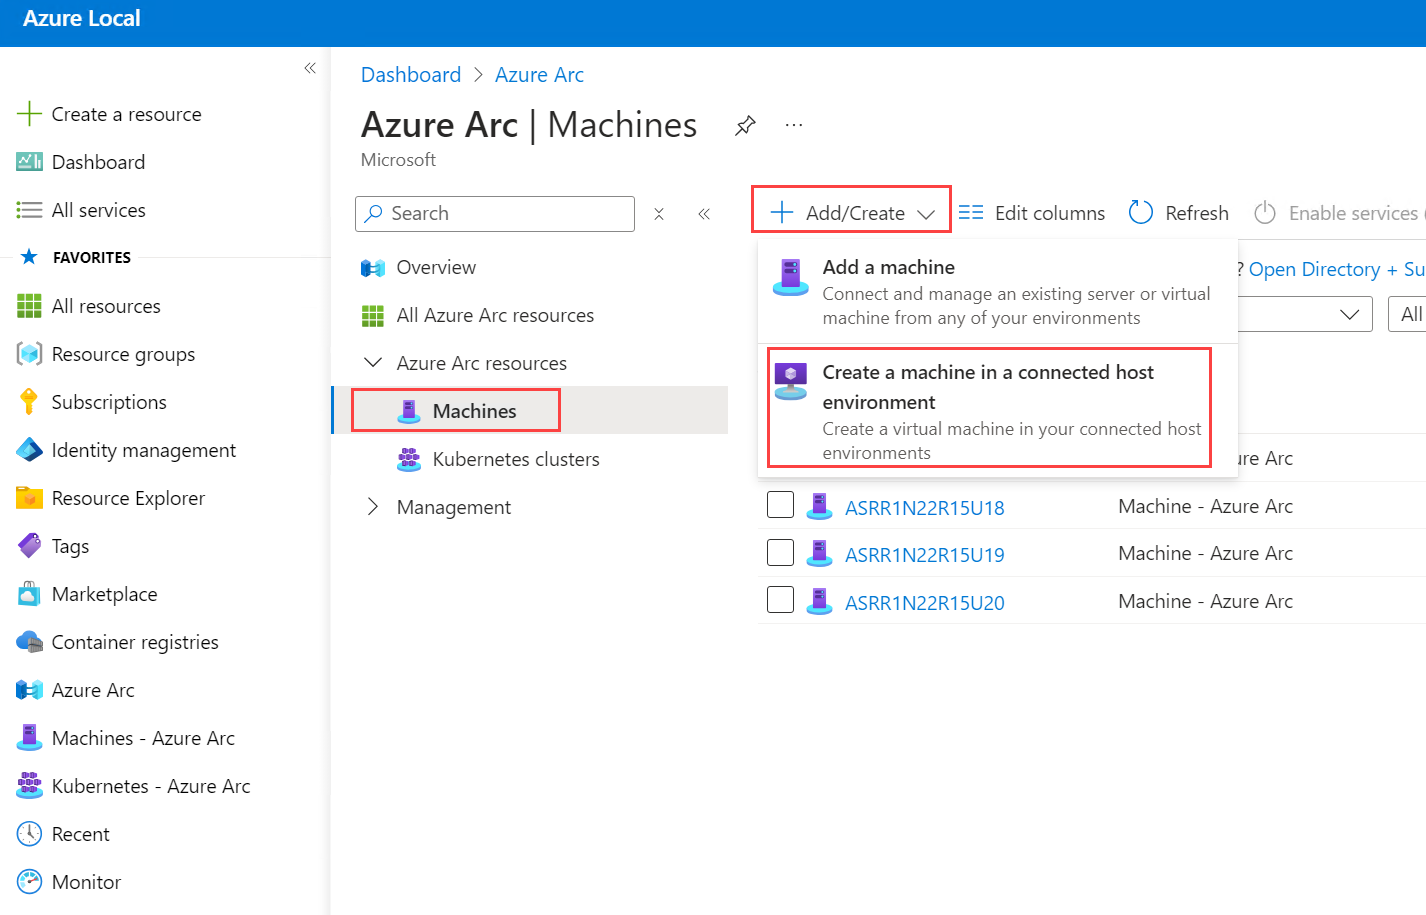
| VM creation | Create a VM in the portal by selecting Azure Arc > Machines > Add/Create > Create a machine in a connected host environment. For more information, see Create Azure Local VMs with disconnected operations (step 7) and Create Azure Local VMs. |
| Trusted launch (preview) | Create trusted launch for Azure Local VMs in Azure CLI. Other VM creation options aren't supported. Boot integrity verification isn't supported. For more information about Trusted launch for Azure Local VMs, see Overview for Trusted launch for Azure Local VMs enabled by Azure Arc. |
Create Azure Local VMs with disconnected operations
Follow these steps to create Azure Local VMs running disconnected operations.
Assign role-based access control (RBAC) roles. Use the built-in RBAC roles to control access to VMs and VM resources.
Create a storage path. Check the limitations section.
Here's an example script.
# Install the Azure CLI extension.

az extension add -n stack-hci-vm --version 1.3.0

# Az log in.

az login

# Check and update variables for your environment.
# Replace with your actual values

$subscriptionId = "<SubscriptionId>"  # The starter subscription Id
$resource_group = "disconnected-test-rg"
$customloc_name = "s-cluster-customlocation"
$customLocationID = "/subscriptions/$SubscriptionId/resourceGroups/$resource_group/providers/Microsoft.ExtendedLocation/customLocations/$customloc_name"
$location = "autonomous"

# Create resource group.

az group create -n $resource_group -l $location

# Create storage path.

az stack-hci-vm storagepath create `
    --resource-group $resource_group `
    --custom-location $customLocationID `
    --location $location `
    --path "C:\\ClusterStorage\\UserStorage_1\\VMPath" `
    --name "New_StoragePath"
$storagePathID=(az stack-hci-vm storagepath show --name "New_StoragePath" --resource-group $resource_group --query id -o tsv)
Create a VM image. The image should reside on a cluster shared volume available to all the machines in the instance. The default path can be C:\ClusterStorage. Check the limitations section.
Here's an example script.
curl.exe -o "C:\\ClusterStorage\\UserStorage_1\\testimage.vhdx" "https://ostempfolder.z13.web.core.windows.net/17763.30320.amd64fre.rs5_release_svc_asdb_2303b.230128-1700_client_enterprise_en-us_vl.vhdx"
az stack-hci-vm image create `
    --resource-group $resource_group `
    --custom-location $customLocationID `
    --location $location `
    --storage-path-id $storagePathID `
    --image-path "C:\\ClusterStorage\\UserStorage_1\\testimage.vhdx" `
    --name "test-gallery-image" `
    --os-type "Windows"
For an Ubuntu image, see Prepare Ubuntu image for Azure Local VM via Azure CLI.
Create logical network. Check the limitations section.
Here's an example script:
# Update vm-switch-name and IP addresses in address-prefixes, ip-pool-start, ip-pool-end, and gate for your environment.

# You can find them in: C:\CloudDeployment\FullEnvironment.json

# Find the “HostNetwork”, “Intents”, “Name” for the vm-switch-name. Take the vm-switch-name and put it in the parentheses of the example script. For example "ConvergedSwitch(NameFromJSON)"

# Find the "InfrastructureNetwork": section under “DeploymentData” to find the IP address details.

az stack-hci-vm network lnet create `
    --resource-group $resource_group `
    --custom-location $customLocationID `
    --location $location `
    --name "arcvm-lnet-static" `
    --vm-switch-name '"ConvergedSwitch(managementcomputestorage)"' `
    --ip-allocation-method "Static" `
    --address-prefixes "192.168.200.0/24" `
    --ip-pool-start "192.168.200.180" `
    --ip-pool-end "192.168.200.190" `
    --gateway "192.168.200.1" `
    --dns-servers "192.168.200.222"
Create network interfaces. Check the limitations section.
Here's an example script.
# Pick an IP address between ip-pool-start and ip-pool-end from LNET.

az stack-hci-vm network nic create `
    --resource-group $resource_group `
    --custom-location $customLocationID `
    --location $location `
    --name "arcvm-vnic" `
    --subnet-id "arcvm-lnet-static" `
    --ip-address "192.168.200.185"
Create Azure Local VMs. Check the limitations section.
Here's an example VM creation for disconnected operations on Azure Local using the portal:
Here's an example script to create a VM.
az stack-hci-vm create `
    --resource-group $resource_group `
    --custom-location $customLocationID `
    --location $location `
    --hardware-profile processors="4" memory-mb="8192" vm-size="Custom" `
    --nics "arcvm-vnic" `
    --storage-path-id $storagePathID `
    --computer-name "test-machine" `
    --admin-username "admin" `
    --admin-password "example" `
    --image "test-gallery-image" `
    --name "test-vm" `
    --enable-agent true
Here's an example script to create a VM with trusted launch enabled.
az stack-hci-vm create `
  --resource-group $resource_group `
  --custom-location $customLocationID `
  --location $location `
  --hardware-profile processors="4" memory-mb="8192" vm-size="Custom" `
  --nics "arcvm-vnic" `
  --storage-path-id $storagePathID `
  --computer-name "test-machine" `
  --admin-username "admin" `
  --admin-password "example" `
  --image "test-gallery-image" `
  --name "test-vm" `
  --security-type "TrustedLaunch" `
  --enable-secure-boot true `
  --enable-vtpm true `
  --enable-agent true

Manage Azure Local VMs and VM resources
To manage Azure Local VMs by using Azure CLI, see Azure Local VMs using the Azure CLI. To check the status of the VM, see Status of the VM.
Manage VM extensions
Supported VM extensions are Azure Monitor Agent and Custom Script.
To manage VM extensions, see Manage VM extensions on Arc-enabled VMs for Azure Local.
Related content
This feature is available only in Azure Local 2602 or later.