Hinweis
Für den Zugriff auf diese Seite ist eine Autorisierung erforderlich. Sie können versuchen, sich anzumelden oder das Verzeichnis zu wechseln.
Für den Zugriff auf diese Seite ist eine Autorisierung erforderlich. Sie können versuchen, das Verzeichnis zu wechseln.
When you create a new report, there are two main tasks. First, you define the report dataset of data items and columns. Then, you design the report layout. These steps show how to create a report based on a Word layout. Learn more about the report object in Report object and Report extension object.
How to create a new Word layout from Visual Studio Code
If you want to create a new Word layout from Visual Studio Code, do the following steps:
- Open the report object in Visual Studio Code.
- Navigate to the rendering section (or create one).
- Add a new layout entry of type Word and set the
LayoutFileproperty to a value that is a valid name for a Word file, such as 'MyWordReport.docx'. - Now build the extension (Ctrl+Shift+B) to generate the Word file that includes the Custom XML part.
Using Word to author your report layout
Microsoft Word offers various features to help you format and layout your document reports. You can customize the margins, page orientation, and line spacing to suit your needs. You can define advanced header/footers, utilize sections to change the layout style in different places of the report layout, and utilize fonts to get just the typography that matches your organization.
Learn more in Using Word to author your report layout.
Design guidelines for a report dataset designed for Word layouts
With Word layouts, Word is used as the editor for the report. The person designing the layout interacts with the labels, data items, and fields from the dataset from the data picker in the Word add-in (or using the legacy XML Mapping Pane). If you want users to be able to change the layout, consider using friendly names for labels, data items, and fields.
Using system dataitems
APPLIES TO: Business Central 2025 release wave 1 (v26) and later.
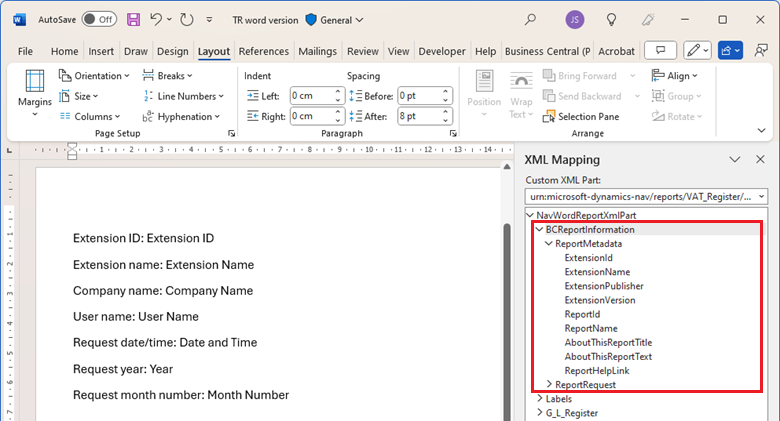
Similar to Excel layouts, you can access report and request metadata in a Word layout. As a layout designer, this information helps you understand a report dataset better. You can also add the metadata as controls on the Word layouts, making it available to users who run the report.
In Word layouts, metadata is available in the XML Mapping pane as columns in two system dataitems: ReportMetadata and ReportRequest.
These two dataitems aren't part of the report dataset but are only present in the Word layout XML.
Tip
Using metadata columns from system data items lets you skip adding common fields to the report dataset, such as company name and user name. This practice also ensures consistent naming and placement of these fields in the Word add-in data picker.
ReportMetadata
The ReportMetadata dataitem includes metadata columns that provide information from the report object.
| Metadata column | Description |
|---|---|
| ExtensionID | The unique ID (GUID) of the app or extension for the report. |
| ExtensionName | The name of the app or extension for the report. |
| ExtensionPublisher | The name of the publisher of the app or extension for the report. |
| ExtensionVersion | The version of the app or extension for the report. |
| ReportID | The object ID of the report. |
| ReportName | The object name of the report. |
| AboutThisReportTitle | The about this report title as declared in the Request Page setup in the AL report. |
| AboutThisReportText | The about this report text as declared in the Request Page setup in the AL report. |
| ReportHelpLink | Help link (if set up) in the extension and report object. |
ReportRequest
The ReportRequest dataitem includes metadata columns from the report request (the report invocation that created the document).
| Metadata column | Description |
|---|---|
| TenantEntraId | The Entra/AAD tenant ID of the environment. |
| EnvironmentName | The name of the environment. Might be empty for on-premises installations. |
| EnvironmentType | The environment type (Production or sandbox). Might be empty for on-premises installations. |
| CompanyName | The company name the user was operating in when running the report. |
| CompanyDisplayName | The display name for the company that the user was operating in when running the report. |
| CompanyId | The company ID (GUID). |
| UserName | The user who ran the report. |
| DateAndTime | The date and time of the report invocation. |
| Language | The application language identified (LCID, Windows language identifier). |
| FormatRegion | The format region applied to the report (specified as a culture tag such as 'en-US' or 'da-DK'). |
| DateTimeValues | The elements of the date (Year, MonthNumber, DayNumber) and time (Hour, Minute) of the report invocation. |
Report labels in Word layouts
Report labels are used by report layouts as, for example, the heading for a field in a table, the title for a chart, or the title for the report itself.
Report labels defined in the Labels section of the report object and captions included on dataitem columns using the IncludeCaption property are available as in the Labels part of the XML Mapping pane in Word:

Learn more about labels in Report labels.
Formatting data in Word layouts
It's often desirable to format data in a report in a different way than how the same data appears in tables, queries, or pages. For example, if a decimal field in a table has precision of five digits, the same level of precision might not be needed in the report.
Specifically for Word layouts, there's no way to control formatting of data elements in Word. Therefore, you need to do the formatting in the report dataset. Learn more in Formatting field values in report datasets.
How to iterate a Word layout over a data item
When you specify a data item in the WordMergeDataItem property, the Business Central Server iterates over that dataitem and does a "Mail merge" between that data item (and the ones below it) and the Word layout when rendering the report using the Word layout. This way, the Word layout is applied to each element in the specified data item.
Note
Before Business Central 2024 release wave 2, defining design elements like first pages, page numbers, and totals didn’t work properly in Word layouts that included sections. The elements would reset for each data item, causing errors when using the WordMergeDataItem property. Users would get an error message about conflicting section breaks: You cannot run the report because the {0} layout contains section breaks that conflict with the sections in the report. Remove the section breaks from the report layout, and then run the report. Starting from version 2024 release wave 2, this restriction is removed.
Learn more, including an example, in WordMergeDataItem Property.
How to do totals in Word layouts
Compared to the layout types Excel or RDL, it isn't possible to do calculations in a Word layout. If you want to add totals to your report, you need to calculate them in AL variables in the report object and then use a data item based on an Integer table to expose them to the XML Mapping pane in Word.
The following example illustrates how to code totals. The example is based on report 1306 "Standard Sales - Invoice" from the base application.
report 50142 "My Sales Invoice report"
{
  // report properties

  dataset
  {
    // In some dataitem here, vTotalAmount and vTotalVATBaseLCY are calculated in the OnAfterGetRecord trigger

    ...

    dataitem(Totals; "Integer")
    {
      // maybe some dataitem properties here

      column(TotalNetAmount; Format(vTotalAmount, 0, AutoFormat.ResolveAutoFormat("Auto Format"::AmountFormat, Header."Currency Code")))
      {
      }
      column(TotalVATBaseLCY; vTotalVATBaseLCY)
      {
      }
    }
  }

  // layouts defined here
  rendering {}

  // labels defined here
  labels {}

  ...

  protected var
    vTotalVATBaseLCY: Decimal;
    vTotalAmount: Decimal

}
Example: Create a Word layout report
The following example extends the Customer List page with a trigger that runs the report as soon as the Customer List page is opened.
Note
The Different first page and Different odd and even options for headers and footers in Word aren't supported for HTML conversion. If you select either of these options, the header and footer don't appear in rendered output, such as an Email Body.
Create a new extension to the Customer List page that contains code to run the report and a report object by adding the following lines of code:
pageextension 50100 MyExtension extends "Customer List"
{
  trigger OnOpenPage();
  begin
    report.Run(Report::MyWordReport);
  end;
}

report 50124 MyWordReport
{
}
Add the Customer table as the data item and the Name field as a column to the report by adding the following lines of code to the report. Learn more about defining a dataset in Report Dataset.
report 50124 MyWordReport
{
  WordMergeDataItem = Customer; // Set this if you want to iterate the report layout over each customer
  // Maybe also set other report properties

  dataset
  {
    dataitem(Customer; Customer)
    {
      column(Name; Name)
      {
      }
    }
  }

  rendering
  {
    layout(MyWordLayout)
    {
      Type = Word;
      Caption = 'Customer list for print';
      Summary = 'Customer list in Word that is designed for printing.';
      LayoutFile = 'MyWordReport.docx';
    }
  }
}
Build the extension (Ctrl+Shift+B) to generate the MyWordReport.docx file.
Open the generated report layout file in Word.
In Word, edit the layout using the XML Mapping Pane on the Developer tab.
Note
If you don't see the Developer tab, go to Options, then Customize Ribbon, and in the Main tabs section, select the Developer check box.
In Word in the Custom XML part lookup, locate the report, and then open the layout.
Right-click on the Customer table, and in Insert Content Control, select Repeating to add the repeater data item.
Right-click on the Name field and in Insert Content Control, select Plain Text to add the column as a text box.
Save the report layout when you're done and then close it.
Back in Visual Studio Code, select Ctrl+F5 to compile and run the report.
The generated report is displayed in preview mode.
Note
If the report layout isn't generated, open the settings.json from Visual Studio Code. Use Ctrl+Shift+P, then choose Preferences: Open User Settings, locate the AL Language extension. Under Compilation Options, choose Edit in settings.json and add the following line:
"al.compilationOptions": {
  "generateReportLayout": true
}
Tip
From the Business Central client, you can export report results as raw data to a Microsoft Excel file. The file contains all columns of the dataset, but without the layout applied. Use the file to help validate that the report returns the expected data, and to ensure that the report layout controls match the dataset value types. To export a report dataset to Excel, run the report and select the Send to > Microsoft Excel Document (data only) on the request page. For more information, see Working with Reports - Send to Excel.
Enabling the Microsoft Word rendering engine
APPLIES TO: Business Central versions 20, 21, and 22
An application feature key controls the rendering of Word reports. Enabling the key RenderWordReportsInPlatform in the Feature Management page in Business Central switches the Microsoft Word report rendering to the new platform rendering, which supports multiple layouts and new triggers for Save and Download actions.
Note
Application rendering is obsolete and will be deprecated in a future release. It's recommended to stay on the old platform if you have extensions that use custom Word layouts and therefore can't use the new platform, for example, because of dependencies on the OnBeforeMergeDocument or OnBeforeMergeWordDocument events.
The following AL snippet can be used in code to implement rendering differentiation in extensions.
 var
    FeatureKey: Record "Feature Key";
    PlatformRenderingInPlatformTxt: Label 'RenderWordReportsInPlatform', Locked = true;

// code snippet
if (FeatureKey.Get(PlatformRenderingInPlatformTxt) and (FeatureKey.Enabled = FeatureKey.Enabled::"All Users")) then
    // Platform rendering of Word reports, Custom layout types will be handled by the OnCustomDocumentMerger event
    ....
else
    // App rendering - The report type will be treated like a Word file and rendered by the application
    ...
Learn more about feature management in Enabling Upcoming Features Ahead of Time.
Report limit - maximum number of documents that can be merged in report
The Business Central platform has built-in limits to protect the stability of the system from a single report consuming too many resources. For example, there's a limit on the maximum number of documents that can be merged in a report using a Word layout.
Learn more about report limits in Report limits.
Difference between RDL and Word layouts
If you're switching from developing reports with RDL layouts to using Word layouts, you might need to change your mindset on how you develop reports and their layouts. RDL allows you to dynamically change many properties in the layout but it isn't possible in Word. For many logic-related conditions, you do them in the report dataset in AL and then utilize the methods outlined in this article.
For reports where you expect customers to adjust the layout or use themes to change the overall look-and-feel of the document, consider using a Word layout over an RDL layout.
How to create a new Word layout document from scratch
If you need an empty Word document that includes the custom XML part for a report's dataset, you have a few options depending on your Business Central version:
If you have access to the AL code for the report object, add a new layout in the Rendering section and compile. This generates a new Word file on your developer machine. Learn more Example: Create a Word layout report.
How to update a layout with the latest report dataset definition
APPLIES TO: Business Central 2024 release wave 2 and later.
The Report layouts page in the client, helps you update a layout with the latest report dataset definition.
Sign in to Business Central and open the Report layouts page.
Select the report in the list and then select Update and Export Layout.
The updated layout file is downloaded to your computer.
Open the updated layout file in Word. Then make changes and save the file.
In Business Central, import the updated layout either as a new layout, by using the New action, or as a replacement to the existing layout, by the Replace Layout action.
How to convert an RDL layout to a Word layout
There's no way to directly convert an RDL layout to a Word layout, but if you want to create a new Word layout based on an RDL layout, then do as follows:
- Create a new blank Word layout. To learn more, go to How to create a new Word layout document from scratch.
- Get a version of the report RDL layout rendered as a Word document:
- From the Report layouts page, find the RDL layout you want to base the new Word layout on.
- From the top pane menu, select the Run Report action. This opens the request page for the report.
- In the bottom of the request page, select the Send to... button. This opens a Choose file type... modal dialog.
- Select Microsoft Word Document and then choose the OK button. This downloads the report rendered as a Word document (where the dataset was merged with the layout and where the Custom XML part isn't present.).
- Mark all content that you want to base the new layout on from the rendered Word document and copy it to the empty Word layout that you created in step 1.
- Now it's time to adjust the Word document to make it a real layout:
- For each table, keep the header and remove all but one row with values. For the latter row, add a repeater from the XML Mapping pane. For the header row, add labels/captions from the XML Mapping pane.
- For each text not in a table, replace the text with the corresponding content control from the XML Mapping pane.
- For each image not in the dataset, encapsulate it with a table to control overflow. Consider resizing it.
- For each image in the dataset, replace the text with the corresponding content control from the XML Mapping pane.
- You can test the layout either by launching a new session from Visual Studio Code or directly from the Report layouts page:
- For the initial test of the new layout, from the Report layouts page, find the report you want to add the new Word layout to. From the top pane menu, select the New action to upload the layout for the first time.
- For subsequent tests of the new layout, from the Report layouts page, find the report you want to add the new Word layout to. From the top pane menu, select the Replace layout action to replace the layout with the latest version.
How to convert an existing document design to a Word layout
In implementation projects, a common specification for document layouts is to design them to match the client’s existing document layouts. There's no way to directly convert a PDF document to a Word layout, but if you want to create a new Word layout based on a PDF document, then do as follows:
Get a version of the PDF document as a Word document as follows:
- Open Word.
- From the File menu, select the Open action and find the PDF document. Select OK. This opens a dialog stating that "Word will now convert your PDF to an editable Word document". Select OK. The resulting Word document might not match the PDF 100%, but it's a start.
- If the PDF document is read-only, the resulting Word document is also read-only. In this case, mark all content by selecting Ctrl+a, copy to clipboard, create a new Word document, and paste the content in the new Word document.
Follow the step-by-step guide in the section How to convert an RDL layout to a Word layout, skipping the step Get a version of the report RDL layout rendered as a Word document.
How to compare two versions of a Word layout
If you need to compare two versions of a Word layout, then do as follows:
- Open Word.
- On the Review menu, select Compare Documents.
- In the Original document list, select the original document.
- In the Revised document list, browse to the other version of the document, and then select OK.
Learn more in Compare and merge two versions of a Word document.
Related information
Using hyperlinks in Word layouts
WordMergeDataItem property
Report design overview
Report object
Report extension object
Developing a custom report render
Creating an RDL layout report
Creating an Excel layout report