Bemærk
Adgang til denne side kræver godkendelse. Du kan prøve at logge på eller ændre mapper.
Adgang til denne side kræver godkendelse. Du kan prøve at ændre mapper.
Note
Community interest groups have now moved from Yammer to Microsoft Viva Engage. To join a Viva Engage community and take part in the latest discussions, fill out the Request access to Finance and Operations Viva Engage Community form and choose the community you want to join.
You might need to rotate the certificates used by your Dynamics 365 Finance + Operations (on-premises) environment as they approach their expiration date. This article shows you how to replace the existing certificates and update the references within the environment to use the new certificates.
Warning
Initiate the certificate rotation process well before the certificates expire. This timing is very important for the Data Encryption certificate, which could cause data loss for encrypted fields if it expires. For more information, see After certificate rotation.
Keep the old certificates in place until the certificate rotation process is complete. Removing them in advance causes the rotation process to fail.
Don't carry out the certificate rotation process on Service Fabric clusters running 7.0.x and 7.1.x.
Upgrade your Service Fabric cluster to 7.2.x or later before attempting certificate rotation.
Preparation steps
Update your infrastructure scripts by following the steps in Update your Infrastructure Scripts.
In the ConfigTemplate.xml file, configure certificates as you require. Follow the steps in Configure certificates. Specifically, follow these steps:
# Only run the first command if you have not generated the templates yet.
.\New-ADCSCertificates.ps1 -ConfigurationFilePath .\ConfigTemplate.xml -CreateTemplates
.\New-ADCSCertificates.ps1 -ConfigurationFilePath .\ConfigTemplate.xml
Note
The AD CS scripts need to run on a domain controller, or a Windows Server computer with Remote Server Admin Tools installed.
The AD CS functionality is only available with Infrastructure scripts release 2.7.0 and later.
Alternatively, if you want to continue to use self-signed certificates, run the following command.
# Create self-signed certs
.\New-SelfSignedCertificates.ps1 -ConfigurationFilePath .\ConfigTemplate.xml
Warning
Never use self-signed certificates in production environments. If you're using publicly trusted certificates, manually update the values of those certificates in the
ConfigTemplate.xmlfile.After you generate the certificates, run the following command.
# Exports certificates into a directory VMs\<VMName>. All certs are written to the infrastructure\Certs folder.
.\Export-Certificates.ps1 -ConfigurationFilePath .\ConfigTemplate.xml
Continue to set up VMs. Here are the specific steps that are required for this process:
Export the scripts that you must run on each VM.
# Exports the script files to be executed on each VM into a directory VMs\<VMName>.
.\Export-Scripts.ps1 -ConfigurationFilePath .\ConfigTemplate.xml
Copy the contents of each
infrastructure\VMs<VMName>folder into the corresponding VM. If you use remoting scripts, they automatically copy the content to the target VMs. Then, run the following script. Perform this step as an administrator.# If remoting, only execute # .\Configure-PreReqs-AllVMs.ps1 -MSIFilePath <share folder path of the MSIs> -ConfigurationFilePath .\ConfigTemplate.xml -ForcePushLBDScripts .\Configure-PreReqs.ps1 -MSIFilePath <path of the MSIs>Run the following script to ensure that all prerequisites are completed. Perform this step as an administrator.
# If remoting, only execute
# .\Complete-PreReqs-AllVMs.ps1 -ConfigurationFilePath .\ConfigTemplate.xml

.\Complete-PreReqs.ps1
Run the following script to validate the VM setup.
# If remoting, only execute
# .\Test-D365FOConfiguration-AllVMs.ps1 -ConfigurationFilePath .\ConfigTemplate.xml
.\Test-D365FOConfiguration.ps1
Run the following PowerShell command so that you have values that you can use in Lifecycle Services later. For more information, see Deploy your on-premises environment from Lifecycle Services.
.\Get-DeploymentSettings.ps1 -ConfigurationFilePath .\ConfigTemplate.xml
Activate new certificates within Service Fabric cluster
To simplify the certificate rotation process, use certificate common names (subject name) instead of thumbprints for your Service Fabric standalone cluster configuration. If you have an existing cluster and want to migrate from using thumbprints to using certificate common names, see Appendix A.
Service Fabric cluster with certificate common names
Service Fabric with certificates that aren't expired
No further action is required on the Service Fabric cluster. Service Fabric automatically detects the new certificates. Proceed with Update the LocalAgent certificates.
If you change the certificate common name, you must upgrade your Service Fabric cluster configuration.
Run the following script to generate an updated cluster configuration file.
.\Update-SFClusterConfig.ps1 -ConfigurationFilePath .\ConfigTemplate.xml -UpdateCommonNamesNote
If the issuers also change, use the following command instead.
.\Update-SFClusterConfig.ps1 -ConfigurationFilePath .\ConfigTemplate.xml -UpdateCommonNames -UpdateIssuersUpdate the Service Fabric cluster with the new configuration file. For more information, see Update the Service Fabric cluster configuration.
Service Fabric with certificates that are expired
If the cluster isn't available 10 minutes after you finish provisioning the new certificates to all nodes, consider restarting the nodes where the Service Fabric service isn't started.
If you change the certificate common name (subject name), the Service Fabric cluster won't start up. If you can't generate new certificates with the previous common name, you need to clean up and recreate the cluster.
Service Fabric with restricted certificate issuers
If you define the following sections for your cluster configuration, you restrict the allowed certificate issuers.
"ClusterCertificateIssuerStores": [
    {
        "IssuerCommonName": "sample-ca",
        "X509StoreNames": "Root"
    }
],
"ServerCertificateIssuerStores": [
    {
        "IssuerCommonName": "sample-ca",
        "X509StoreNames": "Root"
    }
],
"ClientCertificateIssuerStores": [
    {
        "IssuerCommonName": "sample-ca",
        "X509StoreNames": "Root"
    }
],
If the issuer of your new certificates differs from what is defined in these configurations, you must go through a cluster configuration upgrade to add the new issuers.
If you need to update the list of issuers, make the update while the existing certificates are still valid.
Run the following script to generate an updated cluster configuration file.
.\Update-SFClusterConfig.ps1 -ConfigurationFilePath .\ConfigTemplate.xml -UpdateIssuersUpdate the Service Fabric cluster with the new configuration file. For more information, see Update the Service Fabric cluster configuration.
Service Fabric cluster defined with certificate thumbprints
Service Fabric with certificates that aren't expired
Run the following script from a node that belongs to the Service Fabric cluster to generate an updated cluster configuration file.
.\Update-SFClusterConfig.ps1 -ConfigurationFilePath .\ConfigTemplate.xml -UpdateThumbprintsUpdate the Service Fabric cluster with the new configuration file. For more information, see Update the Service Fabric cluster configuration.
Service Fabric with or without expired certificates (cluster not accessible)
If the cluster isn't accessible, continue this process by following the steps in Troubleshoot on-premises deployments.
Update the LocalAgent certificates
Reinstall the LocalAgent in the following situations:
- You change the Service Fabric cluster or server certificate.
- You change the Service Fabric client certificate.
- You change the LocalAgent certificate.
Update your current localagent-config.json file by replacing the serverCertThumbprint and clientCertThumbprint values with the new thumbprints.
{
"serviceFabric": {
    "connectionEndpoint": "192.168.8.22:19000",
    "clusterId": "Orch",
    "certificateSettings": {
        "serverCertThumbprint": "New server thumbprint(Star/SF)",
        "clientCertThumbprint": "New client thumbprint"
    }
},
Run the following PowerShell command on one of the Orchestrator nodes.
.\LocalAgentCLI.exe Cleanup <path of localagent-config.json>Run the following PowerShell command and note the new LocalAgent thumbprint.
.\Get-AgentConfiguration.ps1 -ConfigurationFilePath .\ConfigTemplate.xmlFollow the steps in Configure Lifecycle Services connectivity for the tenant.
Note
If you receive the error Update to existing credential with KeyId '<key>' is not allowed, follow the instructions in Error: "Updates to existing credential with KeyId '<key>' is not allowed".
Continue with Configure a connector and install an on-premises local agent, specifically the following changes:
- Client certificate thumbprint
- Server certificate thumbprint
- Tenant service principal certificate thumbprint
Important
Do not create a new connector in Lifecycle Services. Update the configuration of your existing connector and download the settings file again.
Update your current deployment configuration
Note
This step is necessary only for local agent versions 3.2.2 and older. If you're using local agent version 3.2.3 or later, you can skip this step.
Because you updated your certificates, you must manually update the configuration file in your environment. If you don't update the configuration file, the clean-up job might fail. You only need to perform this manual update once.
Open the
config.jsonconfiguration file on your agent file share. This file is in a share similar to the following path:\\fileserver\agent\wp\environmentID\StandaloneSetup-123456. Run the following SQL statement on the orchestrator database to find the location of this file.select Location from DeploymentInstanceArtifact where AssetId='config.json' and DeploymentInstanceId = 'LCSENVIRONMENTID'Note
Replace LCSENVIRONMENTID with the ID of your environment. You can get this ID from the page for your environment in Lifecycle Services. This ID is the GUID value associated with your environment.
The beginning of the file should resemble the following example.
{
"serviceFabric": {
    "connectionEndpoint": "192.168.8.22:19000",
    "clusterId": "Orch",
    "certificateSettings": {
        "serverCertThumbprint": "Old server thumbprint(Star/SF)",
        "clientCertThumbprint": "Old client thumbprint"
    }
},
Replace the serverCertThumprint and clientCertThumbprint values with the new thumbprints.
{
"serviceFabric": {
    "connectionEndpoint": "192.168.8.22:19000",
    "clusterId": "Orch",
    "certificateSettings": {
        "serverCertThumbprint": "New server thumbprint(Star/SF)",
        "clientCertThumbprint": "New client thumbprint"
    }
},
Save and close the file. Close any programs that are accessing this network location. Otherwise, the clean-up process might fail.
Rotate Credentials.json
If you generate a new axdataencipherment certificate, re-encrypt the Credentials.json file.
Note
Make sure that you run the script from an Application Object Server (AOS) node.
.\Configure-CredentialsJson.ps1 -ConfigurationFilePath .\ConfigTemplate.xml -Action Rotate
Alternatively, if you also want to rotate the existing credentials, follow these steps:
Decrypt the Credentials.json file.
.\Configure-CredentialsJson.ps1 -ConfigurationFilePath .\ConfigTemplate.xml -Action DecryptOpen the Credentials.json file, and update any credentials that you want to update.
Re-encrypt the Credentials.json file.
.\Configure-CredentialsJson.ps1 -ConfigurationFilePath .\ConfigTemplate.xml -Action Encrypt
Update deployment settings in Lifecycle Services
Note
The process replaces only the Client, Data Signing, and Encipherment certificates.
Before you continue, back up the local Dynamics database.
In Lifecycle Services, select the Full Details link for the environment where you want to change the certificates.
Select Maintain and then select Update Settings.

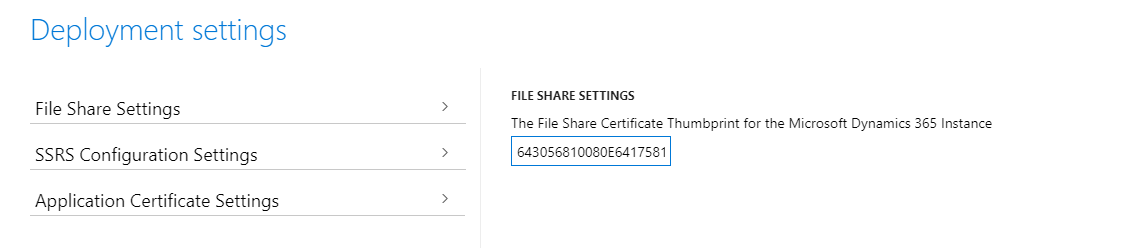
- Change the thumbprints to the new thumbprints that you previously configured. You can find them in the
ConfigTemplate.xmlfile in theInfrastructureScriptsfolder.

Select Prepare.
After the preparation finishes, the Update environment button displays.

Select Update environment to start updating your environment.
During the update, the environment is unavailable.
After the environment is successfully updated with the new certificates, you can view the new thumbprints in Service Fabric Cluster Explorer. The names of the thumbprints in Service Fabric Explorer might differ from the names in Lifecycle Services. However, the values should be the same.
Here's an example of how the name of the same thumbprint might differ.


Update other certificates as needed
Always check if the SQL server certificate is expired. For more information, see Set up SQL Server.
Check to be sure that the Active Directory Federation Service (ADFS) certificate isn't expired.
Clean up old Service Fabric certificates thumbprints
Note
Run the following steps only if you're using a Service Fabric cluster defined with certificate thumbprints. If you're using common names, you can skip this step.
Complete this procedure after a successful certificate rotation or before the next certificate rotation.
Run the following script to generate an updated cluster configuration file.
.\Update-SFClusterConfig.ps1 -ConfigurationFilePath .\ConfigTemplate.xml -RemoveOldThumbprintsUpdate the Service Fabric cluster with the new configuration file. For more information, see Update the Service Fabric cluster configuration.
After certificate rotation
Data encryption certificate
Use this certificate to encrypt data that you store in the database. By default, the system encrypts specific fields by using this certificate. You can check those fields in Document the values of encrypted fields. However, you can use the API to encrypt other fields as needed.
In Platform update 33 and later, the Encrypted data rotation system job batch job uses the newly rotated certificate to re-encrypt data. This batch job crawls through your data to re-encrypt all the encrypted data by using the new certificate. The job runs for two hours each day until all the data is re-encrypted. To enable the batch job, you must enable a flight and a configuration key. Run the following commands against your business database (for example, AXDB).
IF (EXISTS(SELECT * FROM SYSFLIGHTING WHERE [FLIGHTNAME] = 'EnableEncryptedDataCrawlerRotationTask'))
    UPDATE SYSFLIGHTING SET [ENABLED] = 1 WHERE [FLIGHTNAME] = 'EnableEncryptedDataCrawlerRotationTask'
ELSE
    INSERT INTO SYSFLIGHTING ([FLIGHTNAME],[ENABLED],[FLIGHTSERVICEID]) VALUES ('EnableEncryptedDataCrawlerRotationTask', 1, 0)

IF (EXISTS(SELECT * FROM SECURITYCONFIG WHERE [KEY_] = 'EnableEncryptedDataRotation'))
    UPDATE SECURITYCONFIG SET [VALUE] = 'True' WHERE [KEY_] = 'EnableEncryptedDataRotation'
ELSE
    INSERT INTO SECURITYCONFIG ([KEY_], [VALUE]) VALUES ('EnableEncryptedDataRotation', 'True')
After you run the commands, restart your AOS nodes from Service Fabric Explorer. AOS detects the new configuration and schedules the batch job to run during off hours. After the batch job is created, you can modify the schedule from the user interface.
Warning
Make sure that you don't remove the old data encryption certificate before all encrypted data is re-encrypted, and that it isn't expired. Otherwise, data might be lost.
Appendix A
Using certificate common names instead of thumbprints to describe your Service Fabric cluster configuration eases future certificate rotation operations because the Service Fabric cluster automatically switches to using new certificates once they're available in the machine. Service Fabric doesn't accept any certificate. However, the certificate that you provide must match the subject name that you define in the Service Fabric cluster. Additionally, the issuer of the certificate must match the issuer that you also specify in the configuration. For more information on how Service Fabric uses common names, see Common name-based certificate validation declarations. For more information about how to secure standalone Service Fabric clusters, see Secure a standalone cluster on Windows by using X.509 certificates.
Run the following script to generate an updated cluster configuration file.
.\Update-SFClusterConfig.ps1 -ConfigurationFilePath .\ConfigTemplate.xml -UpgradeToCommonNamesNote
In some cases, you might choose not to restrict the issuer of the certificates in the Service Fabric cluster configuration. While this choice isn't recommended, you can achieve it by using the following command.
.\Update-SFClusterConfig.ps1 -ConfigurationFilePath .\ConfigTemplate.xml -UpgradeToCommonNames -DoNotRestrictCertificateIssuersUpdate the Service Fabric cluster with the new configuration file. For more information, see Update the Service Fabric cluster configuration.