Bemærk
Adgang til denne side kræver godkendelse. Du kan prøve at logge på eller ændre mapper.
Adgang til denne side kræver godkendelse. Du kan prøve at ændre mapper.
This article shows you how to migrate machines as physical servers to Azure by using the Azure Migration and modernization tool. Migrating machines by treating them as physical servers is useful in many scenarios:
- Migrate on-premises physical servers.
- Migrate virtual machines (VMs) virtualized by platforms such as Xen and KVM.
- Migrate Hyper-V or VMware VMs, if you're unable to use the standard migration process for Hyper-V or VMware agentless migration.
- Migrate VMs running in private clouds.
- Migrate VMs running in public clouds, such as Amazon Web Services (AWS) or Google Cloud Platform (GCP).
In this tutorial, you learn how to:
- Prepare Azure with required permissions to use Azure Migrate.
- Check requirements for machines you want to migrate. Prepare a machine for the Azure Migrate and Modernize replication appliance that's used to discover and migrate machines to Azure.
- Set up the replication appliance.
- Install the Mobility service on machines you want to migrate.
- Start migration execution.
- Track and monitor migrations.
- Run a test migration to make sure everything's working as expected.
- Run a full VM migration.
Note
Tutorials show you the simplest deployment path for a scenario so that you can quickly set up a proof of concept. Tutorials use default options where possible and don't show all possible settings and paths. For detailed instructions, review the how-to articles for Azure Migrate and Modernize.
If you don't have an Azure subscription, create a free account before you begin.
Prerequisites
Before you begin:
- Go to an existing project or create a new project.
- Complete the tutorial to prepare Azure and discover physical servers for migration.
- We recommend that you complete the assess physical servers tutorial before migrating servers to Azure.
- Verify permissions for your Azure account
- Your Azure account needs permissions to create a VM
- write to an Azure managed disk.
- For the required Azure Migrate built‑in roles and permission details to create a project and run discovery, assessments, and migrations, see Prepare Azure accounts for Azure Migrate.
- Assign permissions to register the Replication Appliance in Microsoft Entra ID. For more information, see required permissions.
Also,
- Review the migration architecture.
- Review the limitations related to migrating Windows Server 2008 servers to Azure.
Note
Windows Server 2008 and Windows Server 2008 R2 have reached End of Support (EOS). For more information, see, End of support for Windows Server 2008 and Windows Server 2008 R2 and Perform in-place upgrade to Windows Server 2016, 2019, 2022, or 2025. Review your usage and plan OS upgrades and migrations accordingly.
Note
If you're planning to upgrade your Windows operating system, Azure Migrate and Modernize might download the Windows SetupDiag utility for error details in case upgrade fails. Ensure that the VM created in Azure after the migration has access to SetupDiag. If there's no access to SetupDiag, you might not be able to get detailed OS upgrade failure error codes but the upgrade can still proceed.
Create an Azure network
Important
Virtual networks are a regional service, so make sure you create your virtual network in the desired target Azure region. For example, if you're planning on replicating and migrating VMs from your on-premises environment to the East US Azure Region, your target virtual network must be created in the East US Region. To connect virtual networks in different regions, see Virtual network peering.
Set up an Azure virtual network. When you replicate to Azure, Azure VMs are created and joined to the Azure virtual network that you specified when you set up migration.
Prepare for migration
To prepare for migrating physical servers, ensure that you:
- Check machine requirements: Verify that your source machines are supported for physical server migration.
- Set up a replication appliance: Physical server migrations require a separate replication appliance to execute agent-based migrations. You can’t use the Azure Migrate appliance created for discovery to execute physical server migrations.
Note
Azure migrate appliance based discovery is a prerequisite to set up replication appliance and track agent-based migrations in the new portal. To execute standalone migrations using the replication appliance, use the link available in Azure Migrate project > Execute > Migrations to open the classic portal.
Check machine requirements for migration
Make sure machines comply with requirements for migration to Azure.
Note
When you migrate physical machines, the Migration and modernization tool uses the same replication architecture as agent-based disaster recovery in Azure Site Recovery. Some components share the same code base. Some content might link to Site Recovery documentation.
Verify physical server requirements.
Verify that on-premises machines that you replicate to Azure comply with Azure VM requirements.
Some changes are needed on VMs before you migrate them to Azure:
Prepare a machine for the replication appliance
The Azure Site Recovery Replication appliance is used to replicate machines to Azure. Learn more.
To set up a new appliance, you can use PowerShell installer script. Ensure you meet the hardware and software requirements, and any other prerequisites.
Note
The replication appliance shouldn't be installed on a source machine that you want to replicate or on the Azure Migrate: Discovery and assessment appliance you might have installed before.
Set up the replication appliance
Important
The classic replication appliance retires on September 30, 2026.
- The final recovery point for existing replications is May 31, 2026.
- Migration support for these replications continues until September 30, 2026.
- You must use the simplified appliance for all new agent-based migrations.
This section describes how to download & use the PowerShell installer script to set up the simplified appliance.
In the Azure Migrate project > Execute > Migration, select Start execution.
On the Specify intent page, under What do you want to migrate, select Servers or virtual machines (VMs). Under Where do you want to migrate to, select Azure VM.
Under How will you select workloads, select one of the following options:
- From all inventory to manually select servers.
- From an assessment to use an existing assessment.
Under Discovery method, select the appliance that matches your source environment (physical servers), and then select Next.
On the Workloads page, select Set up the replication appliance to start the appliance setup.
The virtualization type is prepopulated and unavailable for editing, based on the Azure Migrate appliance used for discovery.
In Target region, select the Azure region to which you want to migrate the machines.
Select **Confirm that the target region for migration is
region-name.Select Create resources. This creates an Azure Site Recovery vault in the background.
Note
You can't change the target region for this project after clicking this button, and all subsequent migrations are to this region.
Set up the appliance using PowerShell
Follow these steps:
Download the installers from the portal or from the provided link, and place them on the replication appliance you created in your environment. Ensure that the appliance meets the requirements.
Unzip and extract the components.
Execute the DRInstaller.ps1 PowerShell script as an administrator.
Register appliance
After the appliance is created, the Microsoft Azure Appliance Configuration Manager launches automatically. It validates prerequisites such as internet connectivity, time synchronization, system configurations, and group policies.
CheckRegistryAccessPolicy - Prevents access to registry editing tools
- Key: HKLM\SOFTWARE\Microsoft\Windows\CurrentVersion\Policies\System.
- The DisableRegistryTools value shouldn't be equal to 0.
CheckCommandPromptPolicy - Prevents access to the command prompt
- Key: HKLM\SOFTWARE\Policies\Microsoft\Windows\System.
- The DisableCMD value should be equal to 0.
CheckTrustLogicAttachmentsPolicy - Trust logic for file attachments.
- Key: HKLM\SOFTWARE\Microsoft\Windows\CurrentVersion\Policies\Attachments.
- The UseTrustedHandlers value shouldn't be equal to 3.
CheckPowershellExecutionPolicy - Turn on Script Execution. - PowerShell execution policy shouldn't be set to AllSigned or Restricted. - Ensure the group policy Turn on Script Execution Attachment Manager isn't set to Disabled or Allow only signed scripts.
Use the following steps to register the appliance:
If the appliance uses a proxy for internet access, configure the proxy settings by toggling on the 'Use proxy to connect to internet' option.
- All Azure Site Recovery services use these settings to connect to the internet.
Note
Only HTTP proxy is supported.
Ensure the required URLs are allowed and reachable from the Azure Site Recovery replication appliance to maintain continuous connectivity.
After the prerequisites are verified, the appliance fetch all its component information in the next step. Review the status of all components and then select Continue.
Save the details, and then proceed to choose the appliance connectivity method. You can select either FQDN or a NAT IP to define how communication with the appliance occurs.
 .
.After saving the connectivity details, select Continue to proceed with registration in Microsoft Azure.
Ensure the prerequisites are met, and then proceed with the registration.
 .
.Friendly name of appliance: Provide a friendly name to track this appliance in the Azure portal under Recovery Services Vault infrastructure.
Note
The name can't be changed once set.
Azure Migrate replication appliance key: Copy the key from the portal's discovery screen.
 .
.After pasting the key, select Login. You're redirected to a new authentication tab. By default, an authentication code is generated on the Appliance Configuration Manager page. Use the following code in the authentication tab.
Enter your Microsoft Azure credentials to complete the registration.
After successful registration, you can close the tab and return to the Appliance Configuration Manager to continue the setup.
Note
An authentication code expires within 5 minutes of generation. If there is inactivity for longer than this duration, you're prompted to re-log in to Azure.
After successfully signing in, the details for Subscription, Resource Group, and Recovery Services Vault are displayed.
Select Continue to proceed.
 .
.After successful registration, proceed to configure vCenter details.
 .
.Select Add vCenter Server to input the vCenter information.
Enter the server name or IP address of the vCenter, including the port number and then provide the username, password, and a friendly name. This information is used to retrieve details about the virtual machines managed through the vCenter. The user account details are encrypted and stored locally on the machine. Learn more.
Note
If you're adding the same vCenter Server to multiple appliances, ensure that the same friendly name is used across all appliances.
After successfully saving the vCenter information, select Add Virtual Machine credentials to provide user details for the VMs discovered through the vCenter.
Note
- For Linux OS, ensure to provide root credentials.
- For Windows OS, a user account with admin privileges should be added. These credentials are used to push the installation of the mobility agent onto the source VM during the enable replication operation. The credentials can be chosen per VM in the Azure portal during the enable replication workflow.
- Visit the Appliance Configurator to edit or add credentials to access your machines.
After adding the vCenter details, expand Provide Physical Server Details to add information about any physical servers you plan to protect.
 .
.Select Add Credentials to add the credentials of the machine(s) you plan to protect. Provide all necessary details, such as the Operating System, a friendly name for the credential, username, and Password. The user account details are encrypted and stored locally on the machine.
Finally, select Add.
 .
.Select Add Server to add the physical server details. Provide the machine's IP address or FQDN
Select the credential account, and then select Add.
 .
.
Install the Mobility service agent
When you enable replication for VMware virtual machines and physical servers, the Mobility service is installed on each on-premises machine. The Mobility service captures data writes it to the machine, and forwards it to the Site Recovery process server.
You can install the Mobility service using the Mobility service agent software. The following methods are available for deployment:
- Push installation: When protection is enabled via the Azure portal, Site Recovery installs the Mobility service on the server.
- Manual installation: You can install the Mobility service manually on each machine through the user interface (UI) or command prompt.
- Automated deployment: You can automate the Mobility service installation with software deployment tools such as Configuration Manager.
Learn more about mobility service agent installation.
Execute migrations
Note
In the portal you can select up to 10 machines at once for replication. If you need to replicate more, then group them in batches of 10.
In the Azure Migrate project > Execute > Migration, select Start execution.
On the Specify intent page, under What do you want to migrate, select Servers or virtual machines (VMs). Under Where do you want to migrate to, select Azure VM.
Under How will you select workloads, select one of the following options:
- From all inventory to manually select servers
- From an assessment to use an existing assessment
In Discovery method, select the appliance that matches your source environment (Physical) and then select Next.
In Workloads, select the machines you want to replicate and migrate and select the Target VM security type. Azure Migrate supports migration to Trusted Launch Virtual Machines (TVMs). By default, it migrates eligible VMs as TVMs. These VMs provide enhanced security features such as secure boot and virtual TPM at no extra cost. We recommend using them wherever applicable.
Select the replication appliance you have set up from the drop-down menu or set up a new replication appliance by referring the steps provided in previous section.
In Guest credentials, In Guest credentials, select the friendly name of the credentials created previously during the replication appliance setup. Select the VMs you want to replicate and then click Next.
In Target settings, select the subscription and target region to which you want to migrate, and specify the resource group where the Azure VMs will reside after migration. Complete the following settings:
Availability options: Select one of the following:
- Availability Zone – Pins the migrated machine to a specific Availability Zone in the region. Use this option to distribute machines that are part of a multi-node application tier across Availability Zones. If you select this option, specify the Availability Zone for each selected machine on the Compute tab. This option is available only if the selected target region supports Availability Zones.
- Availability Set – Places the migrated machine in an Availability Set. The selected target resource group must contain one or more availability sets.
- **No infrastructure redundancy required **– Select this option if you don’t require Availability Zones or Availability Sets for the migrated machines.
Virtual network: Select the Azure virtual network and subnet that the Azure VMs will join after migration.
Cache storage account: Keep the default option to use the cache storage account that is automatically created for the project. To use a different storage account for replication, select it from the drop-down list.
Note
- If you use private endpoint as the connectivity method for the Azure Migrate project, grant the Recovery Services vault access to the cache storage account. Learn more
- To replicate using ExpressRoute with private peering, create a private endpoint for the cache storage account. Learn more
Disk encryption type, select:
- Encryption-at-rest with platform-managed key
- Encryption-at-rest with customer-managed key
- Double encryption with platform-managed and customer-managed keys
Note
To replicate VMs with customer-managed-keys (CMK), you'll need to create a disk encryption set under the target Resource Group. A disk encryption set object maps managed disks to a Key Vault that contains the CMK to use for SSE.
Azure Hybrid Benefit: - Select No if you don't want to apply Azure Hybrid Benefit and then select Next. - Select Yes if you have Windows Server machines that are covered with active Software Assurance or Windows Server subscriptions, and you want to apply the benefit to the machines you're migrating. Then click Next.
In Compute, review the VM name, size, OS disk type, and availability configuration (if selected in the previous step). VMs must conform to Azure requirements.
- VM size: If you're using assessment recommendations, the VM size dropdown shows the recommended size. Otherwise Azure Migrate picks a size based on the closest match in the Azure subscription. Alternatively, pick a manual size in Azure VM size.
- OS disk: Specify the OS (boot) disk for the VM. The OS disk contains the operating system bootloader and installer.
- Availability Zone: Specify the Availability Zone to use.
- Availability Set: Specify the Availability Set to use.
- Capacity reservation: If you already have a capacity reservation for the VM SKU in the target subscription and location, specify it here for this deployment. Capacity reservations ensure that the required VM SKU is available when you start migration. You can associate a reservation now or skip this step and configure it later during the migration. The capacity reservation for the SKU can be in any resource group within the target subscription and location.Learn more.
In Disks, specify whether the VM disks should be replicated to Azure, and select the disk type (Premium v2, Ultra Disk, Standard SSD, Standard HDD, or Premium Managed disks) in Azure. Then select Next.
- You can exclude disks from replication.
- If you exclude disks, they won't be present on the Azure VM after migration.
- You can exclude disks if the mobility agent is already installed on that server. Learn more.
In Tags, choose to add tags to your Virtual machines, Disks, and NICs.
In Review and start execution, review the settings, and select Review and start execution to start the initial replication for the servers.
Track and monitor
In Azure Migrate project, go to Execute > Migrations. Use View by applications or View by workloads to switch how items are grouped.
Replication works as follows:
- After the Start Replication job finishes successfully, the machines start initial replication to Azure.
- During initial replication, Azure Migrate creates a VM snapshot and replicates disk data from the snapshot to replica managed disks in Azure.
- After initial replication finishes, delta replication begins. Incremental changes to the source disks are periodically replicated to the replica disks in Azure.
- After the Start Replication job finishes successfully, the machines start initial replication to Azure.
Execution progress is shown in Execution stage and Execution status:
- Execution stage: Preparation, Testing, or Completion.
- Execution status: In progress, In error, Action pending, or Completed.
Execution progress is tracked across three stages:
Preparation: Servers enabled for replication remain in the Preparation stage while initial replication (data replication) is in progress. During this stage, you can select Stop, Start, Pause, or Resume from the actions available in the server drill-down blade. After initial replication completes, the servers move to the Testing stage.
Testing: Servers move to the Testing stage after initial replication completes and while delta replication is in progress. In this stage, you can run test migrations on a test virtual network before starting the actual migration (recommended). You can also skip the Testing stage and start migration directly by selecting the appropriate action in the Completion stage.
Completion: Servers move to the Completion stage after test migrations complete or are skipped. In this stage, you can start the final migration (cutover). After migration completes, select Complete migration to clean up migration resources from the actions available in the server drill-down list.
Run a test migration
When delta replication begins, you can run a test migration for the VMs, before running a full migration to Azure. We highly recommend that you do this at least once for each machine, before you migrate it.
- Running a test migration checks that migration works as expected, without impacting the source (on-premises or AVS) machines, which remain operational, and continue replicating.
- Test migration simulates the migration by creating an Azure VM using replicated data (usually migrating to a non-production VNet in your Azure subscription).
- You can use the replicated test Azure VM to validate the migration, perform app testing, and address any issues before full migration.
Do a test migration as follows:
In Azure Migrate project, Under Execute > Migrations > sand select the server by selecting its name in the Workloads column.
In the drill-down menu, under Testing drop-down, select Start test migration.
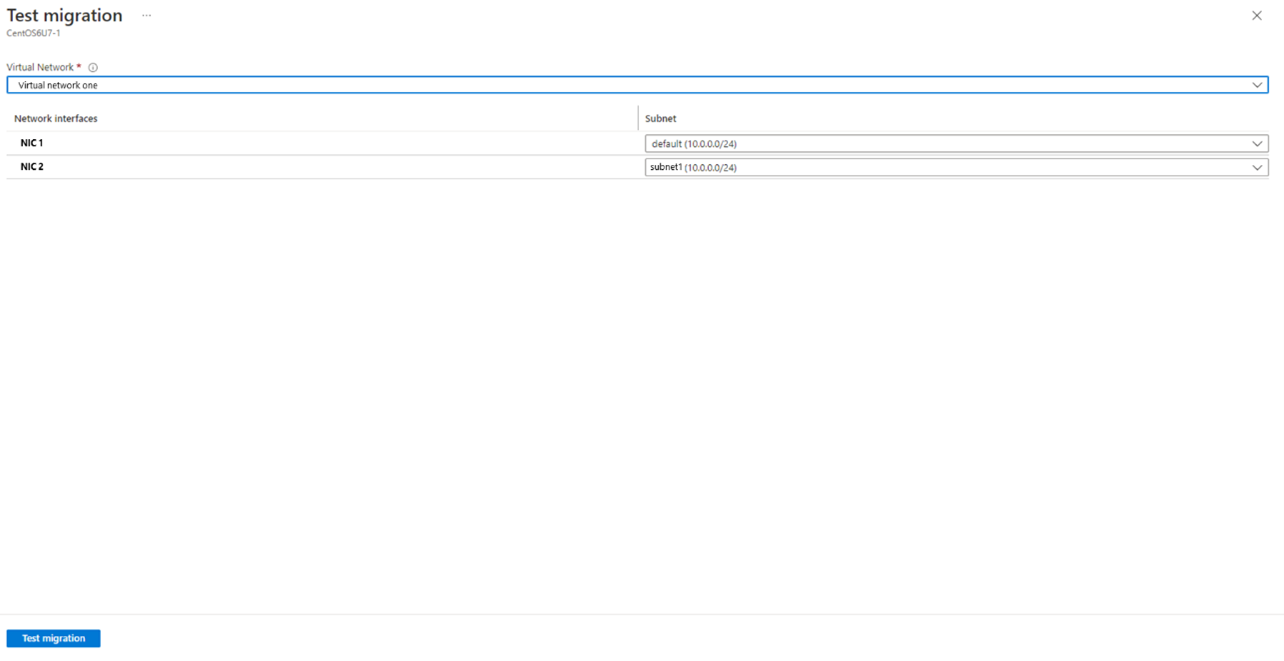
In Test migration, select the Azure Virtual Network(Vnet) in which the Azure VM will be located during testing. We recommend you use a non-production VNet.
Select the subnet to associate with each network interface card (NIC) on the migrated VM.
You have an option to upgrade the Windows Server OS during test migration. To upgrade, select the Upgrade available option.
In the pane that appears, select the target OS version that you want to upgrade to and select Apply. Learn more. 7.After you select Test migration, the job starts. Monitor the status under Execution status in the Azure portal. After the test migration completes, clean up the test resources. Go to the server, and then select Clean up test migration from the Testing drop-down.

Note
You can now register your servers running SQL server with SQL VM RP to take advantage of automated patching, automated backup and simplified license management using SQL IaaS Agent Extension.
- Select the server under Workloads column in Execute> Migrations page. In Compute and Network settings, select checkbox associated with register with SQL IaaS extension.
- Select Azure Hybrid benefit for SQL Server if you have SQL Server instances that are covered with active Software Assurance or SQL Server subscriptions and you want to apply the benefit to the machines you're migrating.hs.

Migrate VMs
After you've verified that the test migration works as expected, you can migrate the source machines.
- In Azure Migrate project, Under Execute > Migrations > and select the server by selecting its name in the Workloads column.
- In the drill-down menu, under Completion drop-down, select Migrate.
- In Migrate > Shut down virtual machines and perform a planned migration with no data loss, select Yes.
- By default Azure Migrate shuts down the source VM, and runs an on-demand replication to synchronize any VM changes that occurred since the last replication occurred. This ensures no data loss.
- If you don't want to shut down the VM, select No
- You have an option to upgrade the Windows Server OS during migration.
- To upgrade, select the Upgrade available option. In the pane that appears, select the target OS version that you want to upgrade to and select Apply. Learn more.
- If you already have a capacity reservation for the VM SKU in the target subscription and location, specify it here for this deployment. Capacity reservations ensure that the required VM SKU is available when you start migration. The capacity reservation for the SKU can be in any resource group within the target subscription and location. Learn more.
- After completing the settings, select Migrate. A migration job starts for the server. Track the job in Azure notifications.
- After the job finishes, you can view and manage the server from the Migrations page which will be tracked under Completion stage.
Complete the migration
- After the migration completes, open the server drill-down page. Under Completion, select Complete migration. This action stops replication for the source machine and cleans up the replication state information for the VM.
- Verify and troubleshoot any Windows activation issues on the Azure VM.
- Perform any post-migration app tweaks, such as updating host names, database connection strings, and web server configurations.
- Perform final application and migration acceptance testing on the migrated application now running in Azure.
- Cut over traffic to the migrated Azure VM instance.
- Remove the on-premises VMs from your local VM inventory.
- Remove the on-premises VMs from local backups.
- Update any internal documentation to show the new location and IP address of the Azure VMs.
Post-migration best practices
- For increased resilience:
- Keep data secure by backing up Azure VMs by using the Azure Backup service. Learn more.
- Keep workloads running and continuously available by replicating Azure VMs to a secondary region with Site Recovery. Learn more.
- For increased security:
- Lock down and limit inbound traffic access with Microsoft Defender for Cloud - Just-in-time administration.
- Manage and govern updates on Windows and Linux machines with Azure Update Manager.
- Restrict network traffic to management endpoints with network security groups.
- Deploy Azure Disk Encryption to help secure disks and keep data safe from theft and unauthorized access.
- Read more about securing IaaS resourcesand Microsoft Defender for Cloud.
- For monitoring and management:
- Consider deploying Microsoft Cost Management to monitor resource usage and spending.
Next steps
Investigate the cloud migration journey in the Cloud Adoption Framework for Azure.