Bemærk
Adgang til denne side kræver godkendelse. Du kan prøve at logge på eller ændre mapper.
Adgang til denne side kræver godkendelse. Du kan prøve at ændre mapper.
Get started with Azure Virtual Network Manager by using the Azure portal to manage connectivity for all your virtual networks.
In this quickstart, you deploy three virtual networks and use Azure Virtual Network Manager to create a mesh network topology. Then you verify the connectivity configuration was applied.

Prerequisites
- An Azure account with an active subscription. Create an account for free.
- To modify network groups using Azure Policy to conditionally define membership, you must be granted access through Azure Role-based Access Control (RBAC) role assignment only. Classic Admin or legacy authorization isn't supported.
Sample values
This quickstart uses the following sample values for creating resources. Use these values to follow along, or replace them with your own.
| Resource | Sample value |
|---|---|
| Resource group | resource-group |
| Network Manager name | network-manager |
| Region | West US 2 |
| Virtual networks | vnet-00, vnet-01, vnet-02 |
| VNet address spaces | 10.0.0.0/16, 10.1.0.0/16, 10.2.0.0/16 |
| Network group | network-group |
| Connectivity configuration | connectivity-configuration |
| Azure Policy name | azure-policy |
| Tag | Name: NetworkType / Value: Production |
Create a resource group
Create a resource group to hold the resources used in this article.
Sign in to the Azure portal.
Select + Create a resource and search for Resource group. Then select Resource group > Create.
On the Basics tab, enter or select the following information:
Setting Value Subscription Select your subscription. Resource group Enter a name for the resource group. Region Select a region for the resource group. Select Review + create and then Create.
Note
For this quickstart, select Connectivity from the Features dropdown when creating your Virtual Network Manager instance. Use the sample values from the preceding table for the resource group, name, and region fields.
Create a Virtual Network Manager instance
Deploy a Virtual Network Manager instance with the defined scope and features needed using the Azure portal.
Important
Virtual Network Manager requires specific permissions within the defined scope. Make sure you have the necessary Azure Role-based Access Control (RBAC) roles before creating the instance.
Sign in to the Azure portal.
Select + Create a resource and search for Network Manager. Then select Network Manager > Create to begin setting up Virtual Network Manager.
On the Basics tab, enter or select the following information:
Setting Value Subscription Select the subscription containing your existing virtual networks. Resource group Select the existing resource group where you want to deploy Virtual Network Manager. Name Enter a name for your Virtual Network Manager instance. Region Select a region for your Virtual Network Manager instance. Virtual Network Manager can manage virtual networks in any region. The selected region is where the Virtual Network Manager instance will be deployed. Description (Optional) Provide a description of this Virtual Network Manager instance and the task it manages. Features Select the features you need from the dropdown list:
- Connectivity: Enables the creation of a full mesh or hub-and-spoke network topology between virtual networks within the scope.
- Security Admin: Enables the creation of global network security rules.
- Routing: Enables the creation and management of user-defined routes at scale.Select the Management scope tab or Next: Management scope to continue.
On the Management scope tab, select + Add.
In the Add scopes pane, select the subscriptions or management groups containing your existing virtual networks, and then select Select.
Select Review + create to validate your configuration.
After validation passes, select Create to deploy the Virtual Network Manager instance.
The Virtual Network Manager instance is now created and ready to manage your existing virtual networks within the defined scope.
Create virtual networks
Create three virtual networks by using the portal. Each virtual network has a networkType tag that's used in Azure Policy for network group membership. If you have existing virtual networks for your mesh configuration, add the tags listed in the table to your virtual networks and skip to the next section.
From the Home screen, select + Create a resource and search for Virtual networks. Then select Create to begin configuring a virtual network.
On the Basics tab, enter or select the following information.
Setting Value Subscription Select the subscription where you want to deploy this virtual network. Resource group Select resource-group. Virtual network name Enter vnet-00. Region Select (US) West 2. Select the IP addresses tab.
On the IP addresses tab, configure the following network address spaces.
Setting Value IPv4 address space 10.0.0.0/16 Subnet name default Subnet address space 10.0.0.0/24 Select the Tags tab. Enter the following tag information and select Review + Create.
Setting Value Name NetworkType Value Production Resource Select Virtual network. After your configuration passes validation, select Create to deploy the virtual network.
Repeat the preceding steps to create more virtual networks with the following information:
Setting Value Subscription Select the same subscription that you selected in step 2. Resource group Select resource-group. Name Enter vnet-01 and vnet-02 for the other virtual networks. Region Select (US) West 2. vnet-01 IP addresses IPv4 address space: 10.1.0.0/16
Subnet name: default
Subnet address space: 10.1.0.0/24vnet-01 Tags Name: NetworkType
Value: Production
Resource: Virtual network.vnet-02 IP addresses IPv4 address space: 10.2.0.0/16
Subnet name: default
Subnet address space: 10.2.0.0/24vnet-02 Tags Name: NetworkType
Value: Production
Resource: Virtual network.
Create a network group
Azure Virtual Network Manager applies configurations to groups of virtual networks known as network groups. To create a network group:
Browse to your resource group, and select your Virtual Network Manager resource.
Under Settings, select Network groups. Then select + Create.
On the Create a network group pane, enter or select the following information, and then select Create:
Setting Value Name Enter a name for your network group. Description (Optional) Provide a description of this network group. Member type Select Virtual network from the dropdown menu. Confirm that the new network group is now listed on the Network groups pane.
Define membership for a connectivity configuration
After you create your network group, you add virtual networks as members. Choose one of the following options for the network group's membership. The members of this network group will be used in the connectivity configuration that you create later in this quickstart.
Add a virtual network manually
In this task, you manually add two virtual networks to your network group for your mesh connectivity configuration:
From the list of network groups, select network-group. On the network-group pane, under Manually add members, select Add virtual networks.
On the Manually add members pane, select vnet-00 and vnet-01, and then select Add.
On the Network Group pane, select View group members. Confirm vnet-00 and vnet-01 are listed with a Source of Manually added. If no virtual networks are listed, select Refresh.


Create a configuration
Now that you created the network group and updated its membership with virtual networks, you create a mesh connectivity configuration.
Under Settings, select Configurations. Then select Create.
Select Connectivity configuration from the dropdown menu to begin creating a connectivity configuration.
On the Basics tab, enter the following information, and then select Next: Topology.
Setting Value Name Enter connectivity-configuration. Description (Optional) Provide a description about this connectivity configuration. On the Topology tab, select the Mesh topology, and leave the Enable mesh connectivity across regions checkbox unselected. Cross-region connectivity isn't required for this setup since all the virtual networks are in the same region.
Under Network groups, select Add > Add network group.
On the Add network groups window, select network-group, and then choose Select to add the network group to the configuration.
Select the View topology tab to visualize the topology of the configuration. This tab shows a visual representation of the network group that you added to the configuration and the connectivity to be established.

Select Next: Review + Create > Create to create the configuration.
After the deployment finishes, select Refresh. The new connectivity configuration appears on the Configurations pane.


Deploy the connectivity configuration
To apply your configurations to your environment, you need to commit the configuration by deployment. Deploy the configuration to the West US 2 region where the virtual networks are deployed:
Under Settings, select Deployments. Then select Deploy configurations and Connectivity configuration from the dropdown.
On the Deploy a configuration window, select the following settings, and then select Next.
Setting Value Connectivity configurations Select connectivity-configuration under Connectivity - Mesh in the dropdown menu. Target regions Select West US 2 as the deployment region. Select Next and Deploy to complete the deployment.
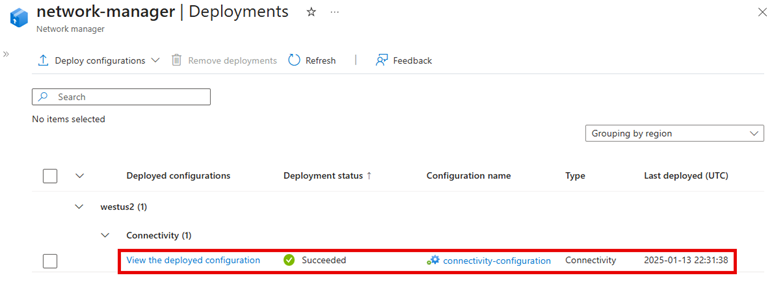
Confirm that the deployment appears in the list for the selected region. The deployment of the configuration can take a few minutes to finish.

Verify configuration deployment
Use the Network Manager section for each virtual network to verify that you deployed your configuration:
Go to the vnet-00 virtual network.
Under Settings, select Network Manager.
On the Connectivity configurations tab, verify that connectivity-configuration appears in the list.

Repeat the previous steps on vnet-01.

Clean up resources
If you no longer need Azure Virtual Network Manager and the resources in this quickstart, you can remove them by following these steps:
- To delete the resource group and all the resources it contains, select resource-group in the Azure portal and select Delete resource group. Confirm that you want to delete by entering resource-group in the text box, and then select Delete.
- To delete the Azure Policy assignment, go to the Policy section in the Azure portal, select Assignments, and then select azure-policy. Select Delete to remove the policy definition.
- In the Policy section, select Definitions and then select azure-policy. Select Delete to remove the policy definition.